
White berry collage
Posted: September 28, 2013 Filed under: Background Stamps, Berry Branch, CAS, Lace Trims, Winter Berries | Tags: CAS, Penny Black stamps, Tsukineko Memento inks 23 Comments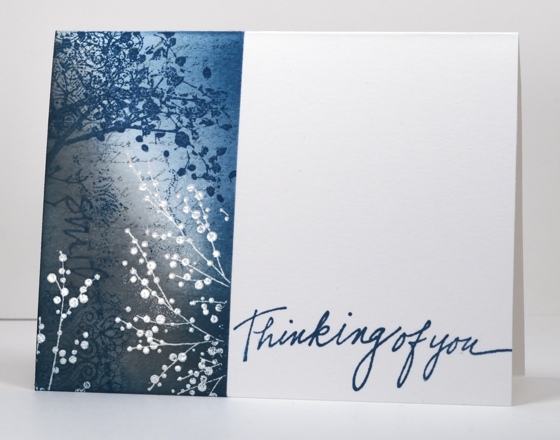
I made this one layer card weeks ago so I am no longer sure of my order of stamping. This is what I might have done:
- position a post-it note mask
- emboss winter berries in white
- sponge grey ink from bottom left hand corner and teal ink from top right hand corner but keep a centre strip paler to create a highlight area
- stamp letter background stamp in grey and lace border stamp in teal (lace stamp is probably patchy because I may have wiped some of the ink off on purpose.)
- stamp the word ‘smile’ and the berry branch in teal
I vaguely remember dropping a stamp on the panel at some point which almost made me toss the card. Sorry I can’t be more precise; I guess it really makes sense to write about the cards as soon as I make them!
I just realized that I can add this to Karen’s One Layer Wednesday challenge this week. It is a free for all so go and check it out
Supplies:
Stamps: Berry Branch, Lace Trims, Winter Berries, Letter Background, Edge to Edge (PB)
Inks: Memento Teal Zeal, London fog & Versamark (Tsukineko)
Also: white embossing powder
One stamp three ways
Posted: August 6, 2013 Filed under: Berry Branch, Stamped Landscapes | Tags: Penny Black stamps, Tsukineko Memento inks 17 Comments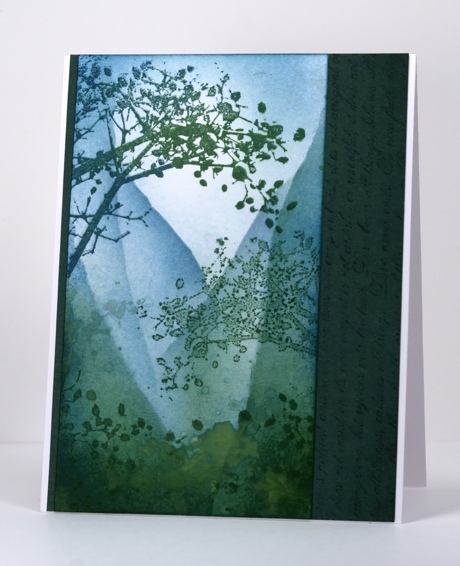
I think this berry branch stamp was the first Penny Black stamp I owned. I love the way it comes in from the side with all the twigs, berries and leaves. Sometimes I want to balance a design with a branch facing the other way and, as I don’t have one of those blank rubber stamps for creating a mirror image, I tried something else. I stamped the branch in a mix of teal and green in the upper left hand corner. I re-inked the stamp and stamped it on the plastic imaging sheet I use with my stamp positioner and stamped the sheet onto the card panel. The image is much paler when stamped this way. The third way I stamped the berry branch was by painting water onto it and stamping it onto the sponged colour. This creates a ghostly watery image.
The steep hills were created by sponging over a torn post-it note mask several times. I also flicked some water droplets and green ink droplets around too. The panel is matted with PB Sea Breeze mix & match cardstock with the 1 Corinthians Love chapter text stamped on it.
Supplies:
Stamps: Berry Branch, Love Chapter (PB)
Inks: Memento Teal Zeal, Summer Sky, Cottage Ivy, Northern Pine (Tsukineko)
Cardstock: Sea Breeze mix & match cardstock
Analogous collage
Posted: January 15, 2013 Filed under: Background Stamps, Berry Branch, CAS, Collage cards 22 Comments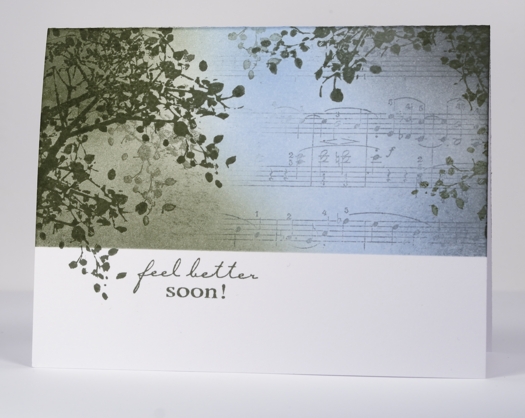
I have another collage card today, this one with a colour scheme more common in my work but probably not as striking as the previous contrasting scheme. An analogous colour scheme is one made up of colours side by side on the colour wheel. An analogous colour scheme works well for a sympathy or get well card because it is more soothing and harmonious than a contrasting one.
To create this card I positioned a mask across the lower third of the card and stamped the branch around the edges, lifting the mask once so a twig could fall below the line. I stamped a couple of times without re-inking to get that misty background look. I partially inked the music background in grey and stamped to the right of the panel then added the blue and green sponging with a little grey on the right.
My older daughter and I were discussing the sentiment; she felt that it always seems a little odd to send a card saying “get well soon” or “feel better soon” as it sounds like a command! As if someone wouldn’t feel better if they could. I guess it is probably short for “I hope you feel better soon”. That is the meaning behind this card made for my son’s writing class teacher who has fractured her wrist.
Supplies:
Stamps: Berry Branch, Music Background, Feel Better (Penny Black)
Inks: Memento London Fog, Summer Sky, Olive Grove (Tsukineko)
Winter Berry Branch tutorial
Posted: February 4, 2012 Filed under: Berry Branch, Penny Black, Tutorial 45 Comments
Thank you so much everyone who has arrived here via the Penny Black blog and also my faithful readers who drop in here regularly to see what I have been doing. The comments I have received in the last day have been such a treat to read. Thank you also to all my subscribers; I am so pleased you have been inspired to sign up.
What better way to thank you all than a tutorial? Many of you asked questions about the Winter Berry Branch card I posted last week so here is the tutorial which will hopefully provide the answers.
Mask the around the area where you are creating your scene. This is one of the trickiest steps, sometimes I trust my eye, sometimes the ruler; both have been known to fail me.
Flick masking fluid randomly over the cardbase. I put my card in a box, almost close the box and blindly flick the paintbrush with masking fluid on it around over the card. This way the masking fluid is contained in the box. An old toothbrush does a good job too but I didn’t have a spare and didn’t think anyone in my family would appreciate masking fluid toothpaste! While you wait for the masking fluid to dry, wash the brush because the masking fluid can ruin it if you don’t.

Stamp the branch first in versamark using a stamp positioning tool. Re-ink with versamark and then add whatever colours you want on your branch using markers; I used real red and early espresso. While you are inking your stamp with markers you must not move your stamp positioning tool.

When your branched is inked in versamark and colour move your stamp positioning tool ever-so-slightly down (as in no more than a millimeter!) and stamp the branch again. What you have created is two branch images extremely close together which you will heat emboss in clear.

In the close up below you can see the two impressions from the stamp. Ideally you want the coloured print to overlap with the versamark print. The versamark is the snow sitting on the branch. The yellow dots are the masking fluid. Because they are raised they will resist the stamp a bit but it doesn’t matter as it will look like a clump of snow.

After embossing in clear embossing powder it is time to start sponging. I tend to build up the colour slowly when sponging so the variations in intensity will be gradual. If you are not happy with your sponging it could be that you stopped too soon.


When you are happy with your sponging you can gently rub off the masking fluid. It should come off easily but make sure you keep your fingers clean otherwise you can smudge colour into the freshly revealed white spots. Remove the masks when all the masking fluid is gone to see your snow laden branch.

Supplies:
Stamps: Berry Branch (Penny Black), Teeny Tiny Wishes(SU)
Inks: Versamark, Marina Mist, Bashful Blue, Real Red, Early Espresso
Cardstock: MFP 100lb white
Also: Clear e.p., Winsor & Newton masking fluid
Berry Branch – Autumn & Winter
Posted: January 24, 2012 Filed under: Berry Branch, CAS, Rollers 19 CommentsHere are the other two cards from my little four seasons Berry Branch set. Winter is definitely my favourite and is the only one where I embossed.
Thank you for the kind comments about the first two; I am happy to have inspired a few people to try the same thing with one stamp.

Supplies:
Stamps: Berry Branch (Penny Black), Teeny Tiny Wishes, Very Vintage roller(SU)
Inks: Chocolate Chip, Real Rust, Riding Hood Red
Cardstock: Flourishes classic ivory

Supplies:
Stamps: Berry Branch (Penny Black), Short and Sweet(SU)
Inks: Versamark, Marina Mist, Bashful Blue, Real Red, Basic Black
Cardstock: Flourishes classic white
Also: Clear e.p., Winsor & Newton masking fluid
Berry Branch – Spring & Summer
Posted: January 22, 2012 Filed under: Berry Branch, Penny Black 12 CommentsI have been busy on another project lately which I will share in the future but today I have a little set of cards I finished a while ago. I made them for a friend’s birthday; there are four – one for each season- all made with the same stamp. Here are the spring and summer cards. Winter and autumn to follow another day.

Supplies:
Stamps: Berry Branch (Penny Black),Teeny Tiny Wishes(SU)
Inks: Regal Rose, Bashful Blue, Always Artichoke
Cardstock: Flourishes classic white
To create both cards I inked the stamp with the lighter colour and added darker highlights with marker. I also masked and sponged but you know that; it is what I do!

Supplies:
Stamps: Berry Branch (Penny Black),Hugs & Wishes(SU)
Inks: Certainly Celery, Old Olive, Bashful Blue, Always Artichoke
Cardstock: Flourishes classic white
Mix and match
Posted: June 30, 2011 Filed under: Berry Branch, Collage cards 23 Comments
I’m not sure what to call this style of card but I have been trying to successfully create one for a while. I like the mix of image with text and a little texture. I have seen several superb examples where different textures and images are mixed very cohesively, sometimes with several layers, other times with one.
I started by working on one layer but decided a mat and an extension of the stamping would work best. I stamped the branch first after inking it with regal rose, using marker to add choc chip twigs and branch colour. I find this stamp quite frustrating although I love the design, as I always want it in two colours but it is very hard to ink it successfully with markers. What I ended up doing here was drawing with choc chip marker over a lot of the twigs after I had stamped them.
I don’t own a large text stamp so I stamped a sentiment stamp repeatedly to give the impression of a page of text. I also inked my large canvas background stamp but stamped it off first so I would only get a faint impression. Finally I sponged the parts of the panel and flicked some water droplets around. The panel is popped up ever so slightly.
Thanks for dropping in; I’ve enjoyed reading the comments you have kindly left here lately.
Supplies:
Stamps: Berry Branch (Penny Black), Canvas (SU), Ageless Adornment (SU)
Inks: Certainly Celery, Regal Rose, Choc Chip, Pretty in Pink
Cardstock: SU Whisper White, Mellow Moss
Less is More ‘Off Centre’
Posted: April 23, 2011 Filed under: Berry Branch, CAS 39 Comments
It has been a few weeks since I managed to play along with the Less is More challenge so it is nice to be involved again. Whether you play along or not the blog is an excellent source of inspiration with hundreds of entries every week. This week the challenge is to create an off centre layout. I really like assymmetrcial layouts so this asymmetrical branch stamp from Penny Black was the perfect choice for the challenge.
I inked the stamp with cherry cobbler and then inked the branches on the stamp with early espresso. By stamping once and then stamping again twice more without re-inking I created a shadowy effect. I added a little fold of riboon too as it needed something extra but not much more.
Supplies:
Stamps: Berry Branch (Penny Black), Taglines (Flourishes)
Inks: Cherry Cobbler, Early Espresso
Cardstock: SU Confetti White, Whisper White, Chocolate Chip
Also: Chocolate grosgrain ribbon
OLW 49: Green, Pink and Never Seen Ink
Posted: April 18, 2011 Filed under: Berry Branch 9 Comments
I haven’t had a chance to play along in any challenges lately as we have been very busy with violin related activities. Both my girls competed in the local Kiwanis Music Festival last week. On Saturday most of their ensemble came to our place to make truffles for a fundraiser. We rolled 2000 truffles in 2 hours and then they all left to play at a concert Saturday night. When Sunday afternoon arrived I took a little time to play with a new stamp from Penny Black. It was the perfect stamp to use with Pink and Green as Jennifer challenged in the One Layer Wednesday challenge this week.
I inked the whole stamp with Pretty in Pink then added Old Olive to the branches and twigs with a marker. I used a mask and sponging to create the bottom left corner. It shouldn’t be too long before I see blossoms like this on some of my trees.
Supplies:
Stamps: Berry Branch (Penny Black), Eastern Influences (SU)
Inks: Old Olive, Pretty in Pink
Cardstock: SU Confetti White


