
Berry Branch – Autumn & Winter
Posted: January 24, 2012 Filed under: Berry Branch, CAS, Rollers 19 CommentsHere are the other two cards from my little four seasons Berry Branch set. Winter is definitely my favourite and is the only one where I embossed.
Thank you for the kind comments about the first two; I am happy to have inspired a few people to try the same thing with one stamp.

Supplies:
Stamps: Berry Branch (Penny Black), Teeny Tiny Wishes, Very Vintage roller(SU)
Inks: Chocolate Chip, Real Rust, Riding Hood Red
Cardstock: Flourishes classic ivory

Supplies:
Stamps: Berry Branch (Penny Black), Short and Sweet(SU)
Inks: Versamark, Marina Mist, Bashful Blue, Real Red, Basic Black
Cardstock: Flourishes classic white
Also: Clear e.p., Winsor & Newton masking fluid
OLW 43 Shimmer
Posted: March 6, 2011 Filed under: CAS, Rollers 7 Comments![]()
Susan’s challenge on Simplicity this week was to add a little shimmer. Once again this was indeed a challenge to me. I rarely add shimmer and could only think of one product I had which would provide any shimmer: some pearl ex powders from SU. I have hardly used them and have forgotten the techniques I once tried.
To make the top card I flicked around a bit of masking fluid first then rolled the dragonflies with versamark before brayering celery and bordering blue over the top of that. I shook pearl ex powder onto the coloured panel and it stuck to the versamark but also lightly to the rest of the area. You can see a bit of shimmer at either edge of the card but the string of shimmery dragonflies actually goes right across the card.
The card below was done in a similar order but I embossed a string of dragonflies first. After that I added a string in versamark and pearl ex and a few coming off onto the ivory cardbase.
All in all it was a fairly experimental exercise which is half the fun of challenges. As others have said in their posts there is a lot more shimmer to be seen in real life but there are glimpses in the photos.
![]()
Supplies:
Stamps: Dragonfly roller, Paint Prings, Simple Sayings 2 (all SU)
Inks: Versamark, Certainly Celery, Bordering Blue
Cardstock: Flourishes Classic Ivory
Also: clear e.p., Pearl Ex powder
OLW 42 I’ve got the music
Posted: February 27, 2011 Filed under: CAS, Rollers 51 Comments Jennifer gave us a musical challenge this week for One Layer Wednesday while Mandi and Chrissie at Less is More sent out a three square challenge. I don’t often combine challenges as that makes them all the more challenging but I had a picture in my mind as to how these two themes might work together.
For the music theme I wanted to create the feel of an aged piece of sheet music and combine it with the warm colours of the wood of a violin. Both my girls have lovely violins; one is over 100 years old and the wood is a warm muted colour, the other is under 10 years old and is a darker, shinier finish. I knew when creating this card I would have to get the musical elements right or they would tell me so.
I cut three 1½” squares out of a post-it note mask and used the SU roller “Music Notes” to fill all three squares. I didn’t re-ink it as I wanted the faded look. I then sponged in close to cocoa and ruby red before stamping my little violin stamp in the same colours. I coloured the violins with watercolour pencils and blended them with water, flicking a little around at the same time to add to the aged look. The treble and bass clefs and the sharp and flat were drawn with black watercolour pencil.
Supplies
Stamps: Music Notes roller(SU), Fiddle(Parlour Victorian Atlantic Canada), Thank You Kindly(SU)
Inks: Ruby Red, Close to Cocoa
Paper: Flourishes Classic Ivory
Also: FaberCastell Watercolour pencils
Unusual
Posted: February 14, 2011 Filed under: Rollers 1 Comment
This card is not so unusual in itself, but it is rather unusual for me. For a start it is a valentine card; I rarely make them and even more rarely give them. I don’t remember the last time I gave one. It also uses bling, something you might see on one of my Christmas cards but rarely anywhere else. I don’t dislike it, it just never occurs to me to use it. It is a small card, about 3.5″ square, a size I like but don’t usually do on purpose. So there you have my one and only valentine for this year. I did cook my children heart shape eggs in toast for breakfast this morning !
Several people have asked where I bought the extreme surfer and skateboarder stamps and the pretty tree in my last card. They are Stampin’ Up) As ninety percent of my stamps are from Stampin’ Up I don’t usually note that down. I do put the company in brackets when they are not from SU. Likewise with my inks. I will try to remember to add where the stamps come from in the future.
Thank you for all the lovely comments on my last card.
Supplies
Stamps: Music Notes roller, Short & Sweet
Inks: Going Gray Real Red
Paper: Flourishes Classic White
Also: Red rhinestones
A musical theme
Posted: December 15, 2010 Filed under: CAS, Rollers 7 Comments
These cards were inspired by cards I admired on Susan Raihala’s and Colleen Dietrich’s blogs.
As our family is involved in many musical activities I bought the musical notes roller from SU planning to make many cards with it. I made a few and then seemed to get stuck without inspiration. That is until I saw Susan’s delightful Christmas balls which I reproduced with very minor changes.

When I saw Colleen’s clever stack of presents I again saw an opportunity to use my music roller. I reproduced her card but without all her gorgeous embossing and layers (I was a bit lazy to add them). Then, because I was on a roll, I made another card with the gifts in a row. On all the cards the punched shapes are popped up on stampin’ dimensionals and on the two cards above the shapes are sponged around the edges too.
Now I had better get on with writing in these cards, that is the idea of making them after all isn’t it?

Supplies
Stamps: Music Notes roller, Short & Sweet
Inks: Choc Chip, Real Red, Wild Wasabi
Paper: Whisper White, Confetti White ,
Also: Gold cord, Red ribbon, red gingham ribbon, stampin’ dimensionals
OLW 17 Border Stamps
Posted: August 29, 2010 Filed under: CAS, Rollers 3 Comments
Susan’s One Layer Wednesday challenge this week is to use a border stamp. Rollers are all I really have in the way of border stamps and I tend to forget them most of the time. I decided to pull out this one and my watercolour pencils, which have also been neglected of late. There is not much to explain really; I inked in black, coloured and then blended with a blender pen.
When the stamping and colouring was done I asked my younger daughter for input regarding ribbon. The choices I gave her were black gingham or red gingham. She didn’t really like either so suggested green, one of her favourite colours. Turns out she was spot on.
Supplies:
Stamps: Time for a Tree, Short & Sweet
Inks: Basic Black
Cardstock: Flourishes Classic White
Also: Faber-Castell Watercolour pencils, Apple Green grosgrain ribbon
Black on Kraft
Posted: July 20, 2010 Filed under: CAS, Rollers Leave a comment
Last week when I was playing with Kraft I switched from white to black embossing and had fun with that too. I pulled out some rollers that I haven’t used in very long time and inked them up with versamark and embossed in black. I decided that the dragonflies needed a little extra something and went in search of my Pearl Ex powders, another item that hasn’t seen the light of day in quite a while. The blue powder was exactly what I needed to add a little lift but then I decided to add a little bling as well. I also used a little copper Pearl Ex on the shells ever so lightly.
That’s all my Kraft cards for now but I know I will reach for it more often than I used to.

Supplies:
Stamps: By the Sea roller, Dragonfly roller, With Gratitude, Simple Sayings 2
Inks: Versamark, Basic Black
Cardstock: Confetti White, Basic Black, Kraft
Also: Black e.p., Pearl Ex powder, Rhinestones
Celebrate with candles
Posted: December 9, 2008 Filed under: Lovely as a Tree, Rollers 6 CommentsDay 10 of Stamp Simply Celebrates! I have a candle and matching box to share today, but first I’ll let you know about all the celebrating going on elsewhere:
Leslie Miller – Running With Scissors – Today we are treated to the beauty of Leslie’s work with her Featured Project where she is showing us how to Alter Food Packaging to turn it into a wonderfully warm, cozy, and sweet gift item that anyone would love to receive! And it’s something we can all easily do! I know you won’t want to miss this, so be sure to visit Leslie today.
You can see more great samples of Leslie’s Project by: Dee, Jennifer
Joan Fricker – Joan’s Garden – Joan offers us a beautiful Featured Project today — who doesn’t love beautifully presented Soap and Candle Gifts! Well, especially these soaps and candles! And you can make your own as a part of Joan’s Challenge, with inspiration from many. Be sure to check out this sweetly scented event!
And there are many more samples of Joan’s Challenge. Check out: LeAnne, Dee, AJ, Barb, Darlene, Janine, Sharon and me!
Anyone can play ANY of the challenges by ANY of the hostesses during our 12 days of Stamp Simply Celebrates!!! You DO NOT need to have a Blog to play — uploading your project to SCS (Splitcoaststampers.com) is not only permissible, but HIGHLY ENCOURAGED. When doing so, use the KEYWORD SSC08. Thanks!
Tammy Hershberger – Stamp Happy – Tammy is offering BLOG CANDY today!

It is great to be playing along in the Stamp Simply Celebrations. I enjoyed decorating a candle and matching box for Joan’s challenge today. I stamped three navy trees on tissue paper then used wax paper and a heat gun to melt them onto the candle. I have a tutorial explaining how to make a box and candle HERE. The trim on the box and candle wrapper were made with the retired Pine Bough roller from Stampin’ Up. The box and lid were made from night of navy cardstock, with panels of vanilla stuck on the sides of the box.
Supplies:
Stamps: Pine Bough roller, Lovely as a Tree
Inks: Night of Navy
Cardstock: Night of Navy, Very Vanilla
Also: Navy grosgrain ribbon, pillar candle (IKEA)
Another simple spring card
Posted: April 6, 2008 Filed under: All Through the Year, Rollers Leave a comment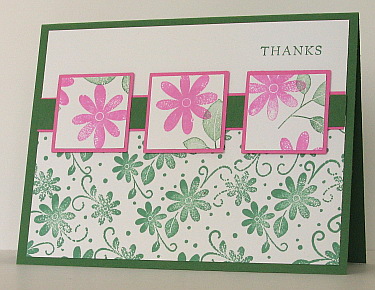
Here is another simple but bright and cheery spring card. The temperatures here today were definitely spring temperatures and I have seen grass around the place but not much at our place. We seem to keep our snow longer than most! I did notice yesterday that daffodils and tulips were coming up in A11’s garden in the 10cm strip where the snow had already melted.
Supplies:
Stamps: All Through the Year, Garden Annuals wheel, Fundamental Phrases
Cardstock: Garden Green, Pixie Pink, Whisper White
Inks: Garden Green, Pixie Pink
Also: Square punches
Box & candle
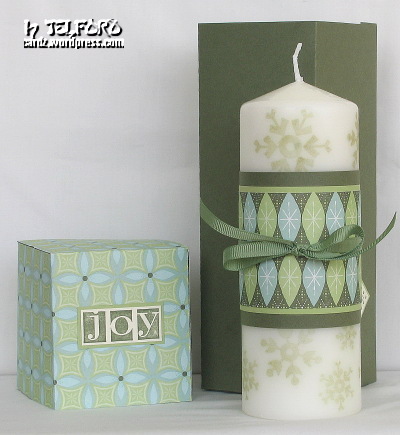
Posted: December 16, 2007 Filed under: Designer Paper, Perfect Presentation, Rollers 5 CommentsWeeks ago I saw this box at No Time to Stamp and decided it would be my December Stampers’ Club project. I also wanted to stamp some candles so I came up with a candle in a gift box for everyone to make.
To make the box I used a 12×12 sheet of cardstock and a 12×12 piece of designer paper for the lid. I scored the cardstock 2 3/4″ from the bottom and then turned it and scored it at 2 3/4″ intervals across the opposite way making 4 panels with a narrow strip left over.
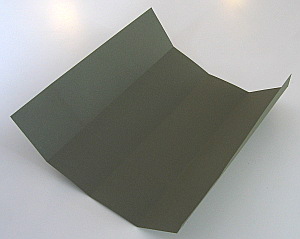
I cut the corner piece out where the narrow strip was and then cut up the four parallel score lines to the 2 3/4″ line.
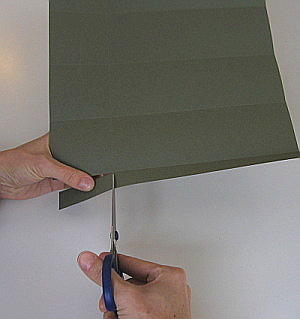

After that it is quite straight forward to stick it together.

The lid follows exactly the same procedure except that you score 2 7/8″ from the bottom and across the piece at 2 7/8″ intervals leaving you a smaller flap to stick the lid together.

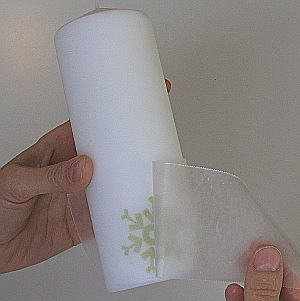
To decorate the candle stamp the image you want to use on tissue paper the same colour as your candle. Then cut out the image you have stamped.

Position the image on the candle and wrap a piece of waxed paper over it, holding either end of the waxed paper on firmly on the other side of the candle.

Holding the wax paper firmly heat the area of the stamped image with a heat tool. It doesn’t need to be heated for long, just long enough to see the wax over the image glisten as it melts into the tissue paper. Peel off the wax paper and repeat for another image on a different section of the candle.
I finished the candle off with two strips of cardstock, a piece of co-ordinating designer paper and a ribbon.
Supplies:
Stamps: Perfect Presentation, Bold Snowflakes roller
Inks: Always Artichoke, Mellow Moss
Cardstock: Always Artichoke, Mellow Moss, Very Vanilla, Wintergreen Designer paper
Also: Candle (IKEA), square punches, Spring Moss grosgrain ribbon, Olive organza ribbon (retired)


