
‘Tis the season
Posted: November 4, 2014 Filed under: CAS, Skyline, Snow Drops, Tis the season | Tags: Penny Black creative dies, Penny Black stamps, Tsukineko Memento inks, Tsukineko Radiant Neon inks 11 Comments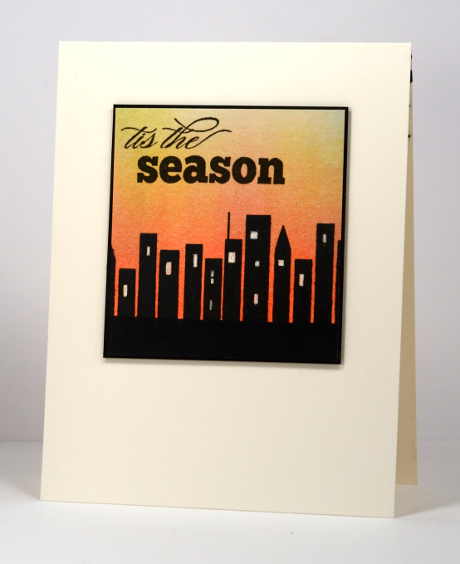
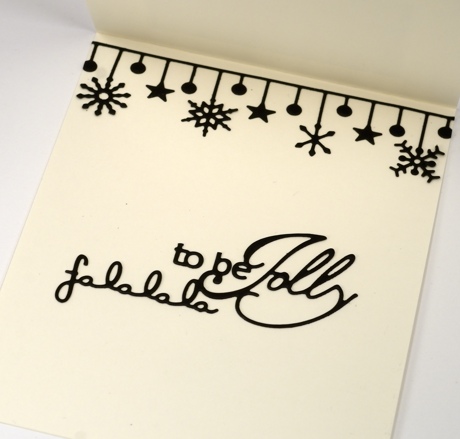
‘Tis not quite the Christmas season just yet but it is the season to change the clocks back which is what we did on Sunday. That means the sunset came earlier than I am used to and I was able to enjoy it at the end of a run. The light was orange and yellow behind the silhouetted trees and buildings as I ran home and that is what inspired this silhouetted city scape. I was undecided about a sentiment until I read the Less is More and the Splitcoast Clean and Simple challenge for this week, both are about non-traditional Christmas cards. This card is definitely non traditional especially when you peek inside to see the rest of the sentiment along with some black snowflakes. Seriously, who wants black snowflakes? I am not sure they work. What do you think?
I brayered the colour onto Neenah natural white cardstock, first radiant neon electric coral, next memento dandelion and lastly from the other end of the panel summer sky. (There is no summer sky left at the top of the panel as I had to trim it after messing up the sentiment.) I stamped the skyline stamp in black then brayered black to cover the base of the panel. The windows are coloured with a white gel pen and the sentiment stamped in versafine onyx black ink. I gave the panel a thin black mat and popped it up on dimensional squares. Inside the card is the rest of the sentiment trimmed from a new die cut and paired with the Snowdrops die cut.
Supplies:
Stamps: Skyline, Season’s Wishes (PB)
Creative Dies: Tis the Season, Snow Drops (PB)
Inks: Memento dandelion, tuxedo black, Radiant Neon Electric coral, Versafine onyx black (Imagine Craft/Tsukineko)
Cardstock: Neenah natural White 110lb cardstock, black cardstock
Let it snow
Posted: October 30, 2014 Filed under: Joyous Wishes, Prancers, Snow Drops | Tags: Penny Black creative dies, Penny Black stamps, Tsukineko Memento inks 14 Comments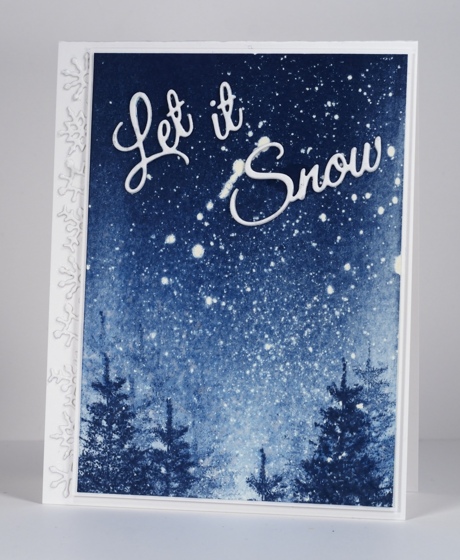
Snow is in our weather forecast for the next few days; I don’t imagine there will be as much as in the card above but who knows?
I know I keep mentioning the “panels already splattered with masking fluid” that I have sitting around on my craft table. There are a couple of reasons I have extras on hand, one is that the fluid takes at least 20 minutes to dry properly so it is good to have one ready for when inspiration strikes. Also I have several different sizes of watercolour blocks now so when I splatter the masking fluid on a block I can end up with quite a few card-sized panels. This panel was generously splattered with masking fluid, both tiny dots and larger ones. I ended up working with just one ink, Memento Nautical blue. I brayered the ink over the masking fluid, a method which gives each dot softer edges, a different effect to that created with sponging ink or watercolouring. I brayered from one edge only and the blue faded out toward the opposite edge of the panel making it the perfect place to stamp some trees with first, second and third generation stamping. After stamping the trees I spritzed the bottom of the card once so there is a little bit of blur around the trees.
I decided on a die cut sentiment so it would stand out and ended up cutting two and stacking them together. When trimmed the panel was a bit narrower than my usual card size so rather than trim the card base I matted with white and popped the panel up over little die cut snow flakes from the Snow drops die.

Supplies:
Stamps: Prancers (PB)
Creative Dies: Joyous Wishes, Snow Drops (PB)
Inks: Memento Nautical Blue (Imagine Craft/Tsukineko)
Cardstock: Neenah Solar White 110lb cardstock,
Also: Winsor & Newton masking fluid
Ski Hill
Posted: October 24, 2014 Filed under: CAS, Prancers, World of Wishes | Tags: Penny Black creative dies, Penny Black stamps 6 Comments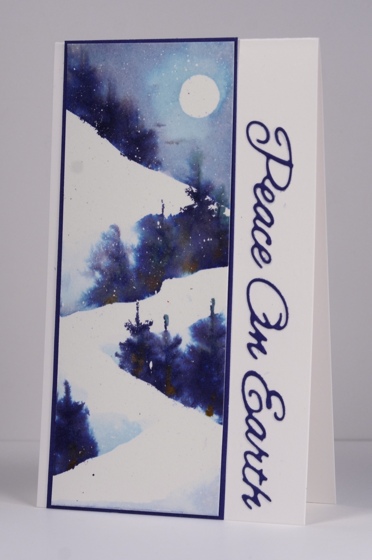
This tall and narrow scene reminds me of a ski run, albeit a fairly narrow one! I created this on a scrap of watercolour paper already splattered with masking fluid. Once again I am not entirely sure of the inks I used but I will list what I think they were in the supply list below. I used a half inch punch to create a circle mask for the moon and masked the hills one by one as I went down the panel. After painting the sky in chipped sapphire and broken china distress stain I stamped dark blue trees onto the damp sky area to end up with very watery trees. I then moved my mask and stamped more trees then painted some diluted broken china stain around them to blur the images and extend the edge of the snow bank. I did the same for the last two tree sections. When I had finished the panel was very blue and did not have enough contrast or variety of colour so I added some brown ink to the trunks of the trees.
To finish I rubbed off the masking fluid, matted in Periwinkle mix&match cardstock and added the die cut sentiment. I think the sentiment is a bit too big for the narrow panel so I would use something smaller if I did a similar layout again.
Supplies:
Stamps: Prancers (PB)
Creative Dies: World of Wishes (PB)
Inks: Broken China, Chipped Sapphire distress stains & Chipped Sapphire, Vintage Photo distress ink (Ranger)
Cardstock: Periwinkle Mix & Match (PB), Neenah Avon Brilliant white 110lb cardstock, Fabriano 100% cotton hot pressed watercolour paper
Also: Grafix frisket film, Winsor & Newton masking fluid
Moon on the rise
Posted: October 10, 2014 Filed under: Etched Branches | Tags: Fabriano Watercolour Paper, Penny Black creative dies, Penny Black stamps, Ranger Distress stains 18 Comments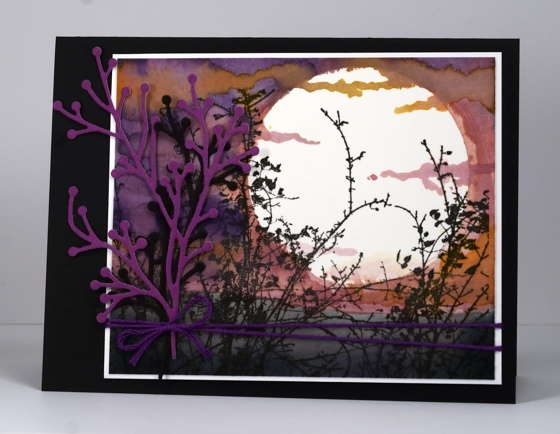
‘Etched Branches’ is a beautiful new stamp from Penny Black`s latest release ‘Winter Wonderland’. I used it to make a ‘moonrise’ scene but I can see myself placing it in a snowy scene very soon.
I used frisket film to mask the moon on watercolour paper. The film is new to me but I will be using it when I’m watercolouring and getting the paper quite wet. Post-it notes and masking paper can get too soggy if I apply a lot of water to the edges. After positioning the moon mask I painted the sky in stripes of pink and purple using the distress stains listed below. I let them dry a bit then painted more water and stain over the colours this created the watermarked edges which look a bit like clouds. I removed the mask and painted a few wisps of cloud over the moon area. I stamped ‘Etched Branches’ in Versafine Onyx black ink then sponged the land below the coloured sky in purple grey and black. To complete the card I matted in white and added branches in purple and black cut with the ‘Natures Song’ die.
I was up a bit earlier than usual this morning to start on a birthday breakfast for my 14 year old and the sky was very pretty in pink and orange. The view from my kitchen is obscured by branches like those in the scene above but also by power lines which are not quite so picturesque.
Stamps: Etched Branches (PB)
Creative Dies: Nature’s Song (PB)
Inks: Victorian Velvet, Spiced Marmalade, Dusty Concord distress stains & Dusty Concord distress ink (Ranger) Memento London Fog, Tuxedo Black (Tsukineko)
Cardstock: Neenah Black 100lb, Neenah Avon Brilliant White, Fabriano 100% cotton hot pressed watercolour paper
Time Out Challenge
Posted: October 9, 2014 Filed under: Wishes, Wondrous | Tags: Penny Black creative dies, Penny Black stamps, Ranger Distress stains 28 Comments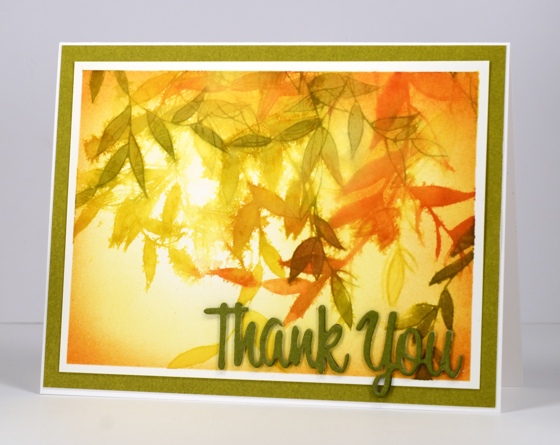
I am honoured to be a guest at Time Out Challenges today. The card above is the inspiration for their current challenge. When I designed this card over a month ago I was not seeing such lovely colours in the local leaves, but now they are looking beautiful. To created the blended mass of leaves above I stamped with distress stains and distress inks on watercolour paper. I used yellow, orange and green and each time I stamped repeatedly without reinking the stamp. Once I had a tangle of leaves stamped I then spritzed the paper and watched the clean edges of the image blur and blend. I used a waterbrush to fill in some of the leaves with the stain they were stamped in. When all was dry I sponged orange and yellow around the edges leaving a white area to look like the light shining through. My sentiment is three die cuts glued together, a process I find fiddly but I like the 3D result.
I hope you do take time out to visit the Time Out Challenge Blog to see what their design team came up with and to get inspired to participate yourself. I am looking forward to visiting through out the next two weeks while the challenge lasts.
Stamps: Wondrous (PB)
Creative Dies: Wishes (PB)
Inks: Mustard Seed, Spiced Marmalade, Peeled Paint distress stains & Spiced Marmalade distress ink (Ranger) Memento Dandelion ink (Tsukineko)
Cardstock: Neenah Avon Brilliant White 110lb, Fabriano 100% cotton hot pressed watercolour paper
Emboss resist wreath
Posted: September 30, 2014 Filed under: Autumn Jewels, Dancing Leaves, Decadence | Tags: Fabriano Watercolour Paper, Penny Black creative dies, Penny Black stamps, Ranger Distress stains 6 Comments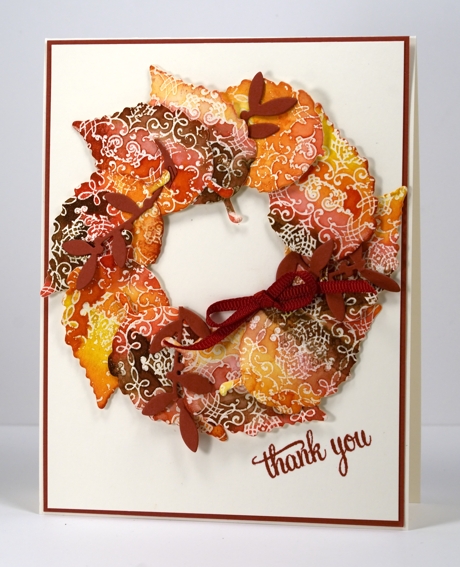
After making numerous emboss resist panels for my September classes I had leftover pieces big enough to punch leaves from. I used a rounded leaf from the new Autumn Jewels set of dies to cut as many leaves as possible then arranged them into a wreath. The arranging took me quite a while as I tried various methods and orientations for the leaves. Having them all turn in the same way and overlap the same way seemed to be the best option in the end. I bent some of the leaves to curl down towards the card and others to curl up, then attached some with 3D adhesive squares and others with flat adhesive. I poked a few twigs of “dancing leaves” in amongst the leaves, added a small bow before matting then stamped a sentiment.
The colours around here are not at their most vibrant yet but on the way to Lake Placid a week ago I enjoyed a gorgeous display of reds, yellows and oranges across the hill sides.
Supplies
Stamps: Decadence, Special Wishes (PB)
Creative Dies: Autumn Jewels, Dancing Leaves (PB)
Inks: Mustard Seed, Barn Door, Spiced Marmalade, Vintage Photo distress stains & , Fired Brick distress inks(Ranger)
Cardstock: Neenah Natural White 110lb, Fabriano 100% cotton hot pressed watercolour paper
Also: 3D adhesive squares(Scrapbook Adhesives). clear embossing powder, red grosgrain ribbon
Blog Hop with Scrapbook Adhesives
Posted: September 23, 2014 Filed under: A Pocket Full, Background Stamps | Tags: Penny Black creative dies, Penny Black stamps, Ranger Distress stains 11 Comments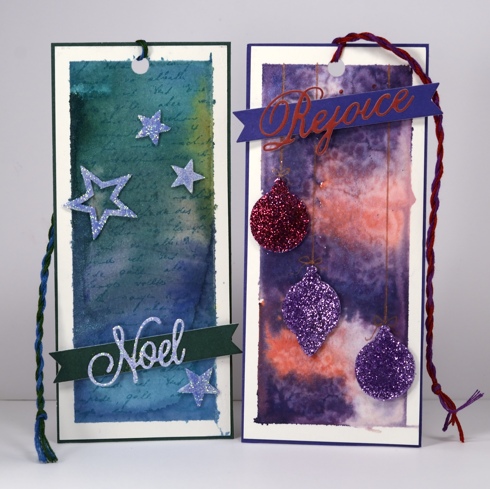
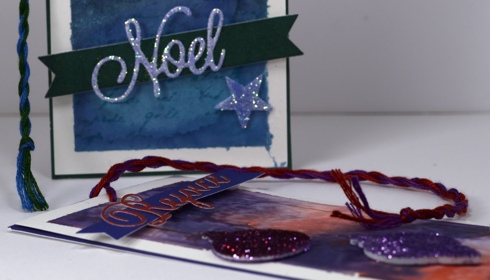
Yes, that is glitter you see on my blog! The PB design team is blog hopping with the Scrapbook Adhesives design team this week so I stepped a little outside my comfort zone and opened up the glitter. I had to go and find the glitter first; it used to live in my craft stash but it had migrated to my daughter’s nail polish stash where it definitely gets more attention.
I created my backgrounds first by taping some watercolour paper to a firm surface and blending distress stains onto the panels. The blue one was spritzed with pearl-ex powder spray to create a pretty sheen and the purple one was sprinkled with salt for some texture.
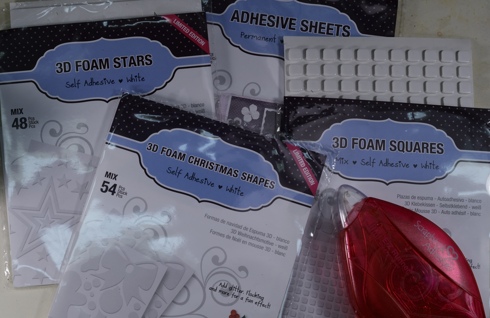
To create the glittery elements I used both 3D Foam Stars and 3D Foam Christmas Shapes. I peeled the shapes, which have adhesive on both sides, off the backing sheets and dipped one side in glitter then pressed the other side onto the watercolour panels. To create the sparkly “Noel” I cut the word from white paper using an adhesive sheet on top of the paper instead of underneath. I removed the top sheet and dipped the sticky side of the word in glitter.
Both banners were cut using a banner die from “A pocket full”. As the die has one “V” end I die cut only half way then flipped the die around and cut the other end with the “V” also. To finish the tags I matted with PB mix & match papers then twisted some embroidery floss to thread through the punched hole at the top.
Both Penny Black and Scrapboook Adhesives are hosting giveaways on their blogs this week so visit everyday for inspiration and a chance to win.
Supplies:
Stamps: Letter Background (PB)
Creative Dies: Exultations, A Pocket Full (PB)
Inks: Evergreen Bough, Pine Needles, Chipped Sapphire, Milled lavender, Dusty Concord, Worn Lipstick distress stains, Peacock Feather distress ink (Ranger)
Scrapbook Adhesives: Adhesive Sheet, Thin dimensional adhesive squares, 3D Foam Stars, 3D Foam Christmas Shapes, EZ runner adhesive
Cardstock: Fabriano 100% cotton hot pressed watercolour paper, #14 Rose Garden, #13 Periwinkle, #06 Spring Meadows paper (PB)
Also: Embroidery Floss
Blessings
Posted: September 18, 2014 Filed under: Autumn Jewels, Lush & Lavish, Words of Gratitude | Tags: Fabriano Watercolour Paper, Penny Black creative dies, Penny Black stamps, Ranger Distress inks, Ranger Distress stains 10 Comments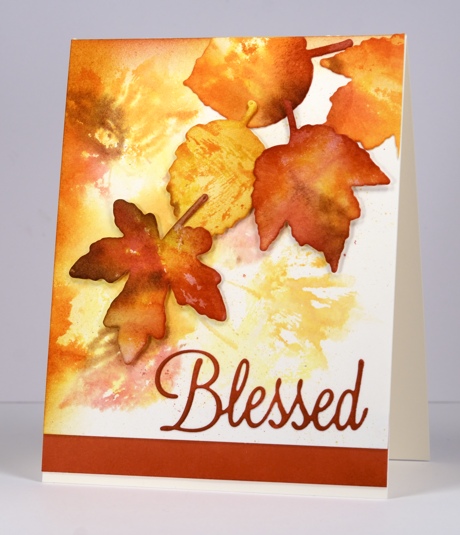
The new leaf stamps and co-ordinating dies from Penny Black are such a treat to use. To create this card of cascading leaves I started by spritzing a 5″x 7″ watercolour block with water. I then inked several of the leaf stamps from the “Lush & Lavish” set with the autumn toned distress stains listed below. I stamped each stamp repeatedly working from one end of the paper to the other so all the intense coloured leaves were at one end and the paler ones at the other. I let the paper dry completely before die cutting three whole leaves and two partial leaves from the intensely coloured end of the paper. I trimmed the other end to be a background for the card. Using the distress inks I sponged the edges of the die-cut leaves to darken them. I arranged and attached the leaves on the background panel, some popped up and others just glued.
To finish the card I cut the word “Blessed” and a border strip from Penny Black fall festival paper. The leaves are just beginning to turn here in Ottawa, there is nothing as intense as the colours in this card but I am looking forward to seeing the gorgeous colours. We have several very large trees in our backyard so once the leaves start turning and falling it goes on for weeks and weeks and weeks.
Supplies
Stamps: Lush & Lavish (PB)
Creative Dies: Autumn Jewels, Words of Gratitude (PB)
Inks: Mustard Seed, Barn Door, Spiced Marmalade, Vintage Photo distress stains & Wild Honey, Spiced Marmalade, Fired Brick, Vintage Photo distress inks(Ranger)
Cardstock: Neenah Natural White 110lb, Fabriano 100% cotton hot pressed watercolour paper, PB Mix & Match Fall Festival paper
Also: Adhesive Sheet & Thin dimensional adhesive squares(Scrapbook Adhesives)
Golden Harvest
Posted: September 12, 2014 Filed under: CAS, Golden Harvest, Words of Gratitude | Tags: Penny Black creative dies, Penny Black stamps, Ranger Distress stains 5 Comments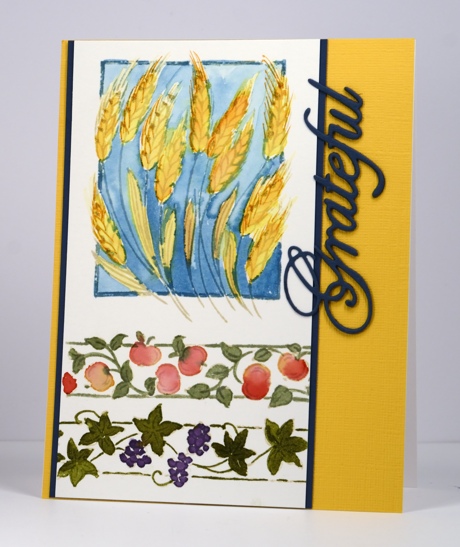
All the new Penny Black Fall 2014 products have been revealed on the PB blog this week and are now available in the online store. I have another fall card today and the temperature outside has dropped dramatically enough to make me realize summer might just be almost over. (you can tell I am clinging to it can’t you?)
I used the set Golden Harvest to create the card above and arranged the three stamps a bit like a sampler of autumn produce. I stamped all three images in antique linen distress ink to give me an outline then with painted distress stains to add colour. I matted it with blue cardstock and cut three “gratefuls’ out of the same cardstock. I stuck two together then trimmed the top off the tall letters and added another full die cut of the word on top. This made it possible to glue the word down evenly over the edge of the matted panel. I know this one isn’t quite as CAS as I often do, but I think it might qualify for the “Three” challenge at CASology this week.
Supplies
Stamps: Golden Harvest (PB)
Creative Die: Words of Gratitude (PB)
Inks: Mustard Seed, Barn Door, Spiced Marmalade, Peeled paint, Bundled Sage, Broken China, Dusty Concord distress stains & Antique Linen distress ink (Ranger)
Cardstock: Neenah Natural White 110lb, Fabriano 100% cotton hot pressed watercolour paper, yellow & blue textured cardstock
Christmas Balls
Posted: August 28, 2014 Filed under: Joyous Wishes, Most Wonderful | Tags: Penny Black creative dies, Penny Black stamps, Ranger Distress stains 8 Comments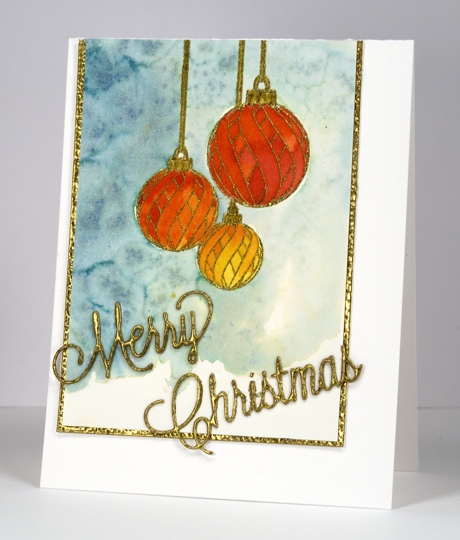
On the Penny Black blog this week the designers have been showcasing sentiments from the new “Season’s Greetings” release. I used this “Merry Christmas” die cut last week but it looked very different coloured with a silver sharpie. I coloured it for today’s card with gold embossing powder and used the same powder to emboss the Christmas balls and the edge of the mat framing the panel. You can see some of the shine on the border but in real life the words and balls glisten in the same way. I embossed the balls first then painted them with distress stains. I painted the background in blue and green diluted and blended with plenty of water then sprinkled salt over it to create some speckly texture.
Thanks for your comments and encouragement which I love to read. I have had a few questions lately which I hope to respond to in the next few days.
Supplies:
Stamps: Most Wonderful (PB)
Creative Dies: Joyous Wishes (PB)
Inks: Versamark (Imagine Craft/Tsukineko), Distress stains Barn Door, Mustard Seed, Spiced Marmalade, Evergreen Bough, Broken China (Ranger)
Cardstock: Fabriano 100% cotton hot pressed watercolour paper, Avon Brilliant white 110lb cardstock
Also: Gold Embossing Powder, Gold Wink of Stella Pen, Salt


