
One stamp three ways
Posted: August 6, 2013 Filed under: Berry Branch, Stamped Landscapes | Tags: Penny Black stamps, Tsukineko Memento inks 17 Comments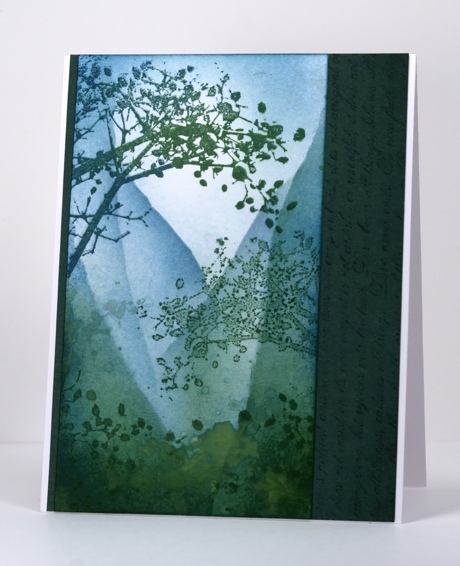
I think this berry branch stamp was the first Penny Black stamp I owned. I love the way it comes in from the side with all the twigs, berries and leaves. Sometimes I want to balance a design with a branch facing the other way and, as I don’t have one of those blank rubber stamps for creating a mirror image, I tried something else. I stamped the branch in a mix of teal and green in the upper left hand corner. I re-inked the stamp and stamped it on the plastic imaging sheet I use with my stamp positioner and stamped the sheet onto the card panel. The image is much paler when stamped this way. The third way I stamped the berry branch was by painting water onto it and stamping it onto the sponged colour. This creates a ghostly watery image.
The steep hills were created by sponging over a torn post-it note mask several times. I also flicked some water droplets and green ink droplets around too. The panel is matted with PB Sea Breeze mix & match cardstock with the 1 Corinthians Love chapter text stamped on it.
Supplies:
Stamps: Berry Branch, Love Chapter (PB)
Inks: Memento Teal Zeal, Summer Sky, Cottage Ivy, Northern Pine (Tsukineko)
Cardstock: Sea Breeze mix & match cardstock
Blue shining through
Posted: July 23, 2013 Filed under: Hillflowers, Leaves, Maidenhairs, Stamped Landscapes, Winter Berries | Tags: Faber Castell gelatos, Penny Black stamps, Tsukineko Memento inks 27 Comments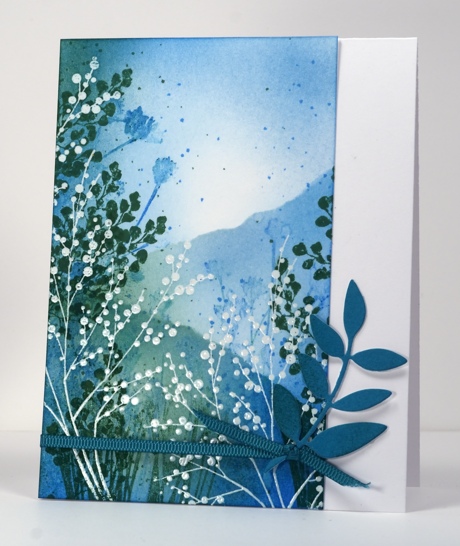
“Time for a scenic card,” I thought as I browsed through my art inspiration board for ideas. The delicate white branches and stems in this piece of art were my starting point. I embossed winter berries in clear and then coloured the hill flowers stamp with the spearmint and the blueberry gelatos, spritzed it and stamped it over the embossing. Next came the Maidenhairs leaves in green and sponging in blues and green. I t was only after I had sponged the perimeters that I decided to create some hills using a torn post-it note mask. Finally I flicked blue and green ink around and a few drops of water here and there. The drops remind me of the tiny insects which sometimes swarm and are not always detected until one is in my eye or down my throat! I thought about adding a sentiment but opted for some die cut leaves instead.
Enjoy your day;, I’ll be back tomorrow with my take on Beating the Heat
Supplies:
Stamps: Maidenhairs,Winter berries, Hill flowers PB)
Inks: Memento Bahama Blue, Summer Sky, Cottage Ivy & Versamark (Tsukineko)
Dies: Leaves
Also: Clear embossing powder, teal ribbon from Lorraine’s stash, Faber Castell gelatos
Bird at sunrise
Posted: April 21, 2013 Filed under: CAS, Stamped Landscapes, Tweet Tweet 39 Comments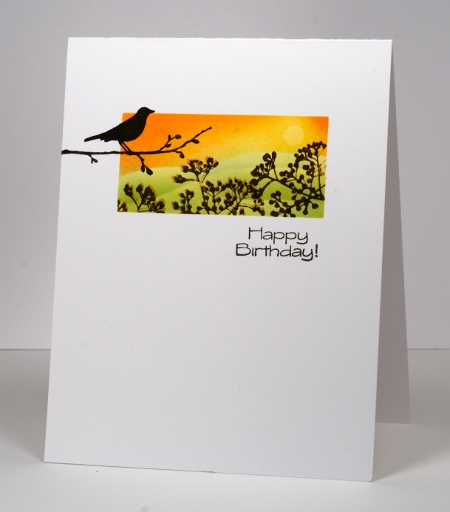
When I saw this week’s sketch from CAS(E) this sketch I knew it was perfect for a little scene. I created it using three stamps from one set, Tweet Tweet. It just so happens that the current Casual Fridays challenge is to create a birthday card so I’ll enter there too.
I positioned post-it notes to mask around a rectangle and punched a little circle mask for the sun. I then cut a wavy mask and positioned it to create the horizon, sponged yellow first, positioned the circle mask and sponged more yellow then orange. Next I lowered the horizon mask and sponged in green, moving the mask twice to create three hills. Before removing the perimeter masks I stamped the little berry branch stamp first in orange then slightly offset in black. Finally I removed all the masks and added the bird stamp and the sentiment.
Around here our grass is beginning to look green and there are even some flowers appearing but we did have snow and ice pellets yesterday!
Supplies:
Stamps: Tweet Tweet (PB)
Inks: Memento Dandelion, Tangelo, New Sprout, Pear Tart & Versafine Onyx Black(Tsukineko)
Watercolour sympathy card
Posted: April 3, 2013 Filed under: Before the Snow, Stamped Landscapes, Watercolour, Winter Ledge 30 Comments
Remember the week or so before Christmas when just about every card I made had the “Before the Snow” tree stamp on it? Well, I have been missing that stamp so I have a card for you today featuring some favourite stamps of mine in a non-Christmas setting. My aim was to create a forest scene but not necessarily a snow scene. When working with watercolour it isn’t always possible to predict how your colours will blend and spread. That white area in my scene could be snow covered hills in the distance or it could be just mist in the forest. Take your pick.
I started with wet watercolour paper. If you have played around with watercolour at all you will know that painting (stamping) onto wet paper will give you a very different effect to painting onto dry paper. Perhaps I can do a tutorial some time showing some of the different ways to work with watercolours. For now just take my word for it; if you want plenty of misty, dreamy, blended colour them stamp or paint onto wet watercolour paper. The colours will start blending and spreading as soon as they hit the paper (but they might not go where you want them to). I stamped green trees onto the right side of the panel, stamping and re-stamping without re-inking so I had dark and light foliage. I stamped a few tree tops over on the left hand side, again re-stamping without re-inking. I added blue ink to the top of the panel with a paintbrush. When the paper was almost dry I stamped some more trees on the right hand side in a darker green and added the branches on the left hand side.
To complete the card I matted in black and tied on a little sponged and stamped tag with silver cord.
This week’s One Layer Wednesday Challenge can be found over on Ardyth’s blog; it looks like fun and I hope to play along.
Supplies:
Stamps: Before the Snow, Winter Ledge, …wishes (Penny Black)
Inks: Memento Summer Sky, Northern Pine, Cottage Ivy, Nautical Blue & Versafine Olympia Green (Tsukineko)
Cardstock: Fabriano 100% cotton hot pressed watercolour paper,
Also: Silver Cord
Birds at night
Posted: February 28, 2013 Filed under: Birds on wire, CAS, Stamped Landscapes 28 Comments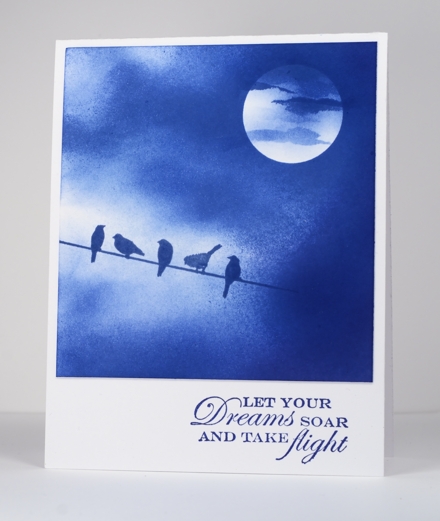
This card is inspired by a photograph taken by Luz Adriana Villa A and shared on flickr. I saw it on Pinterest.
The sky took a while to build up as I sponged from the outside in, with three blues. I used a little light blue at the beginning, the darkest blue at the end but the majority of the sponging was done with Memento Danube Blue. I positioned the moon mask first and stamped the birds before I did any sponging so that I could vary the depth of colour around the image. After I removed the moon mask I tore little strips out of the sticky part of a post-it note to create a very thin cloud like shape.
Supplies
Stamps: Birds on a wire, Free Flight (PB)
Inks: Memento Summer Sky, Paris Dusk & Danube Blue (Tsukineko)
Blue Scene
Posted: February 11, 2013 Filed under: CAS, Facebook Friends, Penny Black, Stamped Landscapes 23 Comments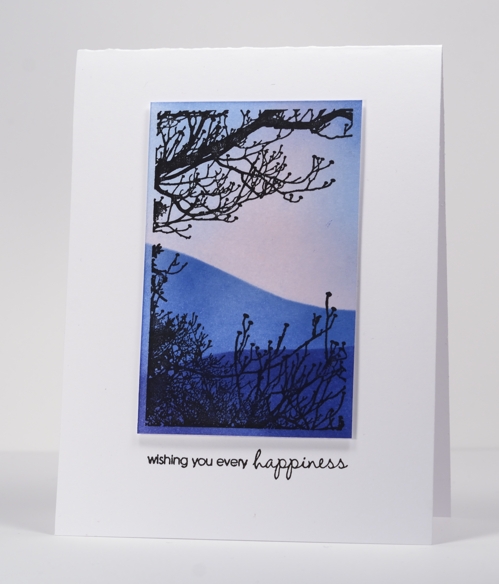
I have another new stamp from the Take Flight catalog to showcase today. This is my kind of stamp as you know, I love silhouettes and I love trees and branches. I fiddled around with the orientation of this stamp for a while before settling on the branches pointing up. You could just as easily point them down or sideways.
To create the panel I sponged a pink and pale blue sky, masked it and sponged a darker blue, masked again and sponged the darkest blue at the base. The stamp has its own border so I just trimmed the panel a little outside the border of the stamp and popped it up.

The fun continues with inspiration galore on the Penny Black Blog. They are eight days into the 20 consecutive days of inspiration, featuring stamps from the Take Flight catalog! The designers and contributors have LOTS in store for you. And since they’re featuring 20 days of inspiration, they’re also giving away 20 NEW stamps to one lucky reader.
Supplies:
Stamps: Facebook Friends, Every Happiness PB)
Inks: Memento Summer Sky, Angel Pink, Bahama Blue, Paris Dusk & Versafine Onyx Black (Tsukineko)
Winter challenges
Posted: January 12, 2013 Filed under: CAS, Hoot of a Time, Stamped Landscapes 47 Comments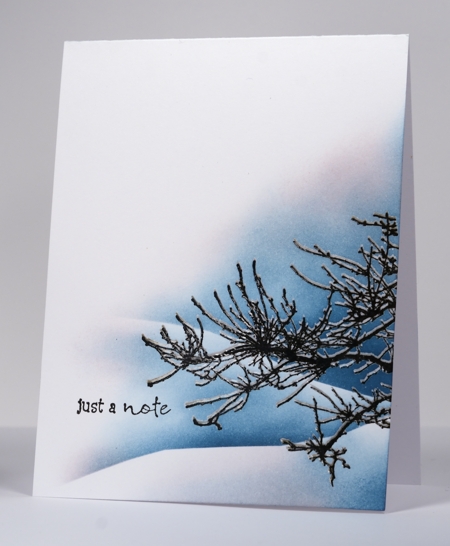
One of the challenges of winter is the warm days, like today. It may not sound hard to take but when you get rain instead of snow you get ice covering everything. And, I may be wrong, but the bitter cold seems to keep the germs at bay whereas the unseasonal thaws don’t.
But this post is really about a couple of card making challenges I am entering. The first is the current CASology challenge “winter”
and the second is CASe this Sketch #10.
I have been inspired to enter a few more challenges by Ardyth who enters several regularly and always nails each one. I think I have said it before but I actually find challenges quite, well “challenging”. It seems to me that being given the parameters for a card is a sure way for all my inspiration to disappear. I was pretty safe with the ‘winter” challenge as I never seem to tire of those winter scenes and the sketch was similar to one of my favourite layouts so I was, this time, up to the challenge. It still took me two attempts to get it right!
This branch is from a Penny Black halloween set but as far as I am concerned it can be useful all year round; I just left the bats out! I stamped the branch in black first then, using a stamp positioning tool I stamped it again in versamark a little above the black image. After embossing in clear powder I was able to sponge the sky behind and expose the snow laden branch. When I had the snow banks and sky completed, the scene really cried out for a little contrast. A few red berries would have been perfect but I didn’t want to risk wrecking it by adding them over the sponging so instead I added a few hints of pink to the sky and snow.
Enjoy your weekend.
Supplies:
Stamps: Wishes, Hoot of a Time (PB)
Inks: Memento Teal Zeal, Angel Pink,Versafine Onyx Black, Versamark(Tsukineko)
Also: clear embossing powder
Snowscape glimpse
Posted: January 4, 2013 Filed under: CAS, Christmas Park, Stamped Landscapes | Tags: CAS, Penny Black stamps 33 Comments
Sometimes a small snapshot of a scene is all that is necessary to give you the big picture. That’s why I like making stamped landscapes which are either wide and short or narrow and tall; they give you a glimpse of a larger scene.
The challenge at CAS-ual Fridays today is to make a clean and simple thank you card. I need a few thank you cards so I decided to keep it simple and enter the challenge. This card started out as a one layer card masked top and bottom with post-it notes but I stamped a simple “thank you” and got two extra black dots I hadn’t asked for. Not to worry, I sliced the stamped panel out of the card and stuck it on a white card base and proceeded to stamp the sentiment again. This time no dots, but crooked! I peeled off the snowscape panel and re-positioned it over the crooked ‘thank you” then wrote my own. The landscape was stamped in the following order:
- Position top and bottom masks then curved horizon mask
- Stamp trees in Paris dusk over the horizon.
- Re-position curved mask and stamp trees in black, emboss in clear.
- Return curved mask to horizon, add a post-it circle for the moon and sponge the sky in Summer sky and Paris dusk
- Return curved mask to lower hill position and sponge snow bank in Summer sky
- Remove curved mask and sponge lower edge in Paris dusk
My son has gone downhill skiing with a friend today for the first time. He’ll probably love it…
Supplies:
Stamps: Christmas Park(PB)
Inks: Memento Summer Sky, Paris Dusk, Versafine Onyx Black, Versamark(Tsukineko)
Also: Clear embossing powder
Winter Sky
Posted: January 1, 2013 Filed under: Stamped Landscapes, Winter Sky 49 Comments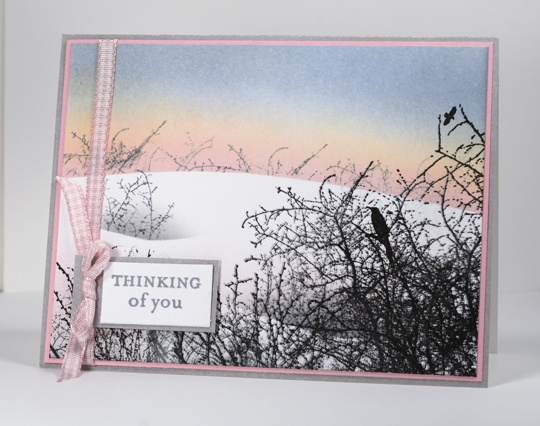
A couple of days ago my husband and I went X-Country skiing. After two big storms the woodland we skied through looked beautiful. I took a few photos but the weather was too cold to take my mitts off and fiddle with my camera for long. As we were heading back to the car the late afternoon sky was turning pink and apricot where it met the expanse of untouched snow in front of us. I took a mental picture rather than freeze my fingers and then tried to recreate it this afternoon with stamps and ink.
I masked the horizon first so I could sponge the sky in pink, yellow, grey and blue. I also dotted some grey twigs along the top of the hill. After removing the mask I partially inked the Winter sky stamp with a grey marker so I could make a little patch of brush in a hollow of snow. When the masks were removed I stamped the complete stamp in grey then black.
Supplies:
Stamps: Winter Sky, Enjoy Life (Penny Black),
Inks: Memento Summer Sky, Angel Pink, Cantaloupe, London Fog, Versafine Onyx Black (Tsukineko)
Cardstock: Penny Black Mix & Match Papers Storm, Rosegarden
Masking Fluid Christmas Collage 2
Posted: December 22, 2012 Filed under: Background Stamps, Before the Snow, Collage cards, Stamped Landscapes 13 Comments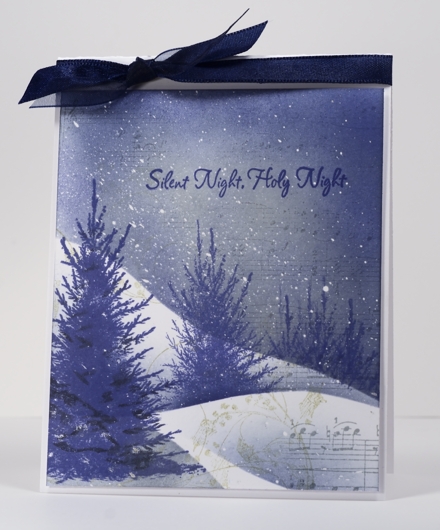
Here ends a week of Christmas cards made using masking fluid to create falling snow. I really enjoy this technique and I hope you will too when you get a chance to try it out. I would love to see what you create as I’m sure others would too so I have created a link up below where you can share your creations. It will be open for two weeks.
To create this one I stamped music background and winter scroll first, before I placed any masks. Then I positioned the first hill mask and sponged the blue and grey sky and added some background trees. I then repositioned the mask to create a snowbank, added a tree, removed the mask, stamped a foreground tree.and added a bit more sponging. I did add a bit of black on the foreground tree for extra definition but I don’t really like it so I wouldn’t bother next time. If that description is a bit rushed check out my tutorial where I go into way more detail.
I hope to post my last few Christmas cards in the next two days and some gingerbread creations too.

Supplies:
Stamps: Letter Background, Winter Scroll, Silent Night, Before the Snow (PB)
Inks: Memento Pistachio,London Fog, Paris Dusk (Tsukineko)
Also: Winsor & Newton Masking Fluid


