
Early light
Posted: June 21, 2013 Filed under: CAS, Enjoy LIfe, Every Happiness | Tags: CAS, Penny Black stamps 39 Comments
Now that I am back from my trip to DC and half way through the piles of washing I found a little time to create a card. I have some great design team tasks to tackle and new class projects to design for August but before I dive into them I played around with a new toy. I know it doesn’t look like anything new here but I cut my mask with one of my new spellbinders square dies. Creating a mask with a die is that little bit easier than lining up the four post-it notes. (not a ground breaking technique, I know!)
With my mask in place I sponged Memento pistachio ink on the lower two thirds of the square and summer sky in the top third. Before removing the mask I stamped the grasses across the bottom of the scene. After removing the mask I added the grass and sentiment in olive grove.
I hope to settle back into a routine of visiting and commenting on your blogs; thank you so much for dropping in here.
Supplies:
Stamps: Enjoy Life, Every Happiness (PB)
Inks: Memento Pistachio, Olive Grove, Summer Sky (Tsukineko)
Whatever is true
Posted: June 11, 2013 Filed under: CAS, Social Butterfly 17 Comments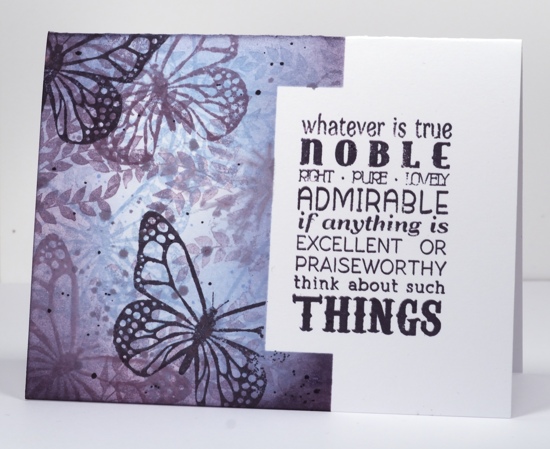
Our family is in the midst of June busyness at present. Track meets, tournaments, concerts, assignments, exams and a trip all to be fitted in before the end of June. That’s why things have been a little quiet here on the blog. I made this card a while ago when I was playing around with the Life’s Messages set.
I masked the right side of the card with a large post-it note then added a smaller post-it to make the indent. The butterfly area is sponged and stamped with memento inks.
I am excited to be heading off to Washington DC in a couple of days and looking forward to meeting a few of my blog readers in Reston, VA on the weekend.
While I haven’t had much time to blog lately I have been very encouraged by the kind and generous comments left here by so many of you. I appreciate the time you take to leave me a message. Thank you.
Supplies
Stamps: Life’s Messages, Social Butterfly, Verdant (PB)
Ink: Memento Summer Sky, Elderberry, Sweet Plum (Tsukineko)
Watercolour Wonder
Posted: June 4, 2013 Filed under: Fluffy Passenger, Lace Trims, Watercolour 10 Comments
I have two very different cards today both made using water colour techniques and effects. First a bit of whimsy, then some vintage. Both these will be added to the Penny Black Watercolor Wonder Board on Pinterest. If you have not visited the Penny Black boards lately you are in for a treat. They are a bunch of new ones full to the brim with inspiration.
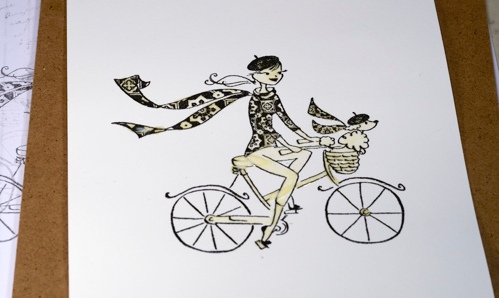
For the watercoloured cyclist (Fluffy Passenger) panel I stamped the image in Versafine Onyx Black onto Watercolour paper. I embossed in clear then painted masking fluid over all the parts I wanted to paint or colour later.
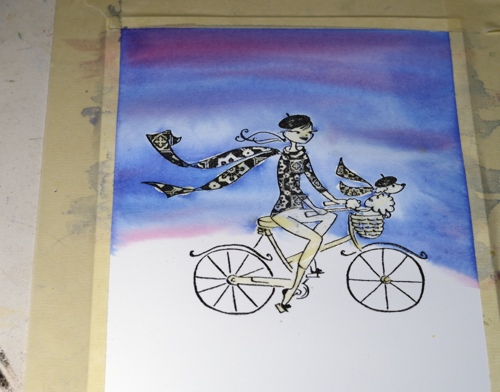
When the masking fluid was totally dry I taped the panel to my craft table and wet the top half which would become the sky. Onto the wet paper I added Danube Blue and Rosebud pink ink letting it blend together to create a pale sunset. As I had only wet the paper half way down the inks did not bleed past the wet edge. When the sky was dry I cut a post-it mask in a hill shape so I could stamp the Paris stamp in the background.
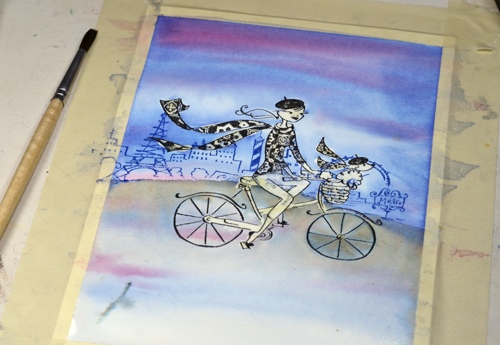
To create the foreground I wet the lower section of the paper and painted on some London Fog plus some more blue and pink. When it was all dry I rubbed the masking fluid off and used Memento markers, inks and a gelato(skin colour) to add colour to the cyclist.
Supplies:
Stamps: Fluffy Passenger, Sweet Wishes, Paris (PB)
Inks: Memento London Fog, Danube Blue, Rose Bud & Versafine Onyx Black (Tsukineko)
Memento Markers: London Fog, Lilac Posies, Dandelion, Danube Blue, Summer Sky, Desert Sand (Tsukineko)
Cardstock: Fabriano 100% cotton hot pressed watercolour paper
Also: Clear embossing powder, Winsor & Newton Masking Fluid, Faber-Castell peach gelato
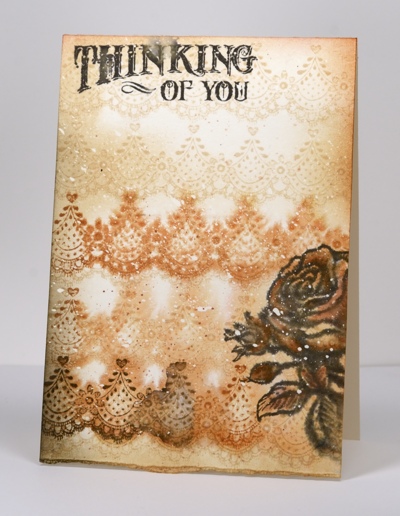
This new lace set from Penny Black is very pretty; there are seven different lace trims to play with. I thought they would be perfect for a vintage card. Before any stamping I flicked masking fluid over the piece of watercolour paper and let it dry. Next I wet the whole piece of water colour paper then stamped the lace stamp in Memento Desert Sand to fill the panel. When it had dried a little but was still damp I restamped some lace in Memento Potter’s clay and finally a small portion in Espresso Truffle. I added the rose in Espresso Truffle also, then used a marker and aqua painter to blend some colour onto the leaves and petals. I added the sentiment when the panel was dry but dropped a few water droplets on it for a little bleeding. When it was all dry I tore the bottom edge, sponged all the edges, added some spots of Potter’s Clay ink then removed the masking fluid to reveal little white flecks and specks.
Thanks for dropping in; I hope you are inspired to splash a little water colour around!
Supplies:
Stamps: Sweet as Honey, Lace Trims, Sentimental (PB)
Inks: Memento Potter’s Clay, Desert Sand, Espresso Truffle (Tsukineko)
Memento Markers: Potter’s Clay, Desert Sand (Tsukineko)
Cardstock: Fabriano 100% cotton hot pressed watercolour paper
Also: Winsor & Newton Masking Fluid
PB Blog Hop: Floral Applique
Posted: May 31, 2013 Filed under: CAS, Floral Applique 128 Comments

Supplies:
Stamps: Floral Applique, Sentimental (PB)
Inks: Versamagic Night Sky & Aegean Blue, Sea Breeze & Sahara Sand, Versafine Majestic Blue(Tsukineko)
OLW 142 Happy Birthday to Ardyth
Posted: May 29, 2013 Filed under: CAS, Embellishments, Penny Black 8 Comments
Happy Birthday dear Ardyth, happy birthday to you.
Birthday girl, Ardyth is hosting the One Layer Wednesday Challenge today and has turned it into a celebration. Darnell has also joined in the festivities with a birthday party on her blog where we can add our “Ardythian” cards. I chose to case this card. I love seeing what Ardyth comes up with on her blog. Clever. Clever. Clever.
I masked a square with post-it notes and then added another mask across the middle. The buttons are from the Embellishments set and the sentiment made using two stamps from Words Express.
Go and check out Ardyth’s blog. Be amazed. Wish her happy birthday and whip up a card!
Poppies in a field
Posted: May 27, 2013 Filed under: Field of Poppies, Penny Black, Watercolour 22 Comments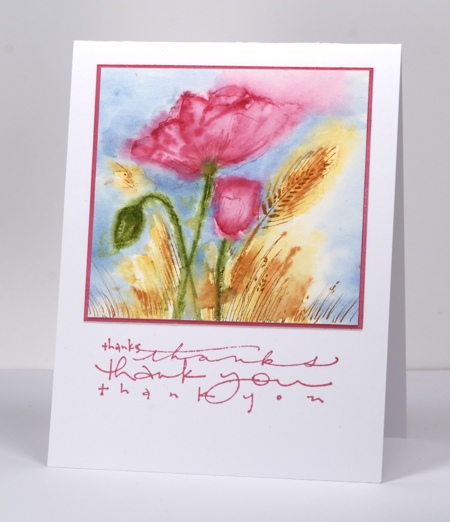
Considering how much I like poppy images it is surprising that it took me a while to play with this stamp. I used one of my favourite watercolour techniques to create this little scene and paired it with one of my favourite sentiment stamps.
For this look, I paint water onto my watercolour paper first. I ink the stamp with markers and stamp it onto the wet paper. The ink bleeds immediately and some times the images are barely recognisable. After the paper has dried a little I stamp the image again and start blending the ink with a brush or aqua painter. At this point I add extra colour to petals and stems if necessary with markers or watercolour pencils. Before the paper has dried I add the blue sky with a paint brush and maybe a little sponging.
I didn’t have the exact colour of pink cardstock to mat the image panel so I just sponged the edge in the same Memento Rosebud ink that I had used for the petals.
Thanks for visiting and leaving me such l0vely comments. I loved all the border ideas submitted for my last One Layer Wednesday Challenge but have not managed to finish commenting yet. I’ll get there; thanks for your patience.
Supplies:
Stamps: Field of Poppies, Thanks, thanks (PB)
Inks & Markers: Memento Summer Sky, Bamboo Leaves, Cantaloupe, Rose bud, Potter’s Clay (Tsukineko)
Cardstock: Fabriano 100% cotton hot pressed watercolour paper, Faber Castell water colour pencils.
You’ve Been Spotted
Posted: May 21, 2013 Filed under: April Showers, CAS, Penny Black 11 CommentsThis week Penny Black and the design team members are taking some time to honour some stampers who make Penny Black stamps shine.

There is a wealth of creativity shared on the Penny Circle Flickr gallery and this lovely butterfly card from Helentheheffalump really caught my eye.
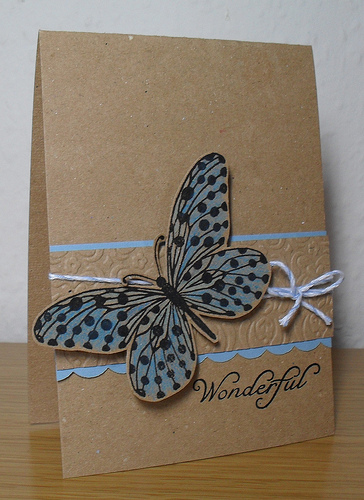
Helen has a Flickr gallery and a blog featuring many Penny Black stamps on beautiful cards. This card appealed to me for several reasons. The blue and black work really well with Kraft cardstock (I am always impressed by pretty Kraft cards because I have never had much success with Kraft). I also like this CAS layout especially with a little texture and twine thrown in.
With the inspiration of Helen’s butterfly in front of me I decided to give Kraft cardstock a go…
Supplies:
Stamps: April Showers (PB)
Inks: Versamark Tsukineko)
Cardstock: Some Kraft I found in the drawer
Also: white embossing powder, Faber-Castell Polychromos pencils, yellow and white embroidery thread
Hot Rod
Posted: May 17, 2013 Filed under: Background Stamps, CAS, Damask Pattern, Hot Rod 8 Comments
Today I am showing off this cool new stamp from Penny Black. I don’t often make cards with cars on them but the detail on this stamp and the flourish on the side of the hot rod won me over. As you can see I didn’t get too adventurous with the layout or even the ink colour. The image below is embossed on four colours of Penny Black mix & match cardstock and the one above is simply Versafine Onyx Black on white cardstock. To add a little colour to the one above I masked a panel and sponged three shades of blue and added a bit of the flourish from the damask pattern background stamp.
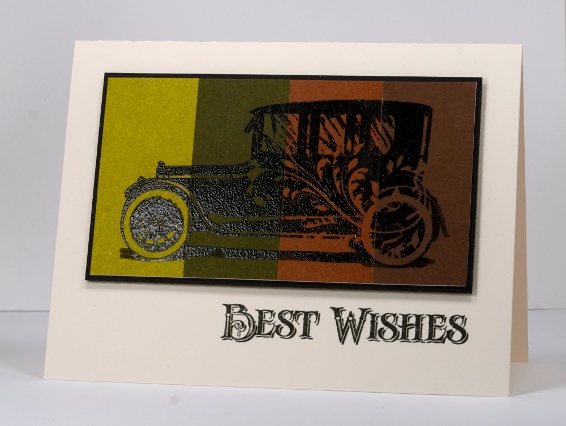
Supplies:
Stamps: Damask Pattern, Hot Rod (PB)
Inks: Memento Summer Sky, Bahama Blue, Danube Blue & Versafine Onyx Black (Tsukineko)
Cardstock: Penny Black Mix & Match Papers Olive Grove & Grand Canyon
Also: Black embossing powder

OLW 140 Borders
Posted: May 15, 2013 Filed under: CAS, Love is in the Air, OLW, Penny Black 16 Comments
This week’s One Layer Wednesday challenge is all about making or stamping a border on your one layer card. You can use stamps designed for creating a border or you can create a border with any stamps as I did for these two cards. I masked both cards with a post-it note and then stamped and sponged below the mask so the stamping became a border pattern. On the card above I embossed a few flowers in white first, stamped some more in red then sponged over all the flowers with yellow, orange and red. On the card below I just stamped the delicate poppy stamp three times and sponged a tiny bit to define the edge of the border. For this challenge I want the border to be the main event on the card. Border and sentiment that’s it, no more!
1. A one-layer card is defined as a single layer of card stock folded in half. No other layers of card stock allowed!
2. Make a card with a border as the image; you can add a sentiment but please remember to keep embellishments to a minimum.
3. Upload your card somewhere online and link it using the InLinkz button on the bottom of this post. If you link to your blog, please make sure the link goes to the individual post, not to your blog’s home page.
4.HAVE FUN! That’s really what it’s all about.

Supplies:
Stamps: Love is in the Air, Poppies, Wishes, Foliage Fancy (PB)
Inks: Memento Dandelion, Cantaloupe, Lady Bug & Versamark & Versafine Habanero, Versafine Majestic Blue(Tsukineko)
Also: Clear embossing powder
Mothers’ Day Watercolour
Posted: May 9, 2013 Filed under: Blooming Garden, CAS, So Blessed, Watercolour 9 Comments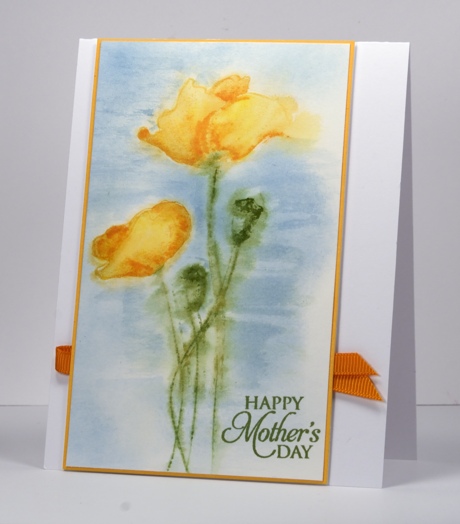
Watercolour and poppies. A combination I love to use. Karen made a lovely watercolour poppy card this week also. Did you see it?
To create this panel I dampened the water colour block with a paintbrush and water, inked the poppy stamp with Memento inks: Bamboo leaves for the stems and Cantaloupe for the blooms and stamped it on the damp paper. The colour bled immediately so I waited a little while before stamping the poppies again in the same place. I then used water colour pencils to fill in the petals and buds before blending the pencil with a paintbrush. The background Summer Sky ink applied with a paintbrush. To paint with ink from a stamp pad I just stamp the pad onto an acrylic block then use a damp brush to pick up some colour and paint it on the panel.
Supplies:
Stamps: Blooming Garden, So Blessed (PB)
Inks: Memento Summer Sky, Bamboo Leaves, Cantaloupe (Tsukineko)
Cardstock: Fabriano 100% cotton hot pressed watercolour paper, Summer Sun Mix & Match Papers
A Mothers’ Day card would definitely fit the bill for the challenge on the Penny Black blog. You can read about it here.


