
Misty Mountains
Posted: December 20, 2016 Filed under: Prancers, Stamped Landscapes | Tags: Brusho, Penny Black stamps 6 Comments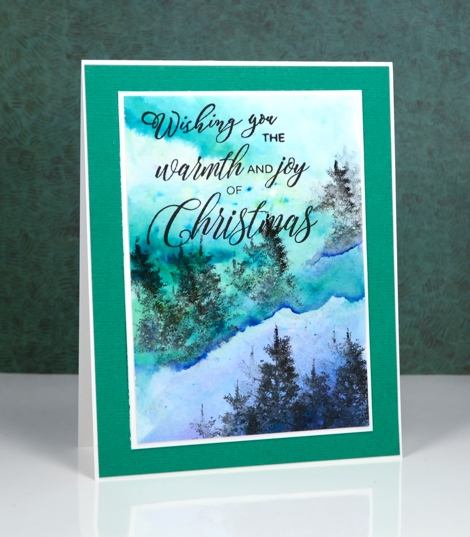
I was happy to read in the comments that I am not the only one who hasn’t sent all their Christmas cards yet. I am making progress; I’ve written 67, sent 60 and have 12 left to write. The card I’m sharing today shows a little sentiment splicing; I’ve taken the ‘wishing you’ from the festive snippets set and added it to half of a stamp from the festive cheer set. The lettering in the two sets combine nicely along with the small capitals on the little words. You can get more from your stamps if you take a look at which sentiments might mix and match with each other. A stamp positioning tool makes this kind of thing easier but partial inking and masking works if you don’t have a handy dandy tool.
The landscape for this card was definitely a brusho experiment. I sprinkled blue and green brusho on my watercolour panel then moved water around with a paintbrush to create some hard edges and feather out other areas. After I’d created my misty mountains I did partial inking on the little tree stamp from the prancers set to fill in some forest on the mountain sides.
Supplies
Stamps: prancers, festive snippets, festive cheer
Inks: versafine onyx black (Tsukineko)
Paper: hot pressed watercolour papers (Fabriano),green linen textured cardstock
Also: brusho watercolour crystals (Colourcraft)
Birch in snow
Posted: December 6, 2016 Filed under: Nature's Silhouettes, Stamped Landscapes | Tags: Brusho, Penny Black stamps 13 Comments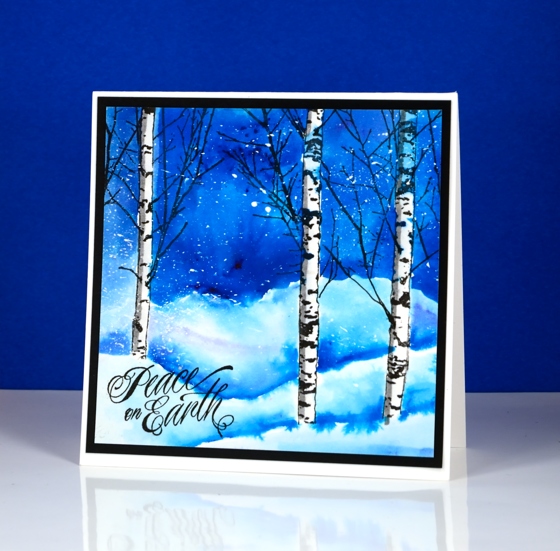
I wish I could tell you the beauty of yesterday’s snowfall inspired this little snowscape but the reality is having this photo edited and ready inspired this little post! I made this card months back but misplaced it somewhere in my spotless workroom!
The ‘nature’s silhouettes’ transparent set includes two long birch trunk stamps. One is a little slimmer than the other so when stamping them you can shape them, turn them upside down, ink them partially and add branches to get a range of different ‘birchy’ looks. I also discovered a little trick you might like. The wider of the two trees just happens to be the same width as narrow painter’s tape which makes masking a snap.
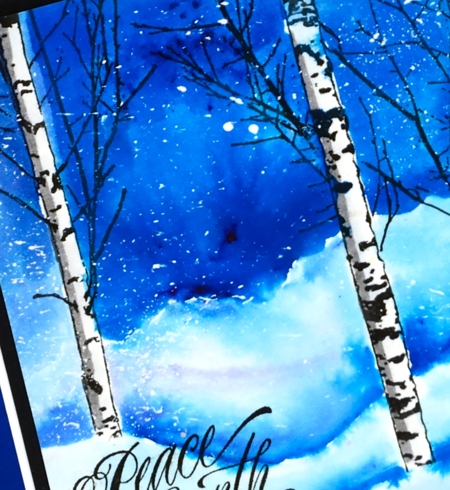
I inked the birch trunks in versafine onyx black for this panel as I didn’t want the watercolour painting to blur the trees at all. Before stamping I splattered some masking fluid and positioned some hill shaped post-it masks at the base of the panel. I stamped the trunks so the base overlapped the post-its. I used the narrow masking tape to mask two of the trunks and cut a narrower mask for the other trunk. I removed the masks from the base of the trees but kept the trunks masked while I painted snow banks and sky with a couple of blue brusho paints. To get the shadow of the snow banks I paint a curved line then soften it with water above but keep it fairly sharp and unblended below. Once the paint was complete I removed the masks from the trunks and add a line of grey down one side of the trunks with a marker.
Even though this particular card wasn’t inspired by my backyard, the beauty of a fresh snowfall is what keeps me creating these snowy scenes.
Supplies:
Stamps: Nature’s Silhouettes, Hello Winter, Into the sky (PB)
Paints: Brusho powders (Colourcraft)
Inks: Versafine onyx black ink, London fog memento marker (Tsukineko)
Cardstock: hot pressed watercolour paper
Also: masking fluid
Gods blessings
Posted: November 16, 2016 Filed under: Skyline, Woodland Beauty | Tags: Brusho, Penny Black stamps, Ranger Distress inks 5 Comments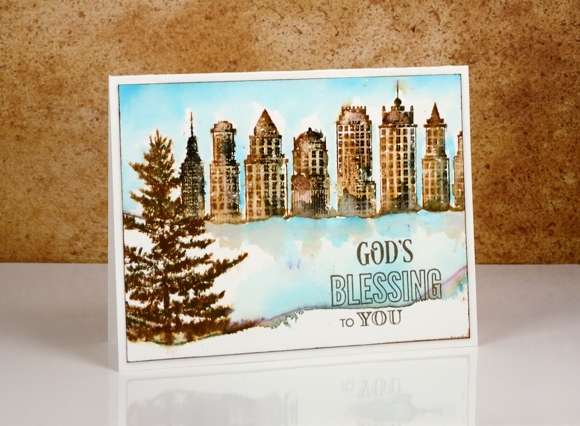
It’s time for a card with a vintage feel; you know they pop up here from time to time. I began with a watercolour panel splattered in a fine spray of masking fluid which results in tiny dots of white to represent snow. As with past cards in this style I used vintage photo distress ink which blends very nicely with water. The smoky black areas were added with black soot distress ink as well as an elegant writer pen. I can’t remember whether I stamped the buildings over a mask or just partially inked the stamp, either way the result made the skyscrapers appear to behind a snowbank. I blended the ink with a paintbrush above the snowbank and later, once the buildings were dry, painted the ice and sky with turquoise brusho.
To frame the scene I ran the vintage photo ink pad around the edges of the panel then attached it to a cream card base.
Supplies:
Stamps: Skyline, Woodland Beauty, Holy Night(PB)
Inks: Versafine vintage sepia ink (Tsukineko) vintage photo, black soot distress inks (Ranger) Elegant Writer (Speedball)
Paint: Turquoise brusho
Cardstock: Fabriano cotton hot pressed watercolour paper
Holly Stencilling
Posted: October 27, 2016 Filed under: CAS, Holly medley | Tags: Brusho, Penny Black creative dies, Penny Black stencils 4 Comments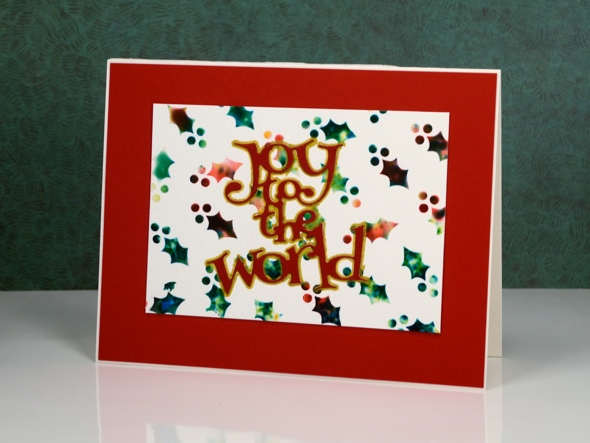
I have a couple more stencilled and watercoloured cards to share today. I used the same technique to create these panels as I did to make the ‘stained glass‘ panel shared earlier in the week.
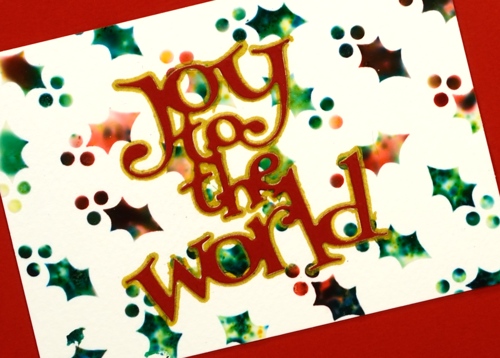
I began with the stencil taped to a piece of watercolour paper then spread molding paste over the stencil to fill all the little holly leaves and berries. While the paste was still wet I sprinkled brusho powder over the stencil then spritzed lightly with water. The water activates the brusho which spreads, blends and soaks into the paste. I removed the stencil and let the paste dry for quite a while before handling it. On the panel below I used a pearl paste instead of white to achieve a shimmery appearance. Water and colour did seep under the stencil in a couple of places but I trimmed the panel to utilise the best portion.
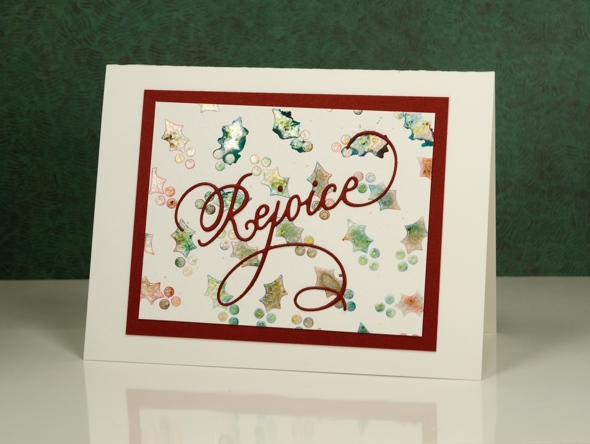
I finished the cards with die-cut sentiments and mats. To make the ‘Joy to the world’ sentiment pop I traced around it with a gold gel pen. You can see in the photo below the shimmer from the pearl paste. When I sprinkled the brusho over and spritzed, it really did not look good; it was more of a dirty mustard colour. Once it dried, though it looked pearly with shades of yellow, green and gold peeping through.

I apologize if I did not answer your questions about the last post; I’ve been travelling around a bit this week and visiting family in Canberra and Newcastle. When the choice was computer time or duplo with my delightful three year old great nephew, well really, there was no choice!
Supplies
Dies: Joy to the World, Rejoice(PB)
Stencil: Holly Medley (PB)
Paints: Red and green Brusho (Colourcraft)
Paper: Fabriano watercolour paper, red cardstock
Also: molding paste, texture luxe pearl paste, gold gel pen
Stained glass
Posted: October 24, 2016 Filed under: Hypnotic | Tags: Brusho, Penny Black stencils 20 Comments
A month or so ago I spent some crafty hours playing with stencils, texture paste and brusho powders. I was spurred on by a friend who had achieved some beautiful results. This panel, which reminds me of a stained glass window, is one of my favourites from that day.
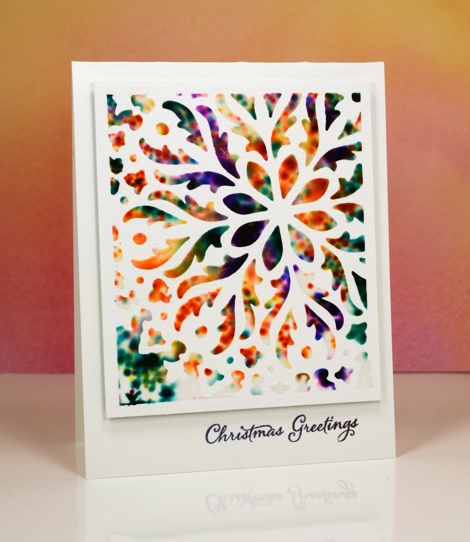
I taped the stencil to a piece of watercolour paper so part of the design would be exposed and framed. I spread a thin layer of paste through the stencil then sprinkled brusho paints over the top. With the stencil still in place I spritzed the whole thing so the brusho would react. The result is the blurry, spotty patterns you see below. Once I’d spritzed I carefully removed the stencil and let the panel dry; it took quite a while.

Because I had framed the pattern with tape I was able to trim the border to about 1/4″ and then pop it up on a card base and add a sentiment. I am still enjoying my time in Australia with family; I’ve posted a few photos on my other blog, Sentient.
Supplies
Stamps: Festive Snippets(PB)
Stencil: Hypnotic (PB)
Paints: Brusho (Colourcraft)
Ink: Versafine onyx black (Tsukineko)
Paper: hot pressed Fabriano watercolour paper
Also: molding paste, not sure which brand
Christmas Joy (another brusho sky)
Posted: October 21, 2016 Filed under: Brusho, Woodland Beauty | Tags: Brusho, Penny Black stamps 14 Comments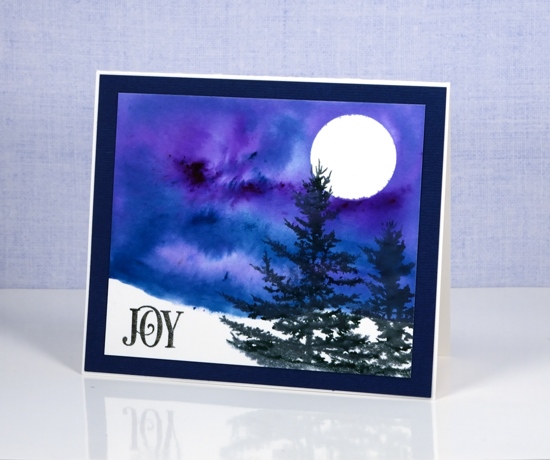
I have one more brusho sky to share this week. For this one I took advantage of the way watercolour powders work to get make the sky a bit more dramatic than the last two more serene scenes. Brusho powders can be blended on or off the paper to create a smooth solid colour or they can be sprinkled onto wet paper and left to move and form patterns with variations in colour intensity. To create this sky I positioned a mask for the moon then painted water over the sky area. I sprinkled a couple of brusho powders into the damp area and let them spread and blend. The areas where I dropped the powder become the textured darker areas in the sky.
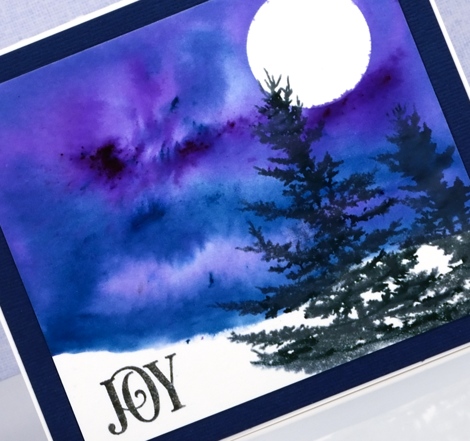
Once the sky dried I stamped the tree from Woodland Beauty several times in gray ink then added shadows on the branches in black marker. Brusho really is a great watercolour medium; it does so many clever things.
Supplies
Stamps: Woodland Beauty, Joy filled (PB)
Paints: Purple, Turquoise, Ultramarine brusho (Colourcraft)
Ink: Versafine onyx black, Smokey Gray ink and black marker (Tsukineko)
Paper: hot pressed Fabriano watercolour paper, blue cardstock
Snow tipped twigs
Posted: October 19, 2016 Filed under: Brusho, Into the sky | Tags: Brusho, Penny Black stamps 10 Comments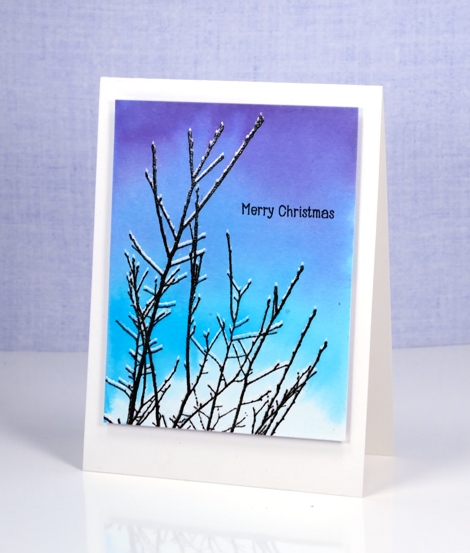
I have another brusho sky to share today. On Monday I explained how sometimes I paint the sky first, other times the images are done first. To create the appearance of snow on these twigs I had to stamp the twigs first. I used the misti and stamped the ‘into the sky’ stamp in versamark first then moved the watercolour panel up ever so slightly and stamped the twigs again in versafine onyx black. I then embossed with clear powder so the images would resist the paint when I added the sky over the top.
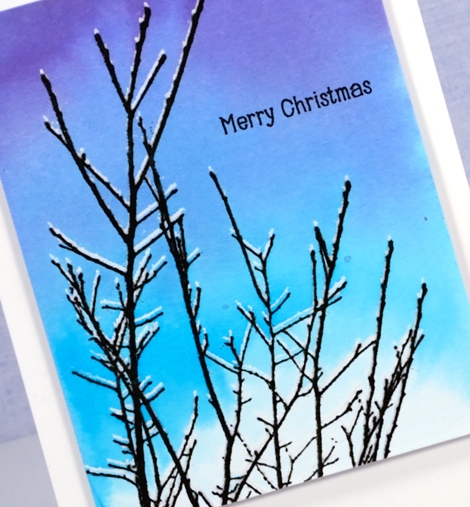
I used three colours of brusho to create the gradated sky leaving a bit of white at the bottom like a cloud. I finished the card by adding a simple sentiment and popping it up on a white card base.
Supplies
Stamps: Into the sky, Holiday snippets (PB)
Paints: Purple, Turquoise, Ultramarine brusho (Colourcraft)
Ink: Versafine onyx black ink(Tsukineko)
Paper: hot pressed Fabriano watercolour paper
Sunset Rendezvous
Posted: October 17, 2016 Filed under: Brusho, Rendezvous | Tags: Brusho, Penny Black stamps 8 Comments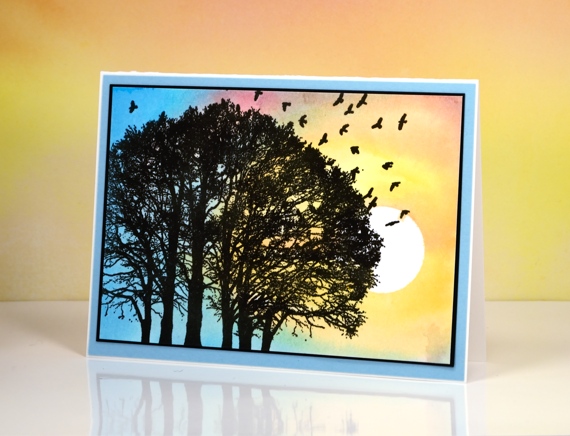
When making scenes like this one I sometimes create the background first then decide what to add to the foreground. Other times I stamp my images and add the sky after. For this one I positioned a moon punched from masking tape on a piece of watercolour paper then painted colour over the whole panel using brusho powders. I can’t remember but it is likely that I intended the panel to be portrait orientation with the moon in the top right corner.
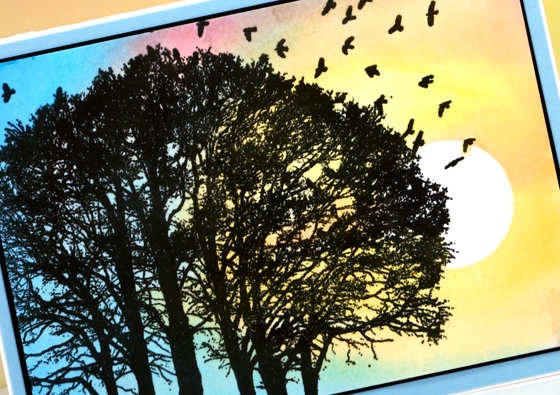
I decided instead to make the masked circle appear to be the sun going down so the light around it is yellow and pink with blue on the far left. Once the paint dried I stamped the tree stamp in versafine onyx black ink to complete the sunset scene.
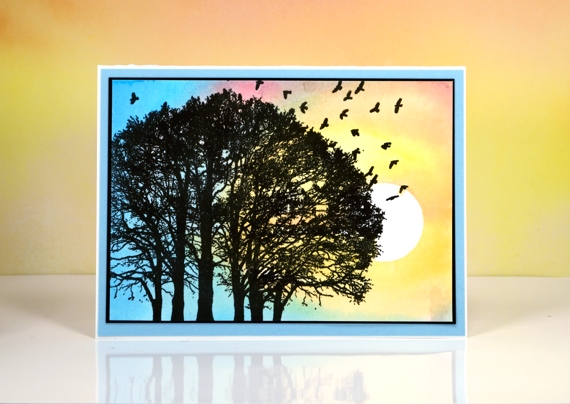
I didn’t add a sentiment as it is the kind of card I could use for any number of occasions. Once I pull it out to use it I can add a small sentiment in the bottom right corner if I wish.
I’m in Australia at present visiting my family; I’ll be posting some photos from time to time on my other blog, Sentient and on instagram
Supplies
Stamps: Rendezvous (PB)
Ink: Versafine onyx black ink, (Tsukineko)
Paint: crimson, yellow, cobalt blue, turquoise brusho (Colourcraft)
Paper: hot pressed Fabriano watercolour paper, Neenah Epic black cardstock, blue cardstock
Also: masking tape
Skyward
Posted: October 3, 2016 Filed under: Brusho, Skyward | Tags: Brusho, Fabriano Watercolour Paper, Penny Black stamps 8 Comments
You know how much I like tree stamps, so you can imagine how delighted I was to see this delicate branch silhouette appropriately called ‘Skyward’. I created a thank you card I’ll be linking to Susan Raihala’s Gratitude Campaign

I chose to keep my design simple by adding colour with brusho. I sprinkled gamboge, lemon and dark brown brusho on a piece of watercolour paper, spritzed with water then dried it immediately with a heat tool. By limiting the amount of water and drying it quickly I was able to halt the blending of the colours. The resulting bursts of colour do a good impression of fall foliage, I think. I wanted the branches to almost fill the sky so I stamped twice overlapping some of the branches.
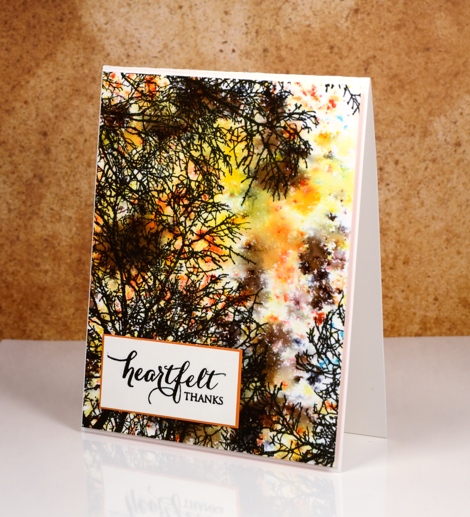
For the second card I used the same technique but went for a summer look. It is not clear whether my colour is sky or foliage so I am happy for it to be both.
You would think I had used blue brusho but I sprinkled leaf green, sea green and lemon. I love the way brusho is never one single colour but a mix of different coloured powders; it’s different every time.

Supplies
Stamps: Skyward, Snippets, Heartfelt (PB)
Ink: Versafine onyx black ink (Tsukineko)
Paper: hot pressed watercolour paper, orange cardstock, teal cardstock
Paint: gamboge, lemon, dark brown, sea green, leaf green brusho powder
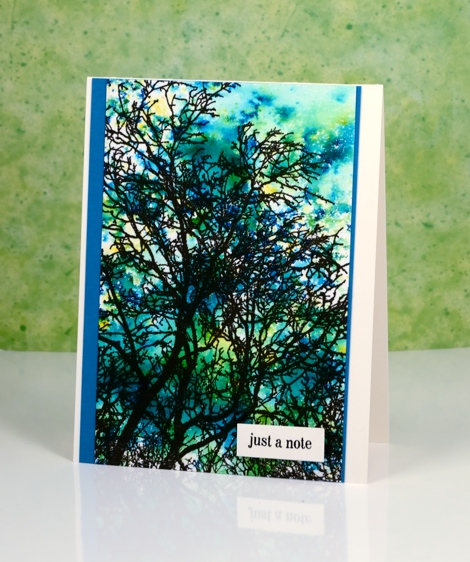
Northern winter sky
Posted: September 30, 2016 Filed under: Brusho, Nature's Gifts, Stamped Landscapes, Woodland Beauty | Tags: Brusho, Fabriano Watercolour Paper, Penny Black stamps 17 Comments
Some times watercolour paint does the work for you. I added a few stamped branches to turn this pretty sky into a scene but really, the blended colours were almost enough by themselves.
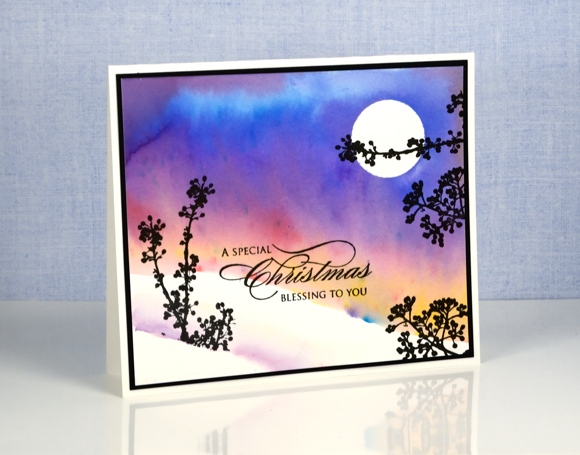
I did have a basic plan but the blending was magic that happened when I walked away. I positioned a frisket film mask in the top right then sprinkled four colours of brusho on the panel of watercolour paper. Using a wet brush I blended the colours creating a hard edge at the bottom and adding water to the upper part of the panel. Once I had wet the whole upper area I tilted the panel so the colour blended from yellow to pink to purple and blue. At this point I had to go and teach a mini class so I was gone for an hour.
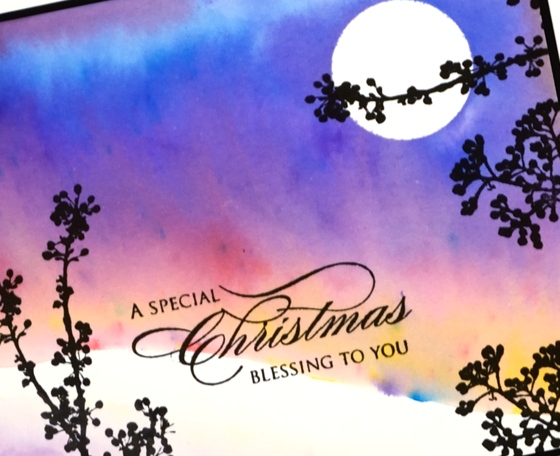
When I returned my panel was dry and all blended in the pretty pattern you see above – magic! I added the berry branches here and there, an extra shadow for a snow bank and a sentiment.
Supplies
Stamps: Woodland Beauty, Nature’s Gifts, Festive Cheer (PB)
Ink: Versafine onyx black ink (Tsukineko)
Paper: hot pressed watercolour paper, Neenah epic black paper
Paint: Violet, ultramarine, crimson, yellow brusho powder


