
Snowy Scene Tutorial
Posted: December 17, 2012 Filed under: Before the Snow, Stamped Landscapes, Tutorial 40 Comments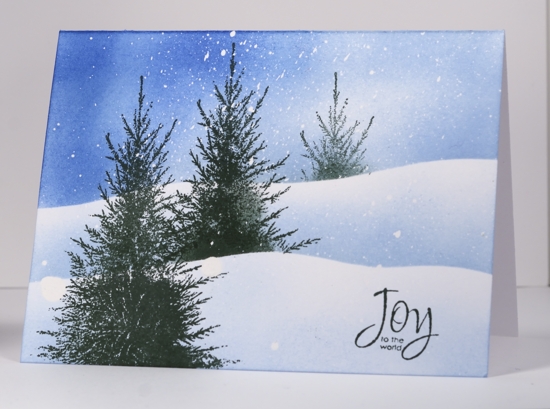
So here is a new tutorial! Thanks for waiting patiently for it. I guess I really should do more so the whole process becomes embedded in my brain! I apologize for the length of this one; you can fast forward if you like; it seems to go on and on! I hope it is helpful particularly in showing the masking fluid technique. I have made quite a few masking fluid resist cards lately as I love the falling snow effect which I will post them on the blog during the week ahead.
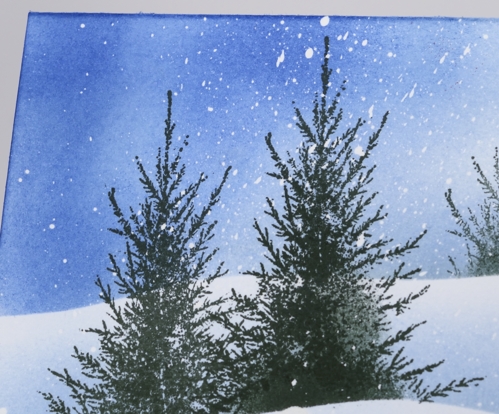
Below is a a close-up of the white flecks left on the card after the masking fluid is removed.
Supplies:
Stamps: Before the Snow, A Wish for Peace (PB)
Inks: Memento Summer Sky, Danube Blue, Northern Pine (Tsukineko)
Also: Winsor & Newton masking fluid
OLW 106 Sponging
Posted: September 19, 2012 Filed under: CAS, OLW, Penny Black, Stamped Landscapes, Tutorial, Winter Ledge 42 Comments
As you may know if you have spent any time browsing around my blog, I love to use sponges to apply ink. That being the case I thought it appropriate that I devote one of my weeks hosting the One Layer Wednesday challenge to sponging. I want you to enter into the sponging fun too. You have no doubt tried it already; I see beautifullyl sponged cards here, there and everywhere. So your challenge this week is to use some sponging on your card; use a little or a lot, combine it with another technique if you like, just get inky! (Aach! I just realised, at the eleventh hour, that I used the very same stamp on my last OLW challenge. Sorry for the repetition; I will pay more attention next month!)
Don’t forget about the Gratitude Campaign! See Susan’s blog for details.
Don’t forget to check out the sneak peaks and giveaways on the Penny Black blog.
OLW106 Rules
1. A ONE-LAYER card is defined as a single layer of card stock folded in half. No other layers allowed!
2. Make a card that incorporates sponging
3. Post your card somewhere online and link back here using the InLinkz button at the bottom of this post. Please make sure you link to the specific post on your blog rather than your blog’s main page.
4. Have Fun!

I have received several requests lately for a sponging video tutorial. I am sorry I don’t have one for you today but I do have the next best thing, a photo tutorial. I will get a sponging video done as soon as I can.

Position your masks first; I find that it helps to use the lines on a cutting mat to get everything square.

Sponge your lightest colour first.

I only used two blues so I started sponging the darker blue on the side I wanted darkest. I even started off the card base to help regulate how much ink I applied. Without picking up more ink I sponged towards the lighter side of the sky as the intensity of the colour faded.

When I am getting close to the coverage I want I blend the ink by sponging in circles instead of dabbing it on.

When I sponged this snowdrift I did not go back to the lighter blue I used the dark blue sponge without picking up more ink. I sponged right on the edge of the post-it mask rubbing it against that edge so the blue would define the snow drift.


I always sponge a little on the bottom edge to define the edge of the panel.


Supplies:
Stamps: Winter Ledge, Silent Night (PB)
Inks: Memento Summer Sky, Nautical Blue, Versafine Onyx Black, Versamark(Tsukineko)
Collage Card Tutorial
Posted: July 16, 2012 Filed under: Collage cards, Flamboyant, Penny Black, Tutorial 17 Comments
I have put together a tutorial describing the way I made my recent collage cards. I am sure there are many successful methods but this is the way I did it.
The tutorial describes how I made a monochromatic collage; my blue collage and the brown collage are in this post. Once again I relied on my son’s and my husband’s expertise to complete the video tutorial but I think I am getting quicker over all!
Supplies:
Stamps: Letter Background, Flamboyant, Gratitude, Lace Delight (PB)
Inks: Memento New Sprout, Pear Tart, Bamboo Leaves (Tsukineko)
Masking Fluid Resist tutorial
Posted: June 13, 2012 Filed under: Breezy, Penny Black, Tutorial | Tags: Tutorial 29 Comments
The card above was created using the Masking Fluid Resist method and the Penny Black stamp Breezy. A tutorial outlining the method is featured on Splitcoast Stampers today. Below is the video version of the tutorial, the first video tutorial I have ever done. I almost didn’t make it as the first few attempts were not good. I persevered and my clever 11 year-old son did all the editing. Masking Fluid resist is a method I use for creating snowy scenes usually, but I couldn’t bring myself to create a snowy card in spring!
Double sponging tutorial
Posted: May 18, 2012 Filed under: CAS, Penny Black, Soft Wings, Tutorial 37 Comments
On Wednesday I posted a card featuring a little square filled with a butterfly and some music. Today I have a tutorial showing the technique on a new card with a bigger image panel.
First I sponged three colours randomly over a piece of white cardstock. Careful blending is not important because the sponging will be stamped over and responged.

I stamped the music background over the stamping in a darker colour.

It’s hard to see but next I embossed the butterfly in clear embossing powder.

The final step is to sponge over the whole panel in a dark colour and watch the butterfly emerge.


Thanks so much for dropping in today; to see more thank you cards pop over to the Penny Black blog
Supplies:
Stamps: Music Background, Soft Wings 40-099, Flourish Thank You 4175F(PB)
Inks: Memento Paris Dusk, Cantaloupe, New Sprout, Summer Sky and Versamark (Tsukineko)
Cardstock: Penny Black Mix and Match papers – Clear Skies, Periwinkle
Also: Clear embossing powder
Favourites
Posted: March 25, 2012 Filed under: CAS, Penny Black, Queen Anne's Lace, Tutorial 44 Comments
The designers at Penny Black are showcasing favourites from the new 2012 catalog at present but what I have posted today is an older Penny Black stamp, Queen Anne’s Lace which has become a new favourite of mine. I love the delicacy of Queen Anne’s Lace which this stamp captures beautifully. Picking a favourite stamp also worked for the Less is More challenge this week which asks us to choose and combine three previous challenges. I chose#15 One layer embossing, #22 Shades of Blue and #59 Masking.
Several people have left questions in the comments section lately about products and techniques; I have a draft in progress to answer those soon but a couple may be answered in the following tutorial. Brenda asked how I mask; the first three photos show how I make use of the lines on my mat to help me line up the edges of the card before positioning the post-it notes. The large post-it notes are worth the extra cost because they do the whole length of the card and the width of the sticky section is good.


After using the grid on the mat I put scrap paper underneath and start my design. For this card I stamped the image twice in versamark, then embossed in clear.

I use round craft sponges cut into quarters to sponge and for this card I used Memento Summer Sky and Danube Blue ink.

Building up colour by sponging takes a while. I start by dabbing the colour on and then blend with a swirly motion to make sure I have good coverage.

For this card I wanted a bit of white space so didn’t sponge the panel completely.

When I was happy with the sponging I stamped the image several times with Summer Sky ink.

I removed the masks and added one more image in Danube Blue and finished with a sentiment, from the transparent set, Gratitude.
Here’s the finished product using a favourite stamp, my favourite colour and a favourite technique.

Thanks for dropping by, I hope you get a chance to work with your favourites this week.
Winter Berry Branch tutorial
Posted: February 4, 2012 Filed under: Berry Branch, Penny Black, Tutorial 45 Comments
Thank you so much everyone who has arrived here via the Penny Black blog and also my faithful readers who drop in here regularly to see what I have been doing. The comments I have received in the last day have been such a treat to read. Thank you also to all my subscribers; I am so pleased you have been inspired to sign up.
What better way to thank you all than a tutorial? Many of you asked questions about the Winter Berry Branch card I posted last week so here is the tutorial which will hopefully provide the answers.
Mask the around the area where you are creating your scene. This is one of the trickiest steps, sometimes I trust my eye, sometimes the ruler; both have been known to fail me.
Flick masking fluid randomly over the cardbase. I put my card in a box, almost close the box and blindly flick the paintbrush with masking fluid on it around over the card. This way the masking fluid is contained in the box. An old toothbrush does a good job too but I didn’t have a spare and didn’t think anyone in my family would appreciate masking fluid toothpaste! While you wait for the masking fluid to dry, wash the brush because the masking fluid can ruin it if you don’t.

Stamp the branch first in versamark using a stamp positioning tool. Re-ink with versamark and then add whatever colours you want on your branch using markers; I used real red and early espresso. While you are inking your stamp with markers you must not move your stamp positioning tool.

When your branched is inked in versamark and colour move your stamp positioning tool ever-so-slightly down (as in no more than a millimeter!) and stamp the branch again. What you have created is two branch images extremely close together which you will heat emboss in clear.

In the close up below you can see the two impressions from the stamp. Ideally you want the coloured print to overlap with the versamark print. The versamark is the snow sitting on the branch. The yellow dots are the masking fluid. Because they are raised they will resist the stamp a bit but it doesn’t matter as it will look like a clump of snow.

After embossing in clear embossing powder it is time to start sponging. I tend to build up the colour slowly when sponging so the variations in intensity will be gradual. If you are not happy with your sponging it could be that you stopped too soon.


When you are happy with your sponging you can gently rub off the masking fluid. It should come off easily but make sure you keep your fingers clean otherwise you can smudge colour into the freshly revealed white spots. Remove the masks when all the masking fluid is gone to see your snow laden branch.

Supplies:
Stamps: Berry Branch (Penny Black), Teeny Tiny Wishes(SU)
Inks: Versamark, Marina Mist, Bashful Blue, Real Red, Early Espresso
Cardstock: MFP 100lb white
Also: Clear e.p., Winsor & Newton masking fluid
The long awaited sponging tutorial
Posted: December 27, 2010 Filed under: CAS, Lovely as a Tree, Stamped Landscapes, Tutorial 35 Comments
At long last I have created a sponging tutorial. The photos from the tutorial worked well and the colours are accurate. Unfortunately I had trouble photographing the final product(above) and getting the colours right. In reality they are a little more vibrant. (Also I think the camera lense has smudges on it as my photos always end up with smudges at the top or right hand side) I know I have taken forever to do this tutorial but in deciding what to do I realized that it would be best to start with the simpler version: a sponged card without embossing so this is it. I may even get around to another tutorial which includes embossing, but I know you will only believe that when you see it!
First I positioned post-it notes to create the borders of my scene.
Next I cut a hilly edge on another post-it note and positioned that two thirds of the way down the white space. When doing a snowy scene I often divide the scene to allow two thirds sky, one third snow, otherwise there is too much white space.

I punched a circle out of post-it with a circle punch and positioned it in the sky. For sponging I use a quarter of a circle sponge. I have some from Stampin’ Up and some Dollar Store; the SU ones are better. I start sponging with the lightest colour first and it often takes quite a while to build up the colour. Remember you can always add more colour but you can’t take it off!

This is how I keep my sponges. When I started sponging I didn’t allocate one sponge per colour I was a bit more random. I soon discovered it was worth having more and keeping them labeled. Mine are sorted in the old SU categories because I still think in the rich regals, soft subtles, etc. I have yet to move on.

We interupt this tutorial to show you the downy woodpecker who flew in for a little suet mix while my daughter was taking a few photos for this tutorial.

After sponging with the lightest colour, which was Almost Amethyst, I started sponging with Brocade Blue. I left a ring of amethyst around the moon and started the brocade outside that.
Then I moved onto Elegant Eggplant. I just keep on sponging until I am happy with the blend and coverage. It always looks more dramatic once you have lifted the masks at the end, so I peek underneath occasionally to see how strong the colour is.

Next, some trees. I repositioned my hill mask, moving it left and a little below where it was previously and removed the moon mask.

I stamped the trees in black, being careful to avoid the little grassy bits at the base of each tree.

At this point I also did a little sponging to show the edge of the snow bank. I usually do a bit with the sponge, but to sponge a smaller area I use a q-tip.

Then I added some trees in Eggplant which I first stamped on scrap and then on the card so it would be paler and appear more distant.

I moved the hill again and sponged the edge of the hill to create the next snow drift.

You can add another few trees here also if you like so you have some more in the foreground. Then move the hill mask again and sponge along the edge again.

Once you have the snow drifts and trees you want remove the hill mask and sponge a little colour along the lower edge so your scene will have an edge one the masks are removed.

There you have it. If you lasted this long, well done. If you are interested in having the original card leave me a comment and I will pick a name at the end of the week. If you make a card using this tutorial let me know and I will put your name in the draw twice. Thanks so much for dropping in and for all the encouragement you give me.

Supplies:
Stamps: Lovely as a Tree, Hugs & Wishes
Inks: Basic Black, Almost Amethyst,Brocade Blue, Elegant Eggplant
Cardstock: Flourishes Classic White
Story-book window & tutorial
Posted: March 7, 2009 Filed under: Baroque Motifs, Branch Out, Garden silhouettes, Pocket Silhouettes, Season of Friendship, Stamped Landscapes, Tutorial 6 Comments
I have finally completed a card tutorial! I had hoped to do one for a snowscape, but the seasons are changing and I have more of a spring scene instead. I used some of the same techniques to do this scene as I used for my snowscapes. The inspiration for this card came from the cover of a children’s novel The Dragonfly Pool by Eva Ibbotson
First I cut a piece of scrap card to be a mask for my hillside. I kept both pieces so I could mask the sky and the hills at different times. Of course you don’t need the huge piece I have, I’m not sure why I went so large?

I started with the sky, holding the mask in place while I sponged with both Bashful Blue and Ballet Blue.

To do the hills I swapped masks and sponged down the left hand side and across the bottom with Garden Green.

I then moved the mask a little to make the edge of a hillside and sponged with more Garden Green and some Certainly Celery.


On the right hand side of the hills I sponged with Summer Sun which I blended into Certainly Celery to create a lighter hillside.


With all the background sponging done I began to stamp the silhouettes along the bottom of the card. I used Basic Black, stamping some of the stamps upside down to use just the stems as grass. Where the flower stems were a little short I lengthened them with a black marker. I used two stamps from Garden Silhouettes to frame the picture in foliage.

Around the outside of the scene I embossed a silver border using an embossing marker and ruler to make a line down each edge.

I added a little flourish to each corner with versamark and the large flourish stamp from Baroque Motifs.

Rather than pouring embossing powder over the whole image I dipped the edges into silver e.p. one at at time and then did the corners.

I stamped the dragonfly in black and coloured the wings with an embossing pen before embossing them in silver.

To make the sentiment I sponged a rectangle of Whisper White cardstock in Garden Green and Certainly Celery, then stamped the words in Basic Black and matted in black.( the photo didn’t turn out, sorry) I attached silver cord to both ends, wrapped it around the back of the cardstock and taped it. I also added the tiny butterflies from the Branch Out set.

As I was mounting the card on black I needed a white panel inside, so I sponged a bit in both greens and made the silver edges and flourishes using the same method described above.

I hope my instructions make sense, the method is fairly straight forward so have fun if you try it. Thanks for dropping in and reading this far! Have a great weekend.

Supplies:
Stamps: Garden Silhouettes, Pocket Silhouettes, Infinite Goodness, Season of Friendship, Baroque Motifs, Branch Out
Inks: Bashful Blue, Ballet Blue, Garden Green, Certainly Celery, Summer Sun, Basic Black, Versamark
Cardstock: Whisper White, Basic Black
Also: Silver e.p., silver cord
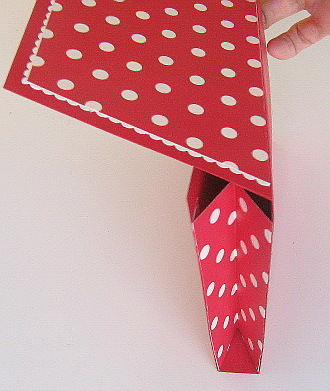
Red polka dot purse
Posted: March 5, 2008 Filed under: Designer Paper, Purses, Tutorial 5 Comments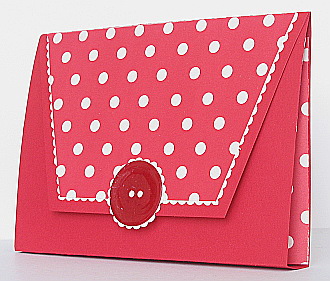
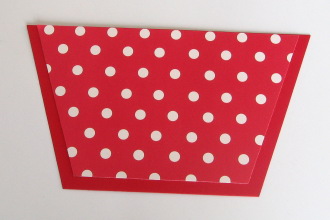
After I had completed my first purse, I set out to make another and create a tutorial as I did it. First I cut a piece of cardstock 10¼” x 6½”. I then scored it at ½”, 5″ and 5¾”as shown below.
To make the purse flap I cut a piece 6½”x 3¾” and measured in 1″ from the corner on both ends of one long side and cut off triangles to make a trapezoid.

I did not measure to make the designer paper shape to decorate the purse flap (sorry), I just made it a little more than ¼” smaller all the way around the three shorter sides. Don’t stick it on yet.
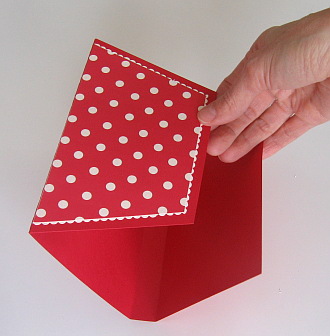
Attach designer paper shape to vanilla cardstock, aligning the longer edge with the edge of the cardstock.

Cut around the designer paper with decorative scissors making a “lace” edge.

Attach the purse flap to the ½” flap on the purse.
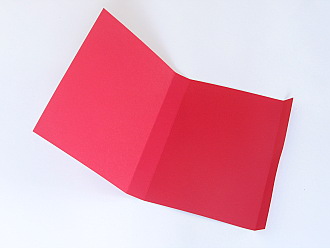
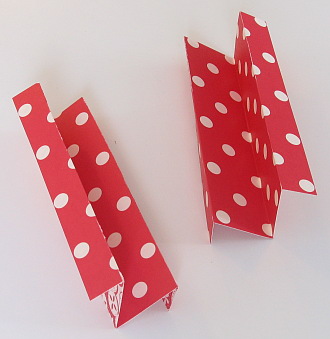
Next I made gusset pieces for the sides of the purse with designer paper. I cut two pieces 4″x 3″ and scored them along the length at ½” 1½” and 2½”. Then I folded them concertina style.
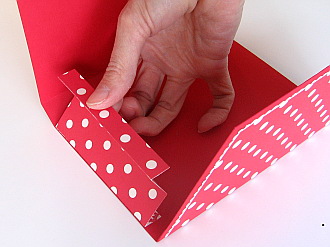
I then glued the narrower section of the concertina piece to the inside of my purse. I think it is easier to just look at the picture than have me try to explain it.
To fasten the purse flap I used a velcro circle and added a big red button with scallop trim to finish it off. The button just happened to end up looking exactly as I wanted even though I wasn’t sure how to make it initially. I punched out a circle of red cardstock and stamped the versamark pad directly onto it. I then embossed with glassy glaze enamel embossing powder, then stamped with versamark and embossed again. When I was heating the second layer I held the heat tool directly over head which pushed liquid enamel out to the sides giving the button a raised edge.


