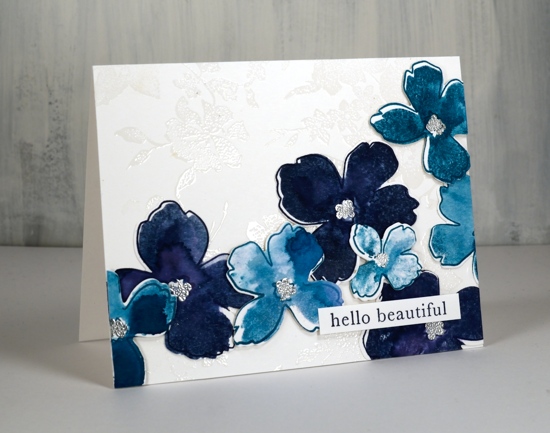
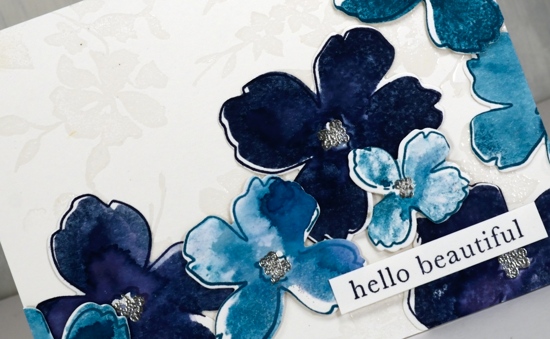
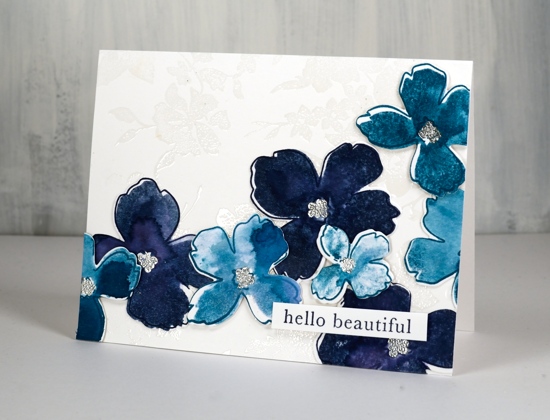
These lovely blooms are new from the Stamp Market and I’ve paired them with the Stamp Market floral background stamp. I experimented with some new to me cardstock and my Catherine Pooler inks to create this design. The cardstock is bristol smooth from Koh-I-Noor and even though this is only my first card with it I am impressed. As you can probably see I subjected it to a decent amount of water. I didn’t flood it but I did spritz each solid stamp before stamping all the petals so the paper had to be able to take a little water. It didn’t respond in the same way as watercolour paper does but it did let the water sit on top and blend as it dried rather than soaking through the instant it got wet. This made it possible for me to get some blurs, blends and watermarks on each flower.
I stamped all the outline stamps first, the larger ones in juniper mist and the smaller ones in daydream CP inks. I then stamped the matching solid stamps in the same colours but spritzed each stamp before pressing it down to fill the outline shape. I love the watermarks and variation of shades I achieved by doing this. I’m not sure if there is a recommended order for stamping outline and fill stamps but I think I have more success when I try to put the filler inside the outline rather than the other way round. As you can see they aren’t exactly lined up but that was intentional.
I stamped little centres on the flowers and embossed in silver powder then cut them all out with the co-ordinating dies. I arranged them to flow across a white panel but decided I wanted a little bit of non-distracting interest in the background panel. Clear embossing the ‘flower background’ stamp was enough, it looks a bit like a white damask table cloth. I glued the dark flowers directly to the background panel and popped the lighter flowers up on dimensional tape. The little sentiment is from the Ink to Paper set ‘tagged’.
First project back in the workroom after many weeks away! Turns out I haven’t completely forgotten how to stamp or watercolour. That’s a relief as I am teaching a class tomorrow!
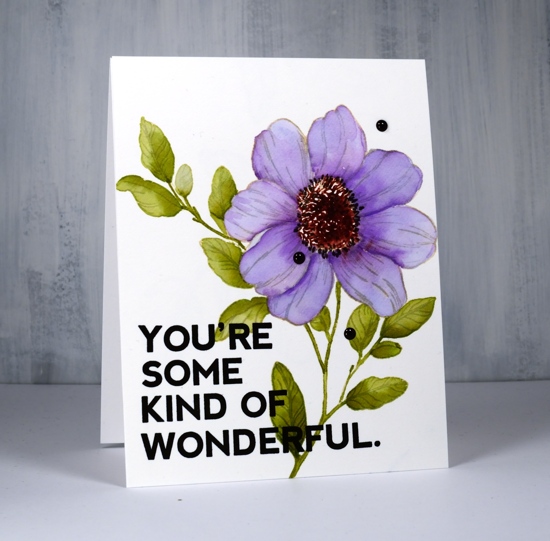
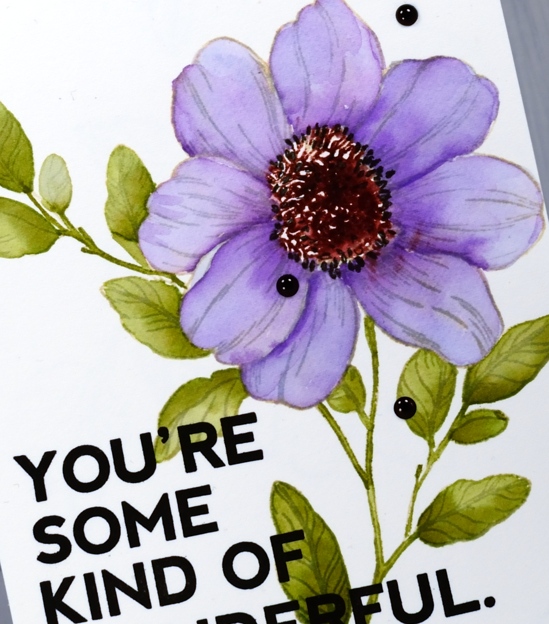
This pretty flower is from ‘The Stamp Market’ and the set is called ‘some kind of wonderful’ which is the cute sentiment included in the set. I decided to do some no-line watercolour to get myself back in the zone. I used antique linen distress ink because it works well to provide a pale outline to paint over and blends fairly well with most colours I might choose to paint with. It disappears better when painted with some colours than others. I added green to the leaves and the stamping turned green; I added lilac to the petals and the stamping remained light brownish. So it’s not perfect but I’m happy with the results.
I painted the leaves first with diluted peeled paint distress ink. I just smoosh the inkpad on my glass mat, add a little water and there’s my ‘watercolour paint’. I can make it lighter by adding more water or darker but not diluting it at all. I painted over the stem with undiluted ink and a brush that came to a nice pointy tip. Don’t try this if your brush doesn’t come to a nice pointy tip, you won’t be happy. Alternatively you can go over the stems with a matching marker.
I kept the stamp and hot pressed watercolour panel in the misti as I worked so I was able to re-ink the middle of the flower with aged mahogany ink and stamp that for a dark centre. I blended the mahogany ink a bit with water but not too much because I wanted to keep some of the stamped detail.
I let the leaves and centre dry completely while I ate lunch then returned to work on the petals. I painted them all with shaded lilac, let them dry then added some depth with a mix of shaded lilac and wilted violet. When the petals were almost dry I drew little ‘carpels’ (maybe?) with a black soot distress marker. Drawing them in made it possible to neaten up the area between the flower centre and the petals which was a little scrappy and untidy.
I decided to use the sentiment included in the set and in doing so discovered something very nifty. The sentiment that I thought was all joined together is actually four different stamps! I know! How handy is that? I occasionally do stamp surgery or tricky masking to get the word ‘you’re’ to be part of a sentiment combo. Now I have a stamp that says YOU’RE! (and one that says SOME and one that says KIND OF and one that says WONDERFUL) Isn’t that wonderful? I am thinking of all possibilities… Anyway I stamped the sentiment boldy in versafine onyx black and then added some black enamel dots to balance out that black boldness.
Hello and welcome to Studio Katia 3rd Anniversary Blog Hop! You should have arrived here from May Sukyong Park‘s blog. I am excited to be celebrating with Studio Katia and to be featuring this gorgeous stamp, ‘Floral Garden‘. It’s a beauty and perfect for a range of different techniques. This new release includes 5 new Clear Stamp Sets and 1 set of Coordinating Dies, 1 new Stand Alone Creative Die, 2 new Stencils and lots of new Embellishments!
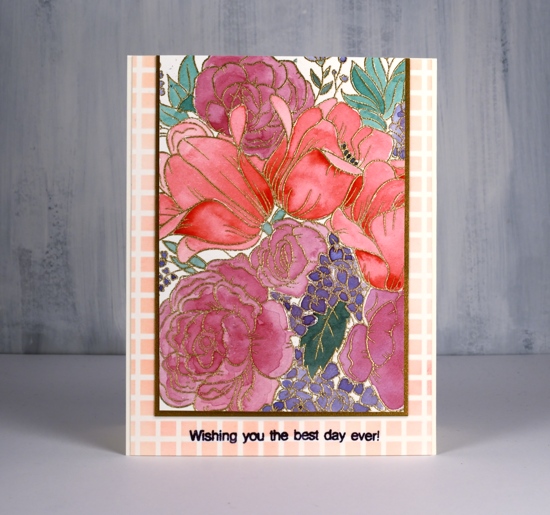
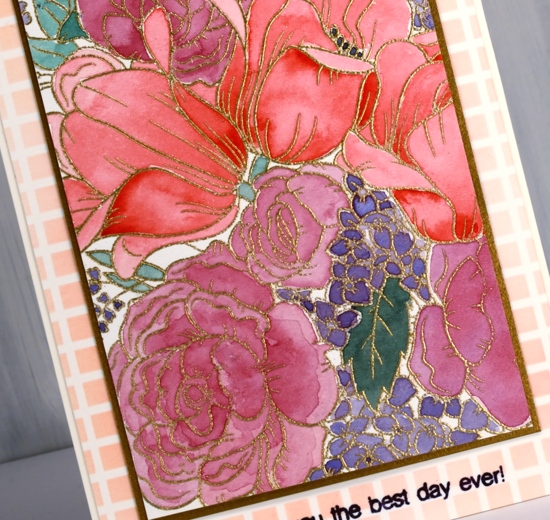
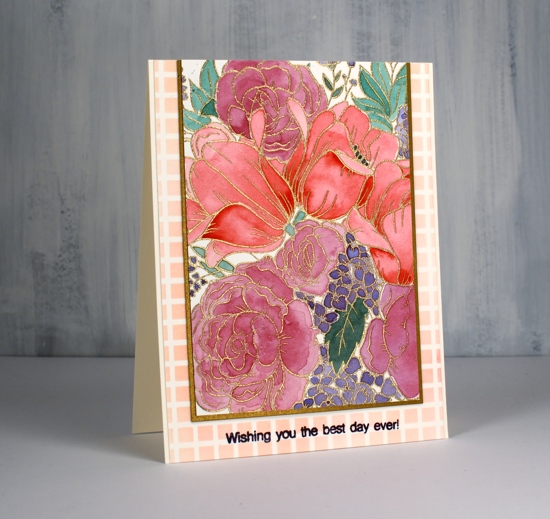
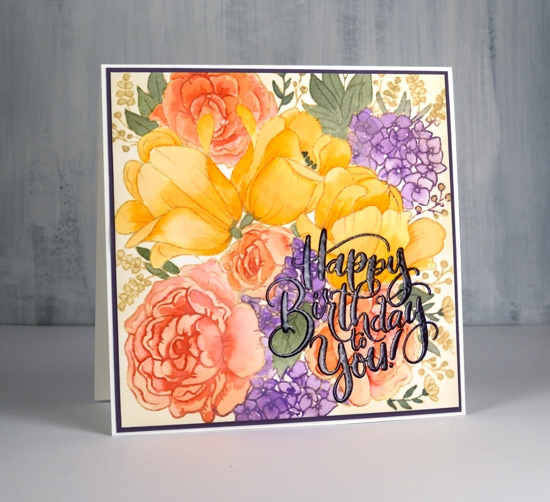
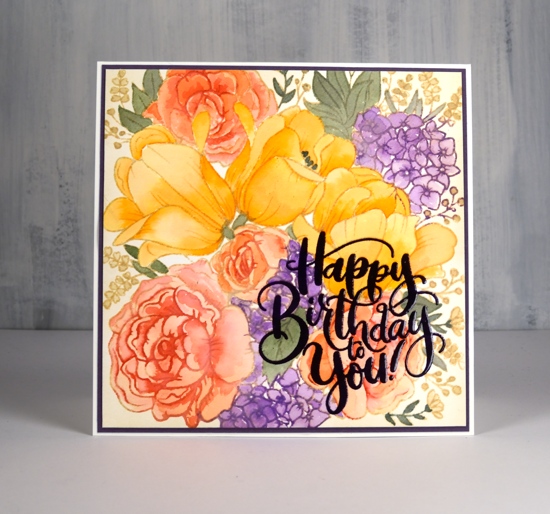
I used the emboss resist technique for one panel and no-line colouring for another. The stamp is a large square so I had the option of creating a big square card or a smaller rectangle card with a portion of the stamped design. I embossed the outline stamp in gold powder on hot pressed watercolour paper then did all the painting with my Sennelier watercolours. I’ve talked about colour choices on the blog before especially about keeping the colour count low to keep things looking cohesive.
I started by painting the tulips in red straight from the pan but all the other colours are mixed, usually with a bit of the original red, that way they work well beside each other. I used a green paint mixed with a little red, a purple/red mix on the roses then a blue/purple mix on the tiny flowers.
I trimmed the panel down and matted it with gold cardstock to match the embossing then layered it on a panel stenciled with festive berries ink through the SK grid stencil . I added a sentiment in dusty concord archival ink using a little stamp from the new ‘Its your birthday‘ set.
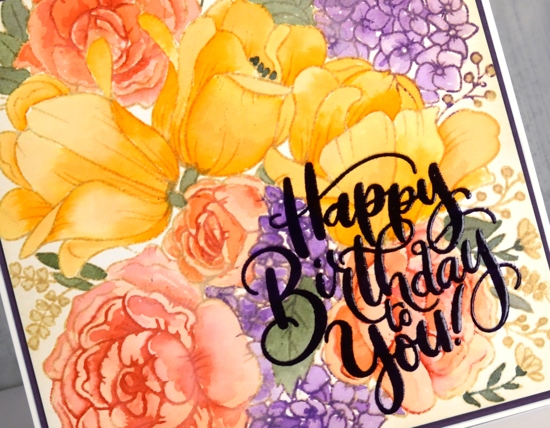
The no-line watercolour panel I stamped in antique linen on hot pressed watercolour paper. I used distress inks as paint by pressing them face down on my glass mat. I used wild honey and carved pumpkin inks for the tulips then mixed some wild honey with festive berries for the roses. As I kept my panel in the stamp positioner while painting I was able to ink the roses lightly with festive berries after I’d done some painting and re-stamp the outline for added definition. I painted the little flowers in wilted violet ink and over-stamped with the same ink so the outlines would be a little darker. I used two greens (iced spruce and bundled sage) for the leaves mixing them into darker and lighter tones. The tiny bell flowers around the edges are painted in antique linen. I also blended antique linen around the edges of the panel.
The sentiment is from the same ‘It’s your birthday’ set and I love that pretty lettering! I stamped in monarch versafine clair ink, clear embossed then stamped again in versamark and embossed once more in clear powder to make it extra shiny. Thanks for joining me today; keep reading for all the ways to win during this blog hop which runs today and tomorrow. Studio Katia has provided a $25 gift certificate for me to give away. Just leave a comment below to be in the running.
For more chances to win visit all the stops along the hop. Your next stop is with the wonderful Laura Bassen. If you get lost you can find the full hop list below or visit Studio Katia Blog!
There will be a $25 Gift Certificate offered at each stop of the Blog Hop
To celebrate Studio Katia is giving away TWO $50 CAD Gift Certificates every day of the Blog Hop! Winners will be chosen randomly from comments left on Studio Katia Blog.
All comments must be left by Saturday, June 22nd, 2019 21:59 PM EST.
All winners will be announced on Sunday, June 23rd, 2019 on the Studio Katia Blog.
Ready to get hopping? Here’s the complete Blog Hop List:
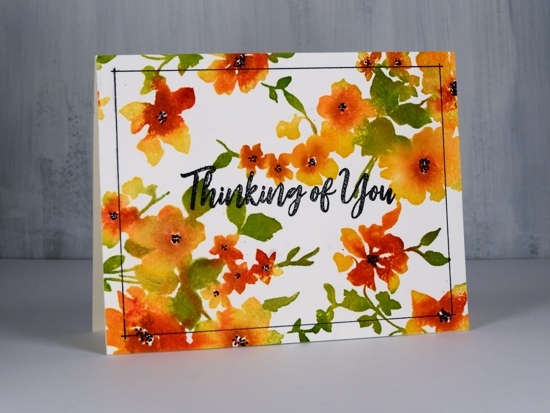
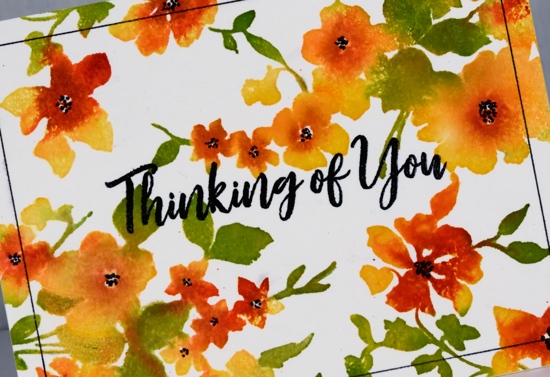
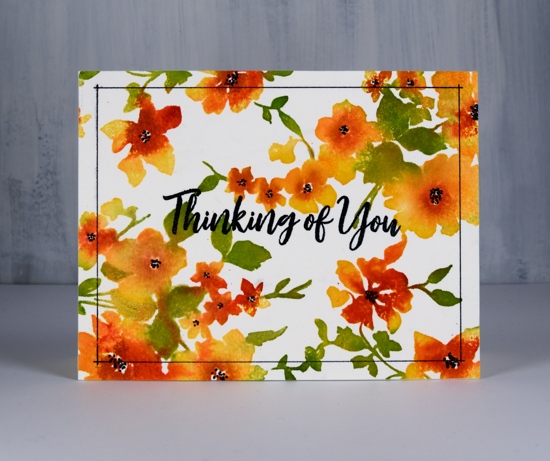
I’m still in yellow-orange-red mode, quite unusual for me. I can assure you the blues and pinks will return! I’ve been wanting to ink up the lovely floral background from The Stamp Market again ever since I gave it the rainbow treatment. With the stamp in the MISTI I stamped first with Catherine Pooler shea butter ink on hot pressed watercolour paper. Next I did partial inking with CP samba ink. As you can see I wasn’t particularly accurate with the second colour but I did try to apply it to flowers not leaves. I spritzed the stamp and stamped again. I switched over to leaves and inked them with CP eucalyptus ink, spritzed and stamped again.
I had managed to catch a lot of the leaves with the ink pad but not all so I switched techniques and pressed the eucalyptus ink onto an acrylic block and picked ink up with a brush to apply to the smaller leaves and stems on the stamp. This worked really well so I pressed the ‘rockin red’ ink on the acrylic block also and used a paintbrush to apply it to the centres of the flowers. There is quite of bit of bleed from one flower or leaf to the next but the overall effect is semi realistic.
I added black centres to the flowers with a black fine tip marker and they popped nicely so I decided on a black embossed sentiment too, it’s from MFT brushstroke expressions. When I embossed the black sentiment in clear powder it also stuck to the flower centres which I wasn’t expecting, giving them a little shine. At this point I was almost happy but not convinced the design was finished. It needed…a frame! I pulled out my new ‘stay-tion’ magnetic board and the black fine tip marker. Lining up frames and borders like this is one of the reasons I really like the new magnetic board. I lined up my panel with the grid on the board, held the panel in place with magnets then positioned the magnetic ruler across the panel ¼” from the edge. I was able to line up the ends of the ruler with the ¼” grid on the board and ruled a thin black line on each side. So satisfying to not mess that up!
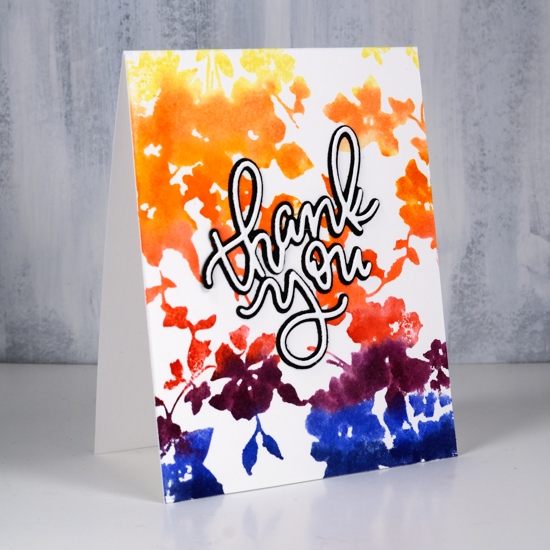
I don’t know how many of you follow Laura Bassen’s blog or youtube channel but if you do you will know where today’s inspiration came from. Nine times out of ten you will find her blending, stamping, painting or piecing a rainbow on her cards. I rarely include the whole spectrum on my cards; I’ll blend from pink to blue or blue to green or yellow to pink but not too many rainbows. I decided this full background stamp from The Stamp Market was a good place to start.
I embossed the whole design on hot pressed watercolour paper using my misti and a sticky grid. Sticky grids are so useful with a large stamp and panel. The grid kept the watercolour paper in place while I stamped with versamark three times. The stamp is large and detailed so I wanted to make sure I got a really good impression, hence the three applications of versamark. I embossed in clear then taped the panel to my glass mat and swiped distress stains across the panel in rainbow order, light to darkest. I still have quite a few distress stain daubers so I used them but you could paint distress stain or reinker across your panel with a paint brush instead of using daubers. I spritzed the panel after I’d applied all the colours and used a paintbrush to blend between colours in a few places. I decided not to dry it with a heat tool because I didn’t want to push any of the stain around the panel, instead I let it air dry and polished stain off the embossing later with a paper towel.
While I had the stamp and stains out I did the negative of the first card and swiped the stains across the stamp before spritzing a little water to start the blending process. I used the MISTI to press the stamp down on my hot pressed watercolour paper and could see through the transparent stamp where the blending was happening.
Another technique I haven’t used before is the layered shadow die sentiment. I haven’t had any shadow dies but the Foiled Fox sent me this one and I did a black on white and a white on black to make the sentiments stand out on both colourful backgrounds. I added double sided adhesive sheets to both black and white cardstocks before die cutting to make it easier to attach the sentiments to the cards.