
Dried Grasses
Posted: August 23, 2015 Filed under: Nature's Gifts, Stamped Landscapes | Tags: Penny Black stamps 5 Comments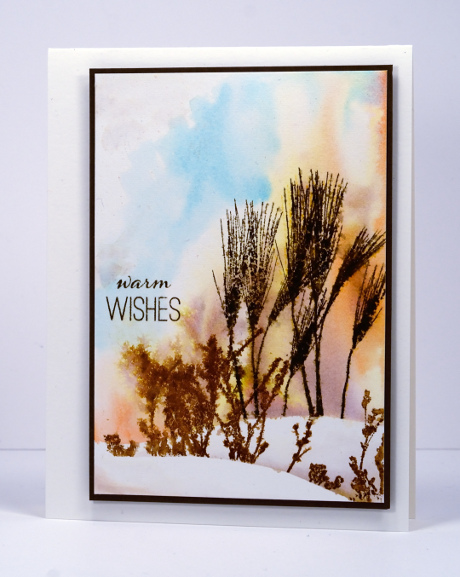
I have another wintry scene to share with you depicting a sunrise and some dried grasses in the snow. Now that I look at it again I realize the background is not unlike a bush fire scene. Not what I was aiming to create! Let’s just stick with snow shall we?
I masked the bottom snow banks with frisket film to keep them white while I painted the sky area using wet into wet techniques and distress stains. When the sky was almost dry I stamped the grasses, moved the snow mask, stamped some more grasses then spritzed so the colour would bleed a little. Even though grasses look brown and dried out in the winter, they often look very delicate and pretty against a snowy back drop, especially when they have a glistening layer of snow balancing on them. Everything is still green and blooming round here so I will try and post a few more summery cards before it’s all golden leaves and pumpkins!
Supplies:
Stamps: Nature’s Gifts, Joyfilled (PB)
Inks: Vintage Photo, Walnut Stain distress inks & Ripe Persimmon, Scattered Straw, Tumbled Glass distress stains (Ranger)
Cardstock: Fabriano 100% cotton hotpressed watercolour paper
Holly Tweet
Posted: August 22, 2015 Filed under: Holly Tweet, Prancers | Tags: Fabriano Watercolour Paper, Penny Black stamps, Ranger Distress stains 12 Comments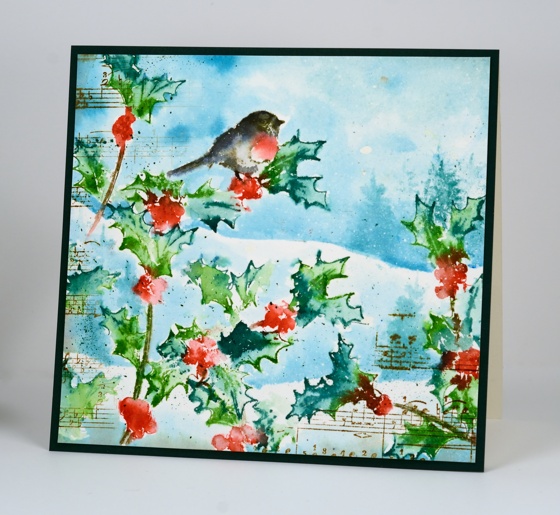
Today’s card is a larger than usual square card stamped with the new ‘Holly Tweet’ stamp. I only wanted one bird so I inked and stamped the holly part several times with distress stains taking care to wipe any water or stain off the bird part of the stamp before each impression. On the last impression I inked the bird as well. The stamp is a sketch style outline stamp so I pulled colour from the outline as well as adding colour with a brush. Once the stamping was dry I painted the snowy hills in the background and stamped some pale trees in the same colour as the sky. I added a few bars of music to frame the scene. A sentiment would easily fit in the top right corner but I decided to leave it blank; sometimes it is nice to send a little painting on the front, leaving all the words for the inside. To see the versatility of the stamp visit the PB blog and check out Pete Roven’s gorgeous card. I am in awe of her fussy cutting and the way she skillfully layers papers and dies to build beautiful scenes.
Supplies:
Stamps: Holly Tweet, Prancers, Music Background (PB)
Inks: Mowed Lawn, Pine Needles, Festive Berries, Chipped Sapphire, Tumbled Glass, Broken China, Frayed Burlap, Barn Door, Black Soot, Vintage Photo distress stains/markers(Ranger)
Cardstock: Fabriano 100% cotton hot pressed watercolour paper, Deep Green cardstock
Also: Winsor & Newton masking fluid
Poinsettia panel
Posted: August 19, 2015 Filed under: Bursts of Red, Footnotes, Sparkler 10 Comments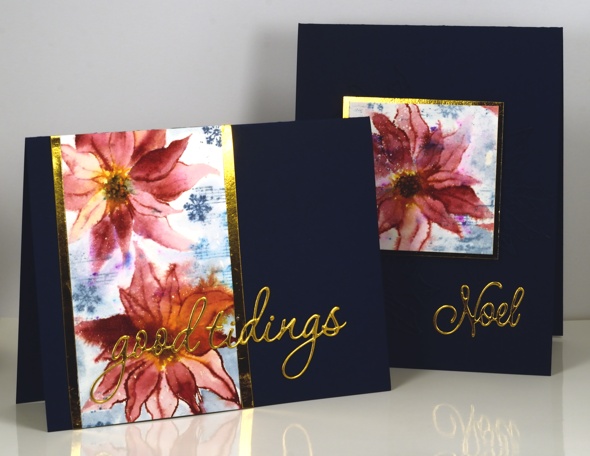
I played around with a poinsettia stamp from last year’s Christmas release to create these cards. My plan was not to create two cards. Well to be honest I didn’t really have a plan; I just taped down a piece of watercolour paper and started stamping. All the stamping was done with distress stains which enabled me to fill in all the petals by either pulling stain from the outline image or adding it where extra was needed. After the poinsettias were painted I drew the centre clusters with a marker as it had been blended over. I treated the panel more as patterned paper than a ‘picture’ by adding some music and snowflakes in blue then painting over them to spread colour into the surrounding area.
Because of my lack of planning the finished panel did not really work as a square or wide rectangle so I sliced it up and was able to make two cards. I had some gold foil cardstock scraps which worked for matting and sentiments but the little square piece needed more than the pop of gold. It is quite hard to see but if you click on the card below you might just make be able to make out the navy die cut poinsettias I arranged behind the patterned panel.
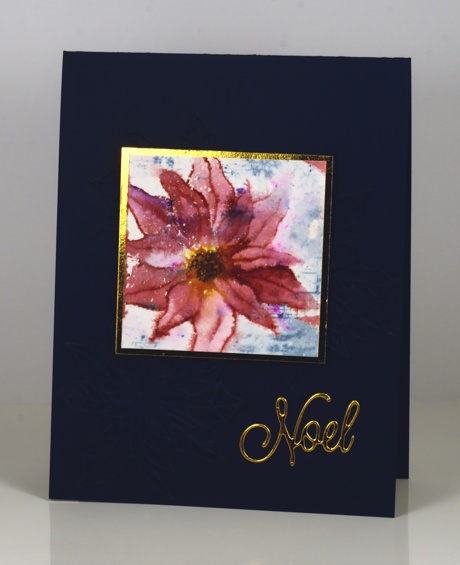
Pink, blue and gold is an unusual colour scheme for Christmas but I think it works. What colours are you reaching for when making this year’s Christmas cards?

Supplies:
Stamps: Sparkler, Footnotes, Hello Winter (PB)
Creative Dies: Good Tidings, Bursts of Red, Exultations(PB)
Inks: Aged Mahogany, Mustard Seed, Salty Ocean, Stormy Sky, Black Soot distress stains/markers(Ranger)
Cardstock: Fabriano 100% cotton hot pressed watercolour paper, Neenah Patriot blue, Gold foil cardstock
Also: Winsor & Newton masking fluid
#Pink Coat in New York
Posted: August 16, 2015 Filed under: On the Town, Skyline, Stamped Landscapes | Tags: Penny Black stamps, Tsukineko Memento inks 22 Comments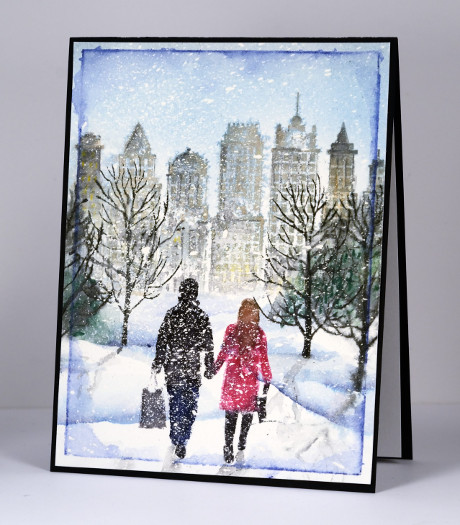
I have another card for you created back in the dead of winter for a Dirty Dozen gallery on Splitcoaststampers. I had already created a NY skyline card the previous month but this I did this one when the theme was ‘For the love of friendship’ and it has a little story to go with it. I made other cards with the theme of friendship in mind but this card was made for one special friend.
When I found out my husband and I were going to New York City for our 25th wedding anniversary (the trip was a gift from our children) I asked my friend, Nan if I could borrow a coat. Despite living in Canada for 14 years the only coat I own is a ski jacket and I was not going to New York with my old ski jacket. My friend Nan, on the other hand has the most extensive coat collection I have ever seen. I borrowed a bright pink wool coat and it was freezing in NYC when we visited so I wore that coat all day long for four days. We took pictures on the Empire State, at the Metropolitan Museum of Art, in Saks 5th Ave and in Central Park. I put some of them on my instagram with the #pinkcoatinNYC so my friend could see the fun her coat was having. Sadly I handed the coat back after the trip with this thank you card. The coat on the card actually turned out looking like the real thing. In real life though my husband is taller 😉
I created this scene on watercolour paper generously splattered with masking fluid so I could get the snow storm effect. I inked the stamps with memento markers then added shading and blending with a paintbrush and watercolour pencils.
It’s bizarre to post this card while it is 31°C outside!
Supplies:
Stamps: Skyline, On the town (PB)
Inks: Memento London Fog, Dandelion, Tuxedo Black, Danube Blue, Rose Bud, Northern Pine, Summer Sky(Tsukineko)
Cardstock: Fabriano 100% cotton hotpressed watercolour paper, Epic Black cardstock(Neenah)
Also: Winsor & Newton masking fluid, Kemper spatter brush, Albrecht Durer watercolour pencils
Winter Sunset
Posted: August 13, 2015 Filed under: Etched Branches, Prancers, Stamped Landscapes | Tags: Faber-Castell Albrecht Durer Watercolour pencils, Fabriano Watercolour Paper, Penny Black stamps 11 Comments
I have another wintry scene today created back in January when it really did look like this outside! I used painter’s tape to mask the edges of the watercolour panel then frisket film to mask the snow while I painted the sky with colour picked up from my watercolour pencils. I stamped some trees before moving the frisket mask down to create more snow banks. Before I moved the frisket film each time I added twigs and scrub in the snow banks by stamping parts of the ‘Etched Branches’ stamp. Frisket film is a plastic film which is waterproof and sticky on one side making it perfect for masking with wet mediums like watercolour.
Occasionally I am asked in classes what to do when paint seeps under the masking tape around the edges of a panel. You can see it did so in a few places on the one above. Often I will do nothing and it will have some uneven edges to add to its uniqueness. If it looks too messy or unbalanced I sometimes trim or add a die cut to cover the offending area.
Don’t forget to keep checking the PB blog if you are interested in the new products from the ‘Especially for You 2015’ release. There are new cards everyday and a chance to win some new stamps and dies.
Supplies:
Stamps: Etched Branches, Amazing, Prancers (PB)
Inks: Walnut stain distress ink (Ranger)
Cardstock: Fabriano 100% cotton hotpressed watercolour paper
Also: Faber Castell Albrecht Durer watercolour pencils, Graffix frisket film
Snowy Hillside
Posted: August 11, 2015 Filed under: Tannenbaum | Tags: Penny Black creative dies, Penny Black stamps, Ranger Distress stains 9 Comments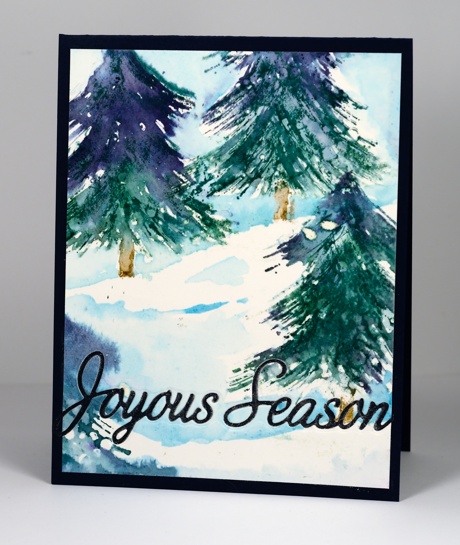
The fun continues on the Penny Black blog today with more new dies on display. I have another new die featured on today’s card; ‘Joyous Season’ will be available along with the remainder of the new release on August 25th.
I made my little scene with the Tannenbaum stamp again, inking with both green and blue stains and painting the sky and snowdrifts with lighter blue stains. My watercolour paper was splattered with masking fluid before I began and then rubbed off when all the ink was dry. Because I was mounting the panel on a dark blue card base I decided to die cut the sentiment straight out of the panel. It is barely noticeable in the photo but I went over the revealed blue letters with a clear wink of stella marker to give them a little sparkle.
Supplies:
Stamps: Tannenbaum (PB)
Creative Dies: Joyous Season (PB)
Inks: Chipped Sapphire, Pine Needles, Tumbled Glass, Broken China, Vintage Photo distress stains(Ranger)
Cardstock: Canson 100% cotton hot pressed watercolour paper
A Very Merry
Posted: August 10, 2015 Filed under: A Very Merry | Tags: Fabriano Watercolour Paper, Penny Black creative dies, Penny Black stamps, Ranger Distress stains 3 Comments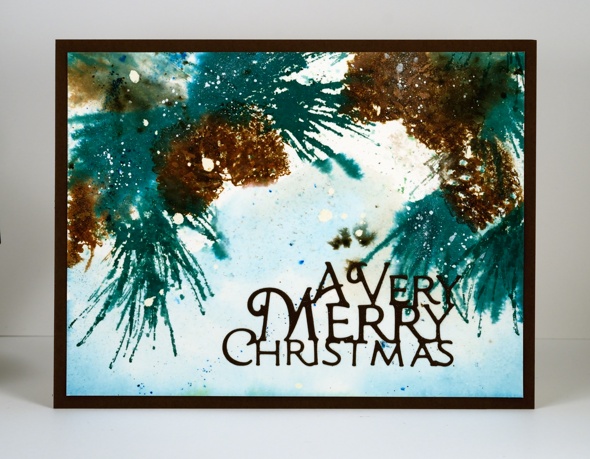
On the Penny Black blog for the remainder of August you can see one new product after another as the ‘Especially for You 2015’ release is revealed. This week is all about new dies and there are a whole stack of new word dies featured on the PB blog today. One of the new word dies happens to be ‘A Very Merry’ on my card above. The pine bough is a new stamp too but I can give you details about that another day. There is a giveaway to coincide with the new release too so pop over to the blog.
If you have visited here before you will know my watercoloured cards range from quite neat and controlled to rather free, watery and loose. This is one of those loose ones that almost didn’t make the cut. However there was something about it, just enough definition in a couple of pine needles and cones to keep me from tossing it. It is stamped and painted on watercolour paper splattered with masking fluid. Before I stamped any images I spritzed some water and some spots of distress stain over the panel. I painted some tumbled glass distress stain also to fill in parts of the background. I let it dry a little before inking the pinecone stamp with distress stains and stamping it three times. It was quite wet so I dropped some bister powder into the wet areas to give some extra depth of colour. When it was almost dry I stamped over the initial images to add more definition in a couple of places. To complete the card I attached the panel to a dark brown card base and die cut the sentiment out of the same colour.
Supplies:
Stamps: Brush Pines (PB)
Creative Die: A Very Merry(PB)
Inks: Pine Needles, Evergreen Bough, Vintage Photo, Tumbled glass, Black soot, Gathered twigs distress stains/markers/inkpads (Ranger)
Cardstock: Fabriano 100% cotton hot pressed watercolour paper & Brown card
Also: Blue and Green bistre powder, Winsor & Newton masking fluid.
Winter view
Posted: August 8, 2015 Filed under: Prancers, Skyline, Stamped Landscapes | Tags: Fabriano Watercolour Paper, Penny Black stamps, Tsukineko Memento inks 6 Comments
Here is another wintry scene I created back in January for Splitcoaststampers. My first month with the Dirty Dozen was January and all the projects had to be finished and uploaded by the 13th. When I was planning my time and projects I did not know our children had planned a trip for my husband and I to celebrate our anniversary and birthdays. They had purchased air tickets, broadway tickets and a hotel room in New York for four days! Some cards were finished before I left on January 6th and a couple, including the one above, were finished when I returned. Inspired by our trip I created this card for the ‘All Cooped Up’ theme and could not imagine a better place to be cooped up in winter than an apartment overlooking Central Park. As you can see from our photo we enjoyed walking through the park in bright sunshine. Freezing cold but sunny.
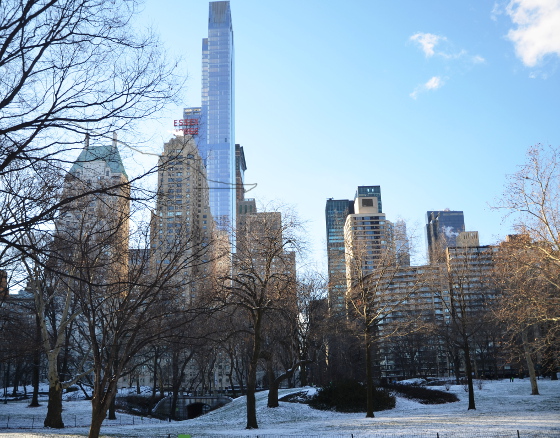
To create this scene I splattered masking fluid on watercolour paper with a spatter brush, then, when it was dry stamped partial imprints of the skyline stamp spritzing both the stamp and paper to make sure my colours blended. I used a brush to pick up and add more colour around the buildings to create the impression of a grey day. Before stamping the bottom buildings I added a snow bank mask so the base of the buildings and the trees would appear behind it.
Supplies:
Stamps: Skyline, Summer Fun, Prancers (PB)
Inks: Memento London Fog, Tuxedo Black, Paris Dusk (Tsukineko)
Cardstock: Fabriano 100% cotton hotpressed watercolour paper, Epic Black & Solar White cardstock(Neenah)
Also: Winsor & Newton masking fluid, Kemper spatter brush
Tannenbaum trio
Posted: August 6, 2015 Filed under: Stamped Landscapes, Tannenbaum | Tags: Bister, Penny Black stamps, Ranger Distress stains 10 Comments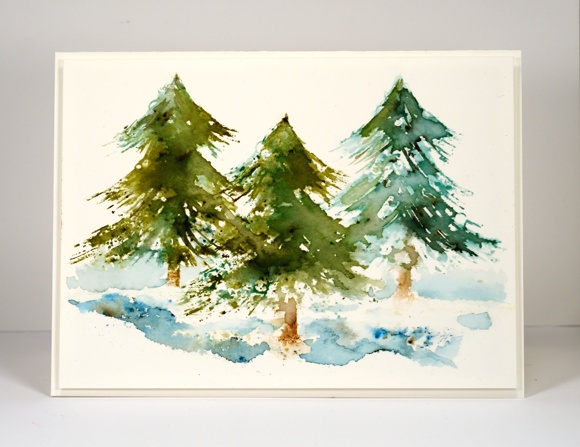
I had a look through my supply of Christmas stamps this week to find some tree stamps to experiment with. I love the ‘before the snow’ tree but it is nice to mix things up a little. Someone said at my class tonight, “You can never have too many tree stamps,” an opinion I entirely agree with. The tree stamp above comes with a decorative topper which I surgically removed ( don’t worry, I kept it in case I need it). I stamped each tree with distress stain first then painted over the stamping with a paintbrush. Next I added some bister and stamped again with water. I did the other trees the same way but varied the original stamping colour so the trees would all look a bit different. The bister moves differently each time which makes the trees more interesting. I painted some water below the trees and added bister powder to create snow banks. Often I will add blue for the sky and a sentiment but I was happy with this one the way it was so I didn’t risk messing it up with further stamping or painting.
By the way there is a brand new challenge on One Layer Simplicity hosted by our talented team member, Karen Dunbrook. It is called Strip Down, you had better check it out to find out exactly what’s required!
Supplies:
Stamps: Tannenbaum (PB)
Inks: Evergreen Bough, Forest Moss, Vintage Photo, Gathered Twigs distress stains/marker (Ranger)
Cardstock: Canson 100% cotton hot pressed watercolour paper & Green card
Also: Blue and Green bistre powder
Cosy Cottage
Posted: August 4, 2015 Filed under: Christmas Cottage | Tags: Fabriano Watercolour Paper, Penny Black stamps, Ranger Distress inks 11 Comments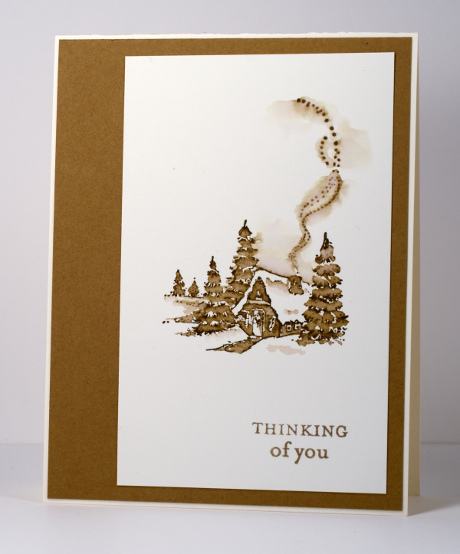
From January to June this year I was honoured to be a member of the Dirty Dozen at Splitcoaststampers. My term on the team is over now but I will forever be a Dirty Dozen Alumni which brings its own opportunities and privileges. Right now there are all sorts of challenges going on especially for fan club members. Alumni have dreamed up wonderful projects and multiple challenges are being released each day.
While I was a member of the Dirty Dozen I created projects with a different theme each month. This is one of the first cards I shared; the theme was “All Cooped Up”. I made it during the bleak midwinter, a far cry from our current hot midsummer! I stamped with one ink then pulled colour from the stamped image with a small paintbrush to fill in the trees, cottage and path. I kept it clean and simple when finishing the card by matching the ink colour exactly with a cardstock mat.
Supplies:
Stamps: Christmas Cottage, Enjoy Life (PB)
Inks: Vintage Photo Distress Stains (Ranger)
Cardstock: Fabriano 100% cotton hot pressed watercolour paper, Neenah Natural White 110lb card stock, Tan cardstock


