
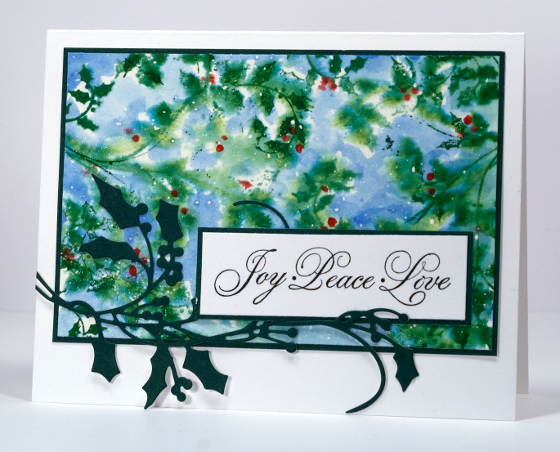
Watercoloured Holly
Posted: December 9, 2013 Filed under: Flourish Holly, Holly Berries, Watercolour | Tags: Fabriano Watercolour Paper, Penny Black creative dies, Penny Black stamps, Tsukineko Memento inks 7 Comments
A week of Winter Wonderland on the Penny Black blog starts today featuring the snow scapes I love to create.
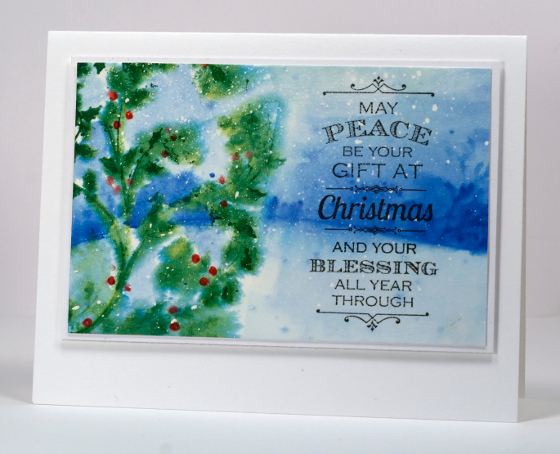
To make today’s cards I created one watercoloured panel which I then cut into two for a wintry scene and a holly background. I flicked masking fluid over the watercolour paper with a toothbrush and let it dry completely. I then wet the whole panel before stamping the holly stamp several times to fill two thirds of the area. The ink bled into the wet paper losing most of its definition. I added berries with a red marker then reinked parts of the holly stamp in green to stamp over the blended green of the first impression. To complete the snowscape I painted a blue watercoloured background stamping a little branch stamp to create a blurred distant wooded area behind the holly and snow. When I want to paint with Memento ink I press the ink pad onto an acrylic block so I can add water and pick up the ink with a paintbrush. Finally I removed the masking fluid, matted both panels and added die cut holly to the card below.
Supplies:
Stamps: Flourish Holly, A better world, Glad Tiding, Season’s Wishes (PB)
Creative Dies: Holly Berries die 51-019
Inks: Memento Cottage Ivy, Danube Blue, Love Letter & Versafine Onyx Black (Tsukineko)
Cardstock: Fabriano 100% cotton hot pressed watercolour paper, Penny Black mix & match Spring Meadow
Also: Winsor & Newton Masking Fluid
Very Vintage Christmas
Posted: December 6, 2013 Filed under: Background Stamps, Christmas Notes, Holiday Collage, Winter Scroll, Winter Village 7 Comments
Not my usual Christmas card or colours that’s for sure. It does seem vintage in it’s emblems and colour scheme but at the same time it reminds me of a wild west wanted poster! We have friends at church who have horses and love all things western so I think this will be their Christmas card.
I often create my own collages by combining a couple of background or pattern stamps with a couple of images. Penny Black has several new Christmas collages that do all that for you. I have used the Christmas Notes collage stamp in the background on the right hand side of the card and repeated the pattern stamp from Holiday Collage on the left hand side. The edges of both the panel and the card base have been darkened by sponging with Memento Espresso Truffle ink on cream cardstock.
The One Layer Wednesday challenge is all about “Love” this week and you can find it on Susan’s blog.
Supplies:
Stamps: Winter Scroll, Christmas Notes, Winter Village , Decadence, Holiday Collage (Penny Black)
Inks: Espresso Truffle, Desert Sand (Tsukineko)
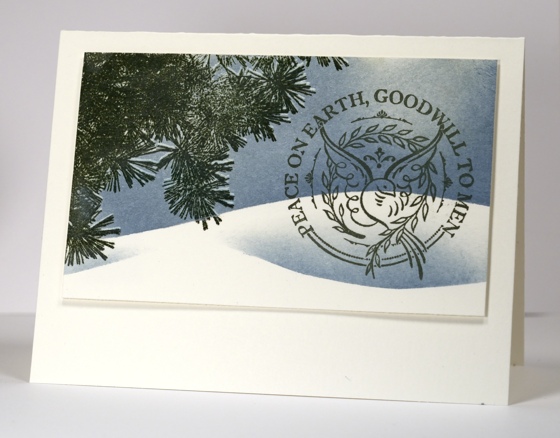
Tannenbaum – the candy cane edition
Posted: December 5, 2013 Filed under: Stamped Landscapes, Tannenbaum 7 Comments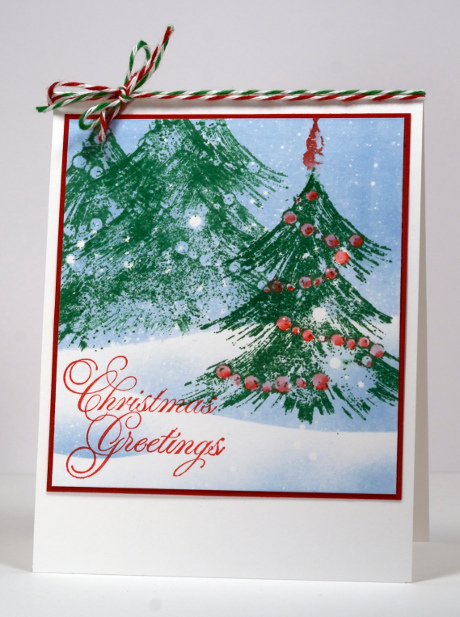
Another snow scene for you today but somewhat simpler than the storm from earlier in the week. I started once again, with a panel that had masking fluid flicked on it. After positioning a hill shaped mask I brayered Memento summer sky ink over the top of the card. Before moving the mask I stamped the Tannenbaum stamp several times with Cottage Ivy ink. I removed the mask and repositioned it to sponge a hollow in the snow for the feature tree also stamped in Cottage Ivy. I repositioned the mask one more time and sponged a small section to create one more little hollow then add the sentiment in Versafine Satin red and the balls with a Memento Lady Bug marker. I gently rubbed off the masking fluid to reveal the falling snow.
The pretty baker’s twine from The Twinery matched perfectly and reminds me of candy canes.
Supplies:
Stamps: Tannenbaum, Season’s Wishes (PB)
Inks: Memento Summer Sky, Cottage Ivy, Lady Bug & Versafine Satin Red (Tsukineko)
Also: Winsor & Newton Masking Fluid, Baker’s Twine Maraschino, Peapod (The Twinery)
Watercolour pointsettia
Posted: December 4, 2013 Filed under: Warm Wishes, Watercolour | Tags: Penny Black stamps, Ranger Distress stains 23 Comments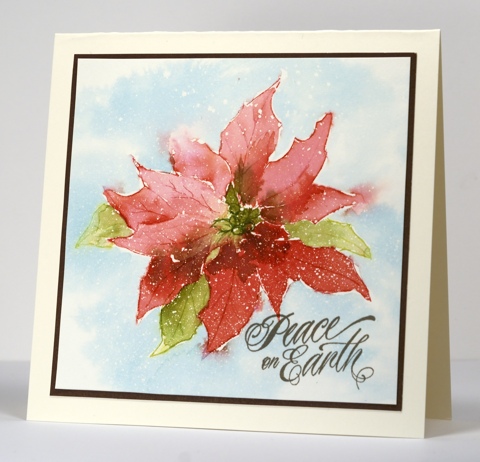
I do not have another snow scene for you today but my pointsettia does feature masking fluid “snowflecks”. I used a watercolour block for this panel and flicked masking fluid over it with a tooth brush. I used distress stains for the first time along with some memento greens. The pointsettia is stamped with Barn Door distress stain. The impression was pale and incomplete at the tips of a few petals which was perfect for what I planned to do. The stamped image was my guide for watercolouring but I didn’t want it the outline to dominate. As I wanted to paint with the distress stains I pressed the bottle’s sponge top down several times onto an acrylic block which I was using as a palette then picked up the ink with a paintbrush. I painted the lower petals with barely diluted stain and the top petals with a blend of water and stain. After I had painted them all red I realised I wanted some green outer ones so I stamped one lightly with memento pear tart ink and drew the others with a pear tart marker. I added brown ink to the areas I wanted to be shadowed and used a marker to redefine the centre of the flower. To create a background I painted water around the poinsettia then painted Broken China stain into the wet areas. The card is 5.5″ x 5.25″.
Thanks for all the lovely comments about my snow storm card. For those who are new to Bits & Pieces you can find all the tutorials I have done here: https://cardz.wordpress.com/category/tutorial/
Supplies:
Stamps: Warm Wishes, Hello Winter (PB)
Inks: Distress stains Barn Door, Peeled Paint, Broken China, Vintage Photo & Memento inks Bamboo Leaves, Pear Tart & Versafine Vintage Sepia
Cardstock: Fabriano 100% cotton hot pressed watercolour paper, Mix and match Grand Canyon paper
Also: Winsor & Newton masking fluid
Snow Storm
Posted: December 3, 2013 Filed under: Berry red snow white, Nature's Song, Stamped Landscapes | Tags: Penny Black creative dies, Penny Black stamps, Tsukineko Memento inks 20 Comments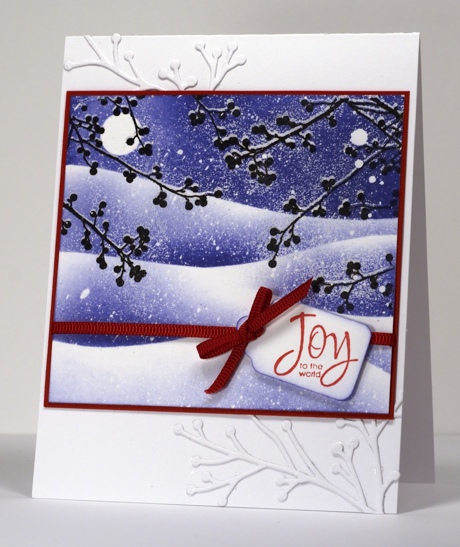
This little scene ended up being considerably snowier than I first thought it would be, hence the title. I double embossed the branches using the method shown here. Extra embossing powder stuck on and around the masking fluid droplets creating the appearance of very fine snow over most of the panel. The moon and snow banks were masked after the embossing using post it note masks. I did all the sponging with one colour, Memento Paris Dusk, and knew when I had finished that I needed some red somewhere to add a little contrast. I played around with adding a little red bird but seriously, what bird would be out in the snow at night during a storm? The answer was to add the sentiment in red. After messing it up on the panel I restamped and punched the sentiment out with a tag punch and totally covered my mistake.
To finish the card I tried several positions for the panel. To position it up the top or at the bottom meant leaving a large empty white space. I don’t usually mind doing that but neither up nor down looked balanced. In the middle looked better especially with a little texture above and below the panel.
Supplies:
Stamps: Berry Red Snow White, A wish for Peace (Penny Black)
Inks: Memento Paris Dusk, Versamark , Versafine Onyx Black & Satin Red(Tsukineko)
Creative Dies: Nature’s Song
Also: Clear e.p., red ribbon
Watercoloured baubles
Posted: December 2, 2013 Filed under: CAS, Ornately, Watercolour 5 Comments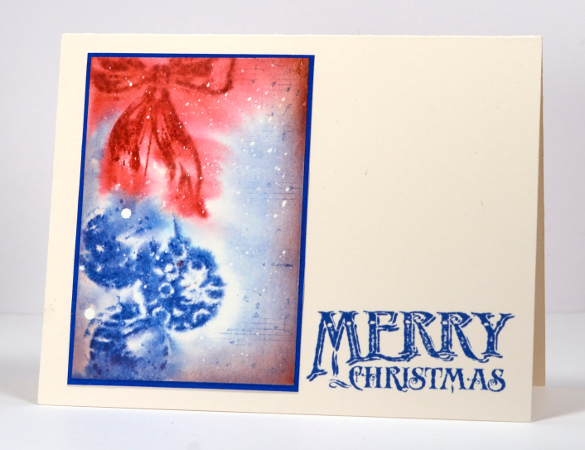
The painted panel above was done on one of the scraps of watercolour paper I like to have lying around already covered with drops of masking fluid. I try to never prepare just one but rather flick the fluid over several pieces of both watercolour paper and white cardstock. That way they will be dry and ready to use whenever I get the chance.
I painted water over the whole panel then inked the stamp from the “Ornately” set with blue and red ink. The ink blurred and bled all over the place immediately but after it had had a chance to dry off just a little I reinked and stamped again in the same place to get the soft edged image. I added the music background and some sponging around the edges. When all was dry I gently rubbed off the masking fluid , matted with blue and added a sentiment to match.
No baubles up at my place yet, how about you?
Supplies:
Stamps: Ornately, Sentimental, Music Background (PB)
Inks: Memento Love Letter, Danube Blue, Rhubarb Stalk (Tsukineko)
Cardstock: Fabriano 25% cotton hot pressed watercolour paper, Mix and match Clear Skies paper
Also: Winsor & Newton masking fluid
Holly Concert
Posted: November 21, 2013 Filed under: Holly Berries, Holly Concert, Watercolour 10 Comments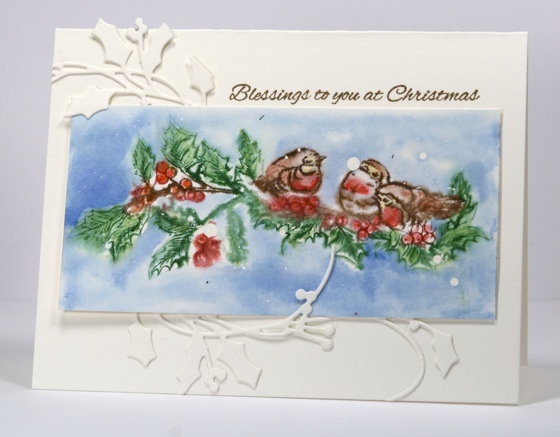
I am enjoying pairing the lovely new Christmas dies from Penny Black with the Christmas stamps. When I had finished this panel featuring the sweet little birds I wanted to frame it on the cardbase. A co-ordinating mat could have worked but the die cut holly added a bit more interest without detracting from the scene.
The white circles are “snow” made by flicking masking fluid onto the paper before I started. I applied ink to the Holly Concert stamp with markers then stamped it on wet watercolour paper so that the colours bled into each other. Using both Memento markers and inks I coloured and blended with water to fill all the images. I then restamped the image to redefine the outlines. I wet all the surrounding space and painted blue ink into it sometimes blending with the image, at other times stopping short of the image.
I am very fussy about colour matching so I have been making card bases for my watercolour cards from watercolour paper. I use 25% cotton for the card base as it is much cheaper than the 100% cotton that is my preference for painting and stamping. If I found a cardstock the right colour I would use that instead but my white is too white and my cream, too cream.
Back soon, I hope…
Supplies:
Stamps: Holly Concert, Silent Night (PB)
Creative Dies: Holly Berries
Inks: Memento Danube Blue, Cottage Ivy, Rich Cocoa, Lady Bug (Tsukineko)
Cardstock: Fabriano 100% cotton hot pressed watercolour paper, Fabriano 25% cotton hot pressed watercolour paper
Also: Winsor & Newton Masking Fluid
OLW 167 Just add water
Posted: November 20, 2013 Filed under: Christmas Harmony, OLW 11 Comments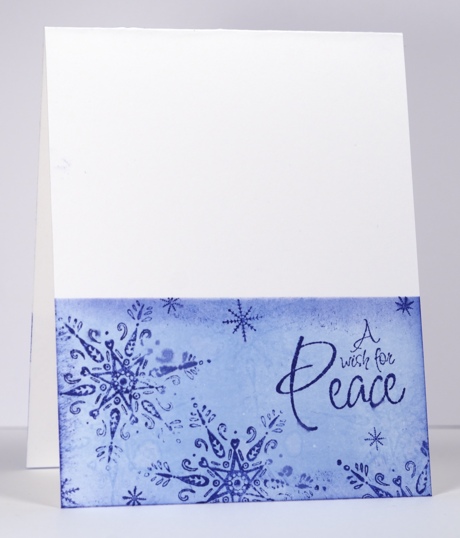
This week’s One Layer Wednesday challenge is to add water to your design some how. I chose to spritz the stamp before printing and also to flick droplets of water onto the panel.
I masked the top of the card front so I could brayer a blue base of Memento summer sky ink. I then stamped some snowflakes in the same summer sky ink; the effect is so subtle you probably can’t see it! Before stamping the snowflakes again in Memento Paris Dusk I spritzed them with water resulting in some of the smudgy images. I then added the small snowflakes and sentiments and strategically placed some water droplets to look like they fell there by chance. I sponged the edges with Paris Dusk before removing the mask.
Sorry I was not able to leave comments last month on all the submissions; there was too much going on in my life. I look forward to your submissions this month. Have fun splashing that water around!
OLW 167 Rules
1. A one-layer card is defined as a single layer of card stock folded in half. No other layers of paper allowed.
2. Make a card using water somehow in the design or process. It could be spritzing, droplets or watercolour painting.
3. Post your card somewhere online and link back to it here using the InLinkz button on the sidebar. If linking to a blog post, please be sure to link to the specific post and not your blog’s home page.
4. The most important rule of all…HAVE FUN!

Supplies:
Stamps: Christmas Harmony, Peace and Joy (PB)
Inks: Memento Summer Sky, Paris Dusk (Tsukineko)
Two snowscapes
Posted: November 19, 2013 Filed under: Pine & Star, Pine Silhouettes, Watercolour 21 Comments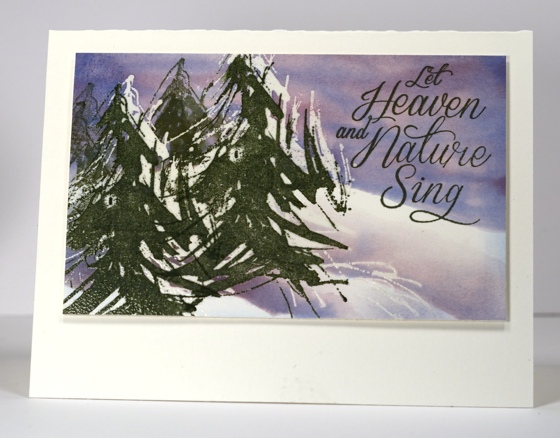
Now that it’s the weather for jackets and boots I can think about stamping snowscapes. If you have been browsing here at Bits & Pieces for a while you will know that I enjoy creating snowy scenes with ink and stamps. I created these two scenes at one sitting; one ended up quite formal and the other more relaxed. I worked on my small watercolour block. (A watercolour block is a pad of watercolour paper which is attached on all four sides with just a small area near one corner unattached so you can tear the piece off when your painting is completed.) The block is 5″ x 7″ and for these panels I divided it in two with a piece of masking tape.
To create the scene above I stamped the tree twice in versamark, then stamped it again but lower in Versafine Olympia Green. I then embossed the trees with clear powder so they would resist when I added the watercoloured sky. I wet the panel with water first but only in the area where I wanted the coloured sky. I then added blue and pink ink with a paint brush. The colours blended in the wet area but did not bleed into the dry part of the panel. I repeated this technique to create the two lower snow banks. ( I hear you; a video would be helpful )
To create the second snowscape I used the same double stamping technique mentioned above but moved the pine silhouette stamp only very slightly lower by using a stamp positioner when I stamped in green. I again embossed in clear powder then sponged blue over the branch which revealed the thin outline of snow on some of the pine needles. The snow hill and banks were done by sponging over post-it note masks with Versamagic chalk inks. Although I often create snow banks this way I don’t think I have used chalk for the sky and snow shadows before. It worked well but required extra ‘polishing’ to remove any chalkiness from the embossed branch. Both panels are popped up with dimensional tape.
I’ll be back tomorrow with the One Layer Wednesday challenge
Supplies:
Stamps: Pine & Star, Glad Tidings, Pine Silhouettes, Season’s Wishes (PB)
Inks: Memento Sweet Plum, Danube Blue, Olive Grove & Versafine Olympia Green & Versamark & Versamagic Aspen Blue, Aegean Blue(Tsukineko)
Cardstock: Fabriano 100% cotton hot pressed watercolour paper, Fabriano 25% cotton hot pressed watercolour paper
Also: Clear Embossing Powder
Dragonfly panel
Posted: November 13, 2013 Filed under: CAS, Social Butterfly, Verdant 8 Comments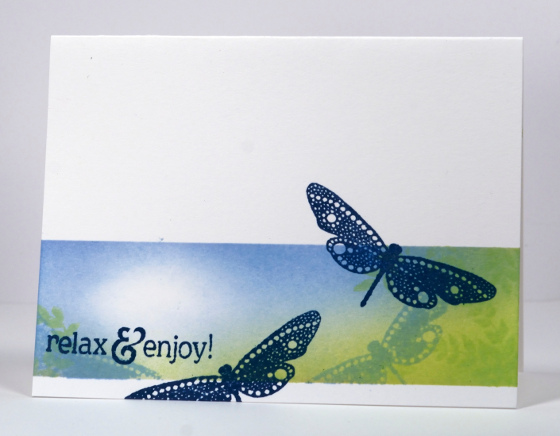
I am back in Canada now. Having not had a chance to do any stamping, I will share another card from my classes earlier this year. This simple one layer card features that same layout I use over and over. I masked the top and bottom with post-it notes then sponged in pale green and pale blue leaving an area free of colour as a light focal point. I added some foliage stamped in green and a couple of dragonflies stamped in blue. Finally I removed the masks and stamped dragonflies and sentiment in a darker blue.
I may have some wintery designs for you soon, now that I have put away my sandals and shorts and pulled out boots and coat!
Supplies
Stamps: Social Butterfly, Verdant , Friendship
Inks: Memento Summer Sky, New Sprout, Nautical Blue


