
Love, love, love
Posted: February 6, 2015 Filed under: Heartfelt, Poise | Tags: Fabriano Watercolour Paper, Penny Black creative dies, Penny Black stamps, Tsukineko Memento inks 5 Comments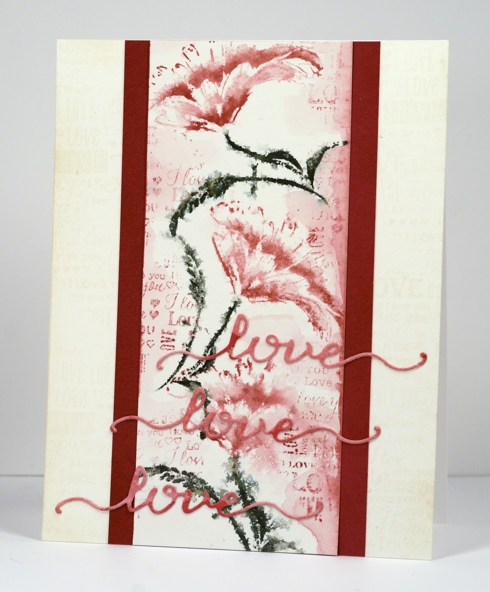
I have another brushstroke stamp featured on today’s card coloured in a loose watery style using Memento markers. To begin I taped a piece of watercolour paper to a cutting mat with painter’s tape. I inked the ‘Poise’ stamp with Memento Northern Pine, Rhubarb Stalk and Love Letter markers, spritzed it and stamped it onto the watercolour panel. I stamped two more flowers to fill the panel then spritzed lightly to let the colour bleed and blend.
For added texture and background I applied Memento Love Letter ink to the heart stamp from ‘So Very Much’ set and stamped down either side of the panel to create partial imprints of text. With a waterbrush I added some diluted Love Letter ink to the edges of the panel, blurring some of the text as I went. For a darker red I diluted Rhubarb stalk ink in the same way.
On a scrap of watercolour paper I painted Rhubarb Stalk and Love Letter ink, spritzed it to blend then dried it with a heat tool so I could cut three “loves” using the die from the ‘Heartfelt’ set. The watercolour panel is matted with Coral Reef mix & match paper then attached to a Neenah Natural White card base. Once again I stamped parts of the heart stamp in Wheat versamagic ink down both sides of card base front.
Supplies:
Stamps: Poise, So Very Much(PB)
Creative Dies: Heartfelt (PB)
Inks:Memento Northern Pine, Rhubarb Stalk, Love Letter markers & Versamagic Wheat chalk ink (Imagine Craft/Tsukineko)
Cardstock: Fabriano hotpressed 100% cotton watercolour paper, Coral reef mix & match paper, Neenah Natural White cardstock
Pop pop poppies
Posted: February 5, 2015 Filed under: Pop pop poppy | Tags: Fabriano Watercolour Paper, Penny Black creative dies, Penny Black stamps, Ranger Distress stains 12 Comments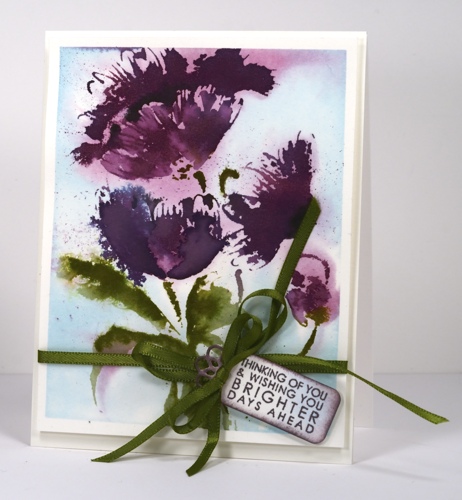
Today’s card features the new brushstroke stamp ‘Pop Pop Poppy’. All this week the new brush stroke stamps are the stars on the PB blog. Yesterday Jill Foster shared a video showing how to make her gorgeous watercolored card with this stamp.
I began by masking the watercolour panel with painter’s tape to create a border. I then painted water over the whole panel and inked the poppy petals with seeded preserves distress stain and the leaves with peeled paint distress stain. When I stamped it on the wet paper the colour bled into the surrounding area. I added tumbled glass distress stain with a paintbrush. I dabbed away a few dark areas of colour to leave areas of muted purple, blue and green on the panel as background colour. When the stain was almost dry I re-inked the petals with seeded preserves, and stamped again for a defined image. Using a stamp positioning tool I stamped the petals then the leaves with peeled paint and finally the flower centres with memento tuxedo black ink. I splattered a little seeded preserves stain over the panel as I like to do.
The little tag was cut using a die from the ‘flower tags’ set. I sponged the edges with seeded preserves ink then stamped a sentiment from ‘pretty petals’ in the same ink. To finish it all off I tied some ribbon around the panel and a bow on the tag before popping up the whole panel on a watercolour paper card base.
Supplies:
Stamps: Pop Pop Poppy, Pretty Petals (PB)
Creative Dies: Flower tags
Inks: Seedless Preserves, Dusty Concord, Bundled Sage, Tumbled Glass distress stains (Ranger), Memento Tuxedo Black ink (Imagine Craft/Tsukineko)
Cardstock: Fabriano 100% & 25% cotton hot pressed watercolour paper
Also: Green satin ribbon
OLS 13 You Blend
Posted: February 3, 2015 Filed under: CAS, Framed Flower, One-Layer Simplicity challenge | Tags: CAS, Penny Black creative dies, Tsukineko Memento inks 12 Comments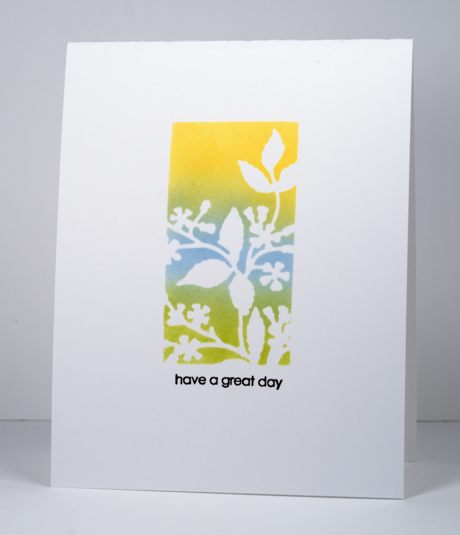
I can’t remember the last time I managed to participate in a challenge so I am happy to be posting a card for the One Layer Simplicity monthly challenge. The challenge is to blend something on your one layer card. I pulled out a new die called ‘framed flowers’ and used it to cut a mask. I added post-it notes all around the edges of the die cut mask so I would be left with just the rectangular image. My blending was done with memento inks and sponges, one of my tried and true techniques. My colour scheme was inspired by the current Runway Inspired Challenge #77, which is why I went for a black sentiment where I would usually just repeat one of the colours in my image. I like the black, it provides a nice contrast and I love the new set it came from, ‘snippets’ which has thirty-one little sentiment stamps. Thirty-one! Yay!
I hope you get a chance to check out the entries on both challenges and get inspired to play along.
Supplies:
Stamps: Snippets (PB)
Creative Dies: Framed Flowers (PB)
Inks: Dandelion, Summer Sky, Pear Tart (Imagine Craft/Tsukineko)
Cardstock: Neenah Solar White 110lb
The Sweetest Sound
Posted: February 2, 2015 Filed under: The Sweetest Sound, Tutorial, Watercolour 13 Comments
Now that the new Penny Black release, Bring on the Happy, has been revealed, the design team is sharing projects and tutorials featuring all the wonderful new products. I am kicking things off with a photo tutorial using ‘the sweetest sound’ brushstroke stamp. Brushstroke stamps will be featured all this week on the PB blog.
To create the card above I started with a panel of my favourite watercolour paper from Fabriano. I splattered a fine mist of masking fluid over it and let that dry before taping it down on all sides. Next I painted water onto the right hand side of panel. I pressed Memento Nautical Blue and Cantaloupe inks onto an acrylic block as a palette then picked up some ink with a paintbrush and dropped it onto the wet paper. I kept adding ink with a large brush until I was happy with the background colour.
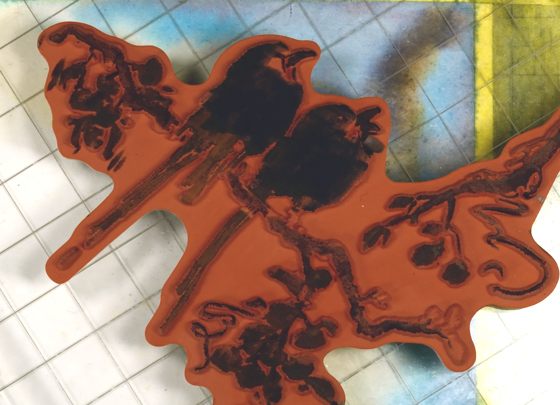
While the paper was still wet I inked only part of a branch on ‘the sweetest sound’ stamp with espresso truffle and olive grove memento markers. I stamped it in the top right and bottom right corners of panel and let the inks bleed into the wet background.
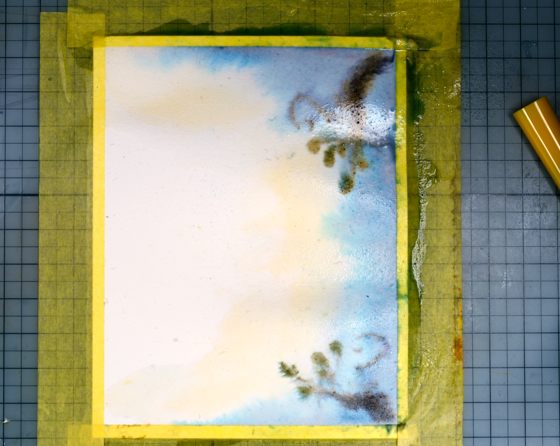
I spritzed the inked stamp with water then stamped onto the watercolour panel.

Using a water brush I blended the colour on the birds and added detail to the eyes with the espresso truffle marker. I then covered the birds with my hand and spritzed water over the branches to make the image bleed.
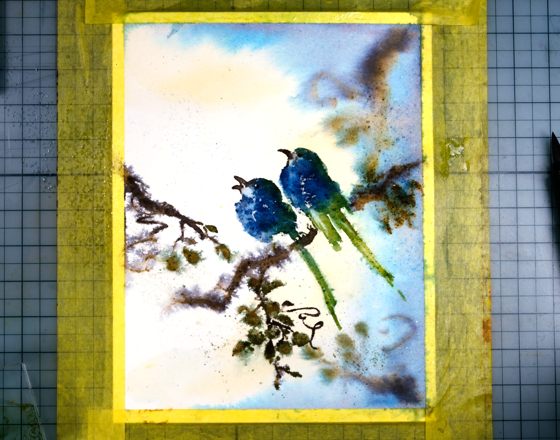
To finish I splattered olive grove and nautical blue ink around the panel. I added a little more definition to the branches with the fine tip of the memento markers. When the panel was dry I removed the masking tape and rubbed off the masking fluid before adding the sentiment from ‘snippets’ set.

I completed the card by matting the panel in a green then popping up the panel on a cold pressed (textured) watercolour paper card base.
Thanks for dropping by. I hope you are enjoying the new release; I will be sharing more projects with brushstroke stamps later this week.
The new One Layer Simplicity Challenge is up on the blog and is hosted by Susan this month. Pop over and check it out.

Supplies:
Stamps: the sweetest sound, snippets(PB)
Inks: Nautical Blue, Cantaloupe, Olive Grove, Espresso Truffle, Bamboo Leaves Memento ink (Imagine Craft/Tsukineko)
Cardstock: Fabriano hot pressed watercolour paper, Strathmore cold pressed watercolour paper, green cardstock
Also: Winsor & Newton masking fluid
Delicate Blossoms
Posted: January 30, 2015 Filed under: CAS, Delicate Blossoms, Stitched Edges | Tags: Penny Black creative dies, Penny Black stamps, Tsukineko Memento inks 13 Comments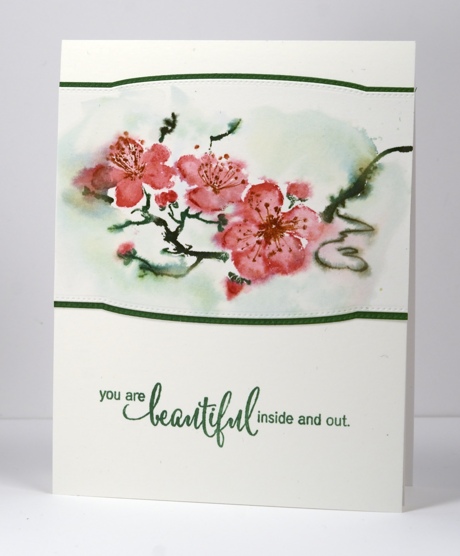
Today I have a simple design featuring a sweet new stamp called ‘delicate blossoms’. The new release, “Bring on the Happy” is available in the online store today and it is full of gorgeous new stamps, dies and stencils. To create the little panel above I used Memento inks and markers on watercolour paper. I inked the stamp one colour at a time and used a stamp positioning tool to make sure the stamp landed in the same place each time. I stamped the blossoms with love letter and angel pink and added some water to blend the colours. I let the inks bleed a little but kept flowers fairly well defined. The branch was inked with two greens and then I added water and summer sky ink around the image to spread some background colour but avoided the flowers. Finally I drew the flower centres with a marker. I cropped the panel using one of the new ‘stitched edge’ dies and added a green mat and sentiment.
Enjoy your weekend.
Supplies:
Stamps: Delicate Blossoms, Heartfelt(PB)
Creative Dies: Stitched Edges (PB)
Inks: Olive Grove, Cottage Ivy, Potter’s Clay, Summer Sky, Love Letter, Angel Pink memento (Imagine Craft/Tsukineko)
Cardstock: Fabriano hotpressed 100% cotton watercolour paper, Neenah Avon Brilliant White 110lb, Green cardstock
Winged things 2
Posted: January 28, 2015 Filed under: CAS, Swirling Wings | Tags: Fabriano Watercolour Paper, Penny Black creative dies, Ranger Distress stains 12 Comments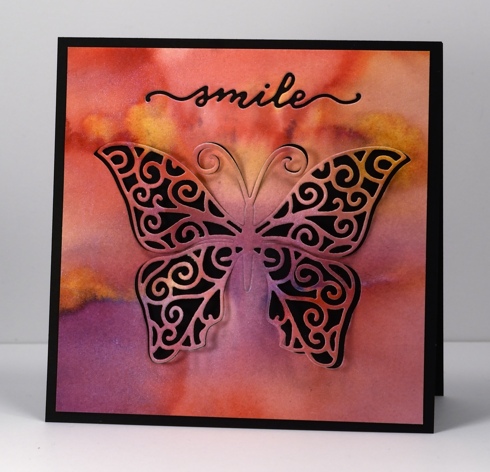
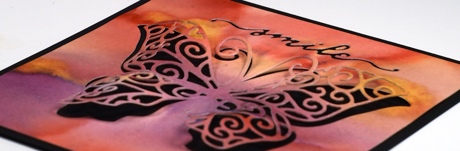
Today I have another card featuring the gorgeous new ‘swirling wings’ die from the Penny Black “Bring on the Happy” release. The panel you see on the card above is the where the inlaid coloured pieces on yesterday’s card came from. I started with a wet piece of watercolour paper and dropped several colours of distress stain onto the paper and let them blend with each other. I also sprayed some pearl-ex spray over the colours to help them blend and give it all a glimmery sheen. When I cut the butterfly I cut from one side, then the other without going all the way to the middle. That way I was able to keep the body of the butterfly attached but lift and curve the wings. I used the cute little ‘smile’ die from the ‘heartfelt set’ to add sentiment. Mounting it on a black card base seemed the perfect way to show off both the colour and the lacy swirls.
Supplies:
Creative Die: Heartfelt, Swirling Wings(PB)
Inks: Dusty Concord, Victorian Velvet, Ripe Persimmon, Spiced Marmalade, Scattered Straw distress stains (Ranger)
Cardstock: Fabriano 100% cotton hot pressed watercolour paper, Neenah Epic Black cardstock
Also: Pearl-ex spray made with interference blue pearl-ex and water
Winged things 1
Posted: January 27, 2015 Filed under: Doodles, Flights of Fancy, Flower Frolic, Swirling Wings | Tags: Penny Black creative dies, Ranger Distress stains 8 Comments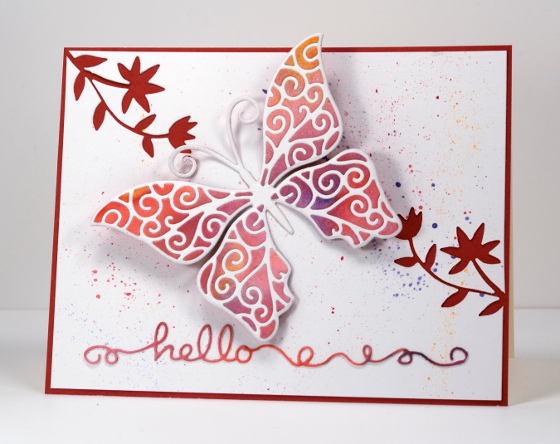
I have more Penny Black prettiness to share today, this time of the creative die variety. There are so many beautiful dies in the new release and this butterfly is one I will probably reach for again and again.
The butterfly on the card above is two layers but cut from three different pieces of cardstock. The underside of the butterfly is a solid red butterfly cut using the ‘flights of fancy’ die. I used the co-ordinating ‘swirling wings’ creative die to cut a lacy butterfly from white cardstock and from watercoloured cardstock. I kept the frame of the watercoloured butterfly for a card I’ll share tomorrow but popped out all the inserts and inserted them into the white lacy butterfly. I splattered some of the same watercolours onto the white card panel and die cut two sprays of flowers with the ‘flower frolic’ die. The little curly ‘hello’ is from a set of three called ‘doodles’ which will be wonderful to use.
Make sure you visit the Penny Black blog and facebook this week; there are giveaways along with all the new inspiration.
Supplies:
Creative Die: Doodles, Swirling Wings, Flights of Fancy, Flower Frolic (PB)
Inks: Dusty Concord, Victorian Velvet, Ripe Persimmon, Spiced Marmalade distress stains (Ranger)
Cardstock: Fabriano 100% cotton hot pressed watercolour paper, Neenah Solar white, red cardstock
Demure but sparkly
Posted: January 26, 2015 Filed under: Demure, Stitched Edges | Tags: Fabriano Watercolour Paper, Penny Black creative dies, Penny Black stamps, Ranger Distress stains 21 Comments
Are you ready for some brand new Penny Black prettiness? The new release is being revealed today on the Penny Black blog, facebook and website and there will be projects on the design team members blogs featuring new products for the new few weeks.
I first played with the new stamps around Christmas, finishing up several cards before the new year so they could travel off to CHA and join in the fun there. I am happy to be sharing some of those cards over the next week, especially as I have been too sick and too behind to do any new stamping lately. I can’t believe January is drawing to a close and I have only posted two new cards on my blog this year!
Before I got sick I did manage to create a few new cards but you will need to pop over to Splitcoaststampers.com to view them. The reason they are there and not here is quite exciting; I was invited to join the Dirty Dozen and began my six month term on January 15. I feel very honoured to involved with such a talented and committed group of artists and look forward to doing all sorts of fun things with Splitcoast in the months to come. Many projects will be featured here on my blog but each month the Dirty Dozen fills a themed gallery with projects available to fan club members only so there will be six new cards from me there each month. January’s theme is “All Cooped Up” and believe it or not I came up with six cards for the theme despite not owning a single chicken stamp!
But back to the card at hand. This one was my favourite from the eight I created for CHA. It is hard to see in the photo but it is covered in shimmery sparkliness. I began by wetting the watercolour panel and dropping Victorian Velvet, Ripe Persimmon and Tumbled glass distress stains into the water. I also sprinkled Camargue salt onto the wet areas to create patterns as it dried. All the little dots in the background were created by the salt absorbing moisture and colour. You can try it with any salt you have on hand but different salts will give you different results. When the background was dry I stamped the flowers in Spiced Marmalade distress ink, the stems in Peeled Paint and the little seeds in Dusty Concord. I used both Spiced Marmalade and Ripe Persimmon stains to paint the flower heads, spritzing with pearl-ex spray here and there to make the colour bleed and shimmer. The sentiment and mat strips do look black in the photo but they are both purple to co-ordinate with the seed heads. See that cute little shaped edge? There are two new edge dies in the “Bring on the Happy” release and I hope they will be the first of many. That edge does add that certain something don’t you think?
Oh, Happy Australia Day!
Supplies:
Stamps: Demure, Sprinkles and Smiles (PB)
Inks: Dusty Concord, Victorian Velvet, Ripe Persimmon, Spiced Marmalade, Tumbled Glass distress stains (Ranger)
Creative Dies: Stitched Edges (PB)
Cardstock: Fabriano 100% cotton hot pressed watercolour paper, purple cardstock
Love you tree
Posted: January 14, 2015 Filed under: CAS, Tree of love | Tags: Penny Black creative dies, Penny Black stamps, Tsukineko Memento inks 7 Comments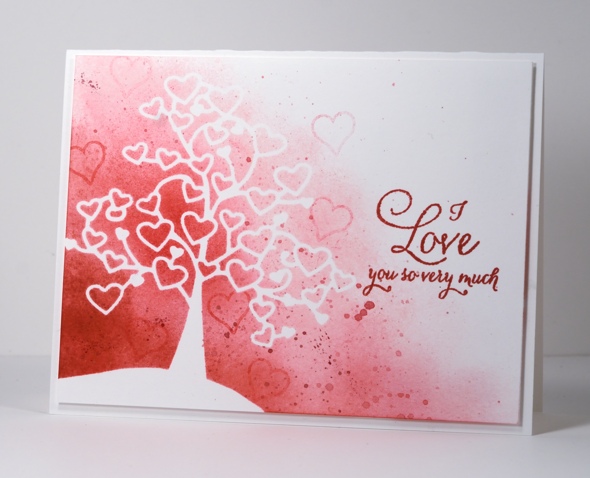
One of my favourite things to do with PB creative dies is to cut masks. For today’s card I diecut the ‘tree of love’ from masking paper then stuck it to white card stock and added a hill mask over the base of the trunk. I used three memento inks to sponge a graduated background then flicked colour from matching coloured pencils. I stamped a few hearts from the cute little ‘posted with love’ set then added the sentiment from ‘so very much’. The panel is popped up on a cardbase of the same cardstock.
Thank you for your kind wishes for Andrew’s and my anniversary; I enjoyed reading them while in New York. We had a wonderful time and I will write about it a bit and post some photos soon. I do have a confession to make however. My patient and kind husband has not received his card yet. I did not write in it before we left thinking that I would write in it during the day and give it to him at dinner on the night of our anniversary. What I didn’t count on was the fact that we were always together (not a complaint by the way, just an observation) so I did not get a chance. Later in the day I told him not to read my blog post that day but I was too late; while I was trying on clothes in Anthropologie, he had been catching up on blog posts. So even though we have been home for several days they have been full days and now I am sick in bed. It seems that my “postal disorder” extends even to the cards I don’t have to post!
Supplies:
Stamps: Posted with love, So Very Much (PB)
Creative Dies: Tree of Love (PB)
Inks: Rhubarb Stalk, Love Letter, Angel Pink memento (Imagine Craft/Tsukineko)
Cardstock: Neenah Solar White 110lb
A reason to celebrate
Posted: January 6, 2015 Filed under: Skyline, Watercolour 19 Comments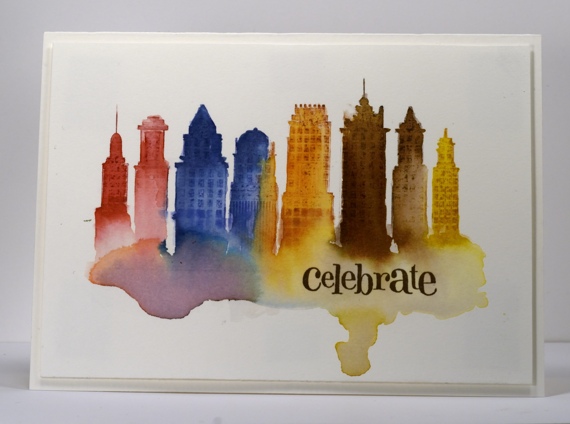
This is a repost of a card I made this time last year. After I had posted it I put it away for the right occasion. Today is the right occasion and my husband is the recipient. We are celebrating our 25th wedding anniversary by spending four days in New York; the trip is a gift from our children. I am very excited!
All the details about the card can be found here. I hope to post a few picture of our trip on instagram and my other blog. Have a good week!


