
Watercolour pointsettia
Posted: December 4, 2013 Filed under: Warm Wishes, Watercolour | Tags: Penny Black stamps, Ranger Distress stains 23 Comments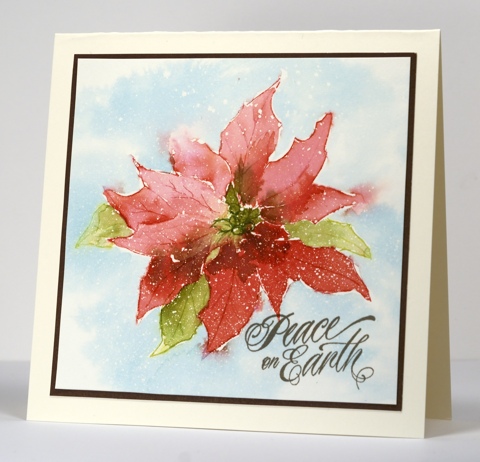
I do not have another snow scene for you today but my pointsettia does feature masking fluid “snowflecks”. I used a watercolour block for this panel and flicked masking fluid over it with a tooth brush. I used distress stains for the first time along with some memento greens. The pointsettia is stamped with Barn Door distress stain. The impression was pale and incomplete at the tips of a few petals which was perfect for what I planned to do. The stamped image was my guide for watercolouring but I didn’t want it the outline to dominate. As I wanted to paint with the distress stains I pressed the bottle’s sponge top down several times onto an acrylic block which I was using as a palette then picked up the ink with a paintbrush. I painted the lower petals with barely diluted stain and the top petals with a blend of water and stain. After I had painted them all red I realised I wanted some green outer ones so I stamped one lightly with memento pear tart ink and drew the others with a pear tart marker. I added brown ink to the areas I wanted to be shadowed and used a marker to redefine the centre of the flower. To create a background I painted water around the poinsettia then painted Broken China stain into the wet areas. The card is 5.5″ x 5.25″.
Thanks for all the lovely comments about my snow storm card. For those who are new to Bits & Pieces you can find all the tutorials I have done here: https://cardz.wordpress.com/category/tutorial/
Supplies:
Stamps: Warm Wishes, Hello Winter (PB)
Inks: Distress stains Barn Door, Peeled Paint, Broken China, Vintage Photo & Memento inks Bamboo Leaves, Pear Tart & Versafine Vintage Sepia
Cardstock: Fabriano 100% cotton hot pressed watercolour paper, Mix and match Grand Canyon paper
Also: Winsor & Newton masking fluid
Watercoloured baubles
Posted: December 2, 2013 Filed under: CAS, Ornately, Watercolour 5 Comments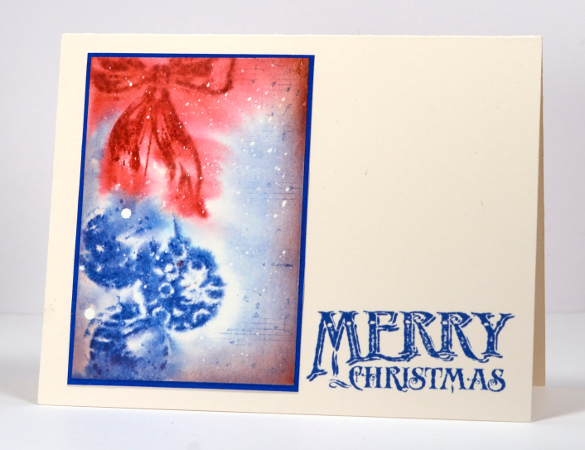
The painted panel above was done on one of the scraps of watercolour paper I like to have lying around already covered with drops of masking fluid. I try to never prepare just one but rather flick the fluid over several pieces of both watercolour paper and white cardstock. That way they will be dry and ready to use whenever I get the chance.
I painted water over the whole panel then inked the stamp from the “Ornately” set with blue and red ink. The ink blurred and bled all over the place immediately but after it had had a chance to dry off just a little I reinked and stamped again in the same place to get the soft edged image. I added the music background and some sponging around the edges. When all was dry I gently rubbed off the masking fluid , matted with blue and added a sentiment to match.
No baubles up at my place yet, how about you?
Supplies:
Stamps: Ornately, Sentimental, Music Background (PB)
Inks: Memento Love Letter, Danube Blue, Rhubarb Stalk (Tsukineko)
Cardstock: Fabriano 25% cotton hot pressed watercolour paper, Mix and match Clear Skies paper
Also: Winsor & Newton masking fluid
Holly Concert
Posted: November 21, 2013 Filed under: Holly Berries, Holly Concert, Watercolour 10 Comments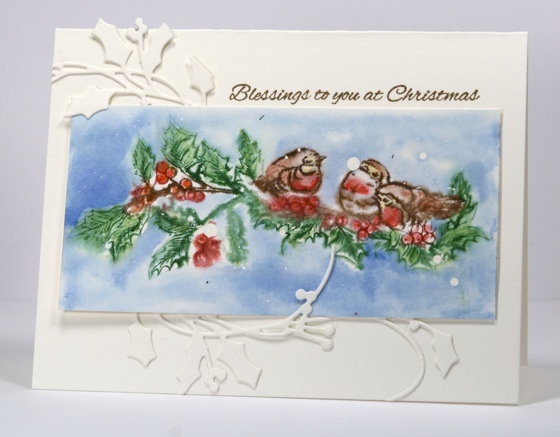
I am enjoying pairing the lovely new Christmas dies from Penny Black with the Christmas stamps. When I had finished this panel featuring the sweet little birds I wanted to frame it on the cardbase. A co-ordinating mat could have worked but the die cut holly added a bit more interest without detracting from the scene.
The white circles are “snow” made by flicking masking fluid onto the paper before I started. I applied ink to the Holly Concert stamp with markers then stamped it on wet watercolour paper so that the colours bled into each other. Using both Memento markers and inks I coloured and blended with water to fill all the images. I then restamped the image to redefine the outlines. I wet all the surrounding space and painted blue ink into it sometimes blending with the image, at other times stopping short of the image.
I am very fussy about colour matching so I have been making card bases for my watercolour cards from watercolour paper. I use 25% cotton for the card base as it is much cheaper than the 100% cotton that is my preference for painting and stamping. If I found a cardstock the right colour I would use that instead but my white is too white and my cream, too cream.
Back soon, I hope…
Supplies:
Stamps: Holly Concert, Silent Night (PB)
Creative Dies: Holly Berries
Inks: Memento Danube Blue, Cottage Ivy, Rich Cocoa, Lady Bug (Tsukineko)
Cardstock: Fabriano 100% cotton hot pressed watercolour paper, Fabriano 25% cotton hot pressed watercolour paper
Also: Winsor & Newton Masking Fluid
Two snowscapes
Posted: November 19, 2013 Filed under: Pine & Star, Pine Silhouettes, Watercolour 21 Comments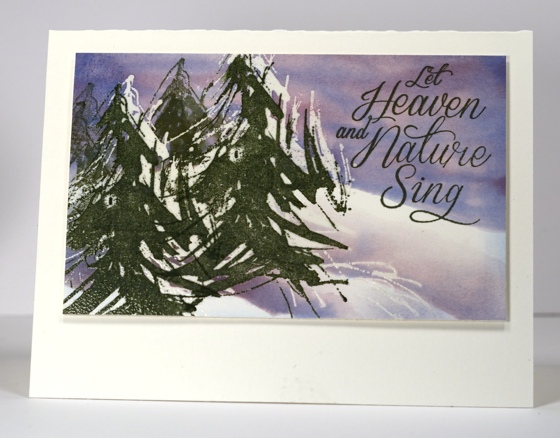
Now that it’s the weather for jackets and boots I can think about stamping snowscapes. If you have been browsing here at Bits & Pieces for a while you will know that I enjoy creating snowy scenes with ink and stamps. I created these two scenes at one sitting; one ended up quite formal and the other more relaxed. I worked on my small watercolour block. (A watercolour block is a pad of watercolour paper which is attached on all four sides with just a small area near one corner unattached so you can tear the piece off when your painting is completed.) The block is 5″ x 7″ and for these panels I divided it in two with a piece of masking tape.
To create the scene above I stamped the tree twice in versamark, then stamped it again but lower in Versafine Olympia Green. I then embossed the trees with clear powder so they would resist when I added the watercoloured sky. I wet the panel with water first but only in the area where I wanted the coloured sky. I then added blue and pink ink with a paint brush. The colours blended in the wet area but did not bleed into the dry part of the panel. I repeated this technique to create the two lower snow banks. ( I hear you; a video would be helpful )
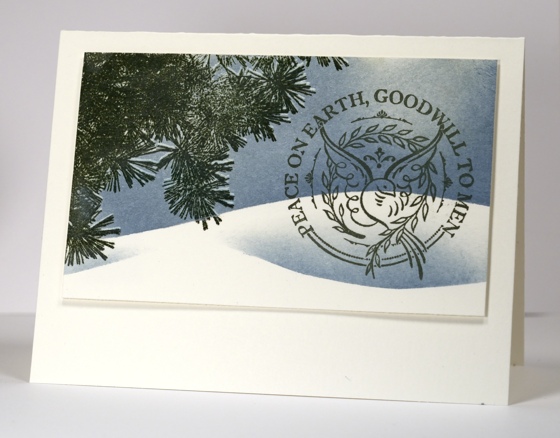
To create the second snowscape I used the same double stamping technique mentioned above but moved the pine silhouette stamp only very slightly lower by using a stamp positioner when I stamped in green. I again embossed in clear powder then sponged blue over the branch which revealed the thin outline of snow on some of the pine needles. The snow hill and banks were done by sponging over post-it note masks with Versamagic chalk inks. Although I often create snow banks this way I don’t think I have used chalk for the sky and snow shadows before. It worked well but required extra ‘polishing’ to remove any chalkiness from the embossed branch. Both panels are popped up with dimensional tape.
I’ll be back tomorrow with the One Layer Wednesday challenge
Supplies:
Stamps: Pine & Star, Glad Tidings, Pine Silhouettes, Season’s Wishes (PB)
Inks: Memento Sweet Plum, Danube Blue, Olive Grove & Versafine Olympia Green & Versamark & Versamagic Aspen Blue, Aegean Blue(Tsukineko)
Cardstock: Fabriano 100% cotton hot pressed watercolour paper, Fabriano 25% cotton hot pressed watercolour paper
Also: Clear Embossing Powder
Watercoloured poppies
Posted: November 4, 2013 Filed under: Blooming Garden, Watercolour | Tags: Fabriano Watercolour Paper, Penny Black stamps, Tsukineko Memento inks 18 Comments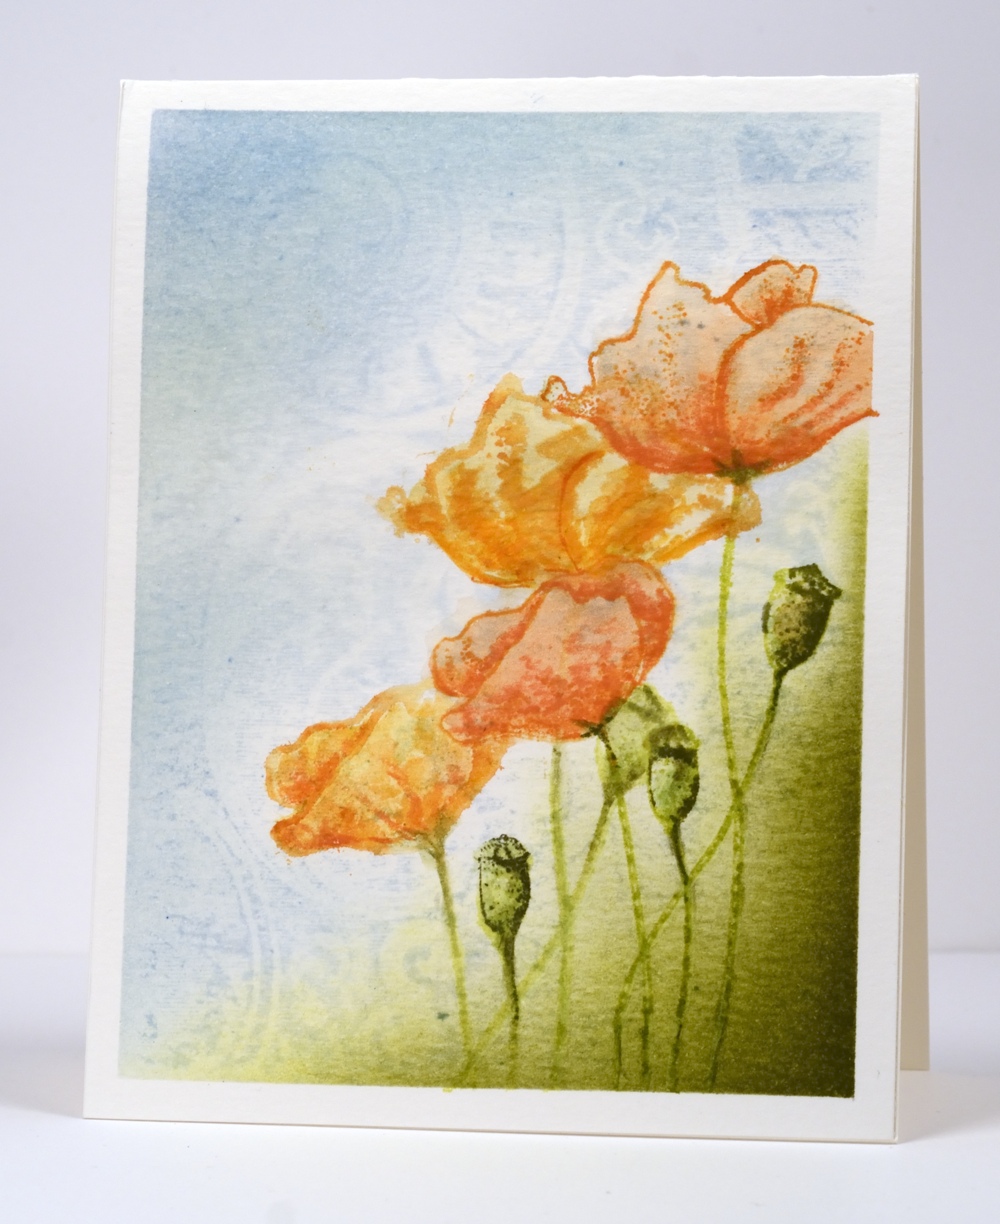
There are various ways to watercolour with stamps; the card above was done using a method I often use when I have an outline stamp. I taped the watercolour paper to my work table and brushed water across the whole panel. While still wet I stamped the background stamp then the poppies. I inked the poppy stamp by applying the orange stamp pad to the flower head and a green stamp pad to the stems. Because the paper was still damp the ink bled a little to make a soft edge. With water and matching watercolour pencils I added colour to the petals and the stems, blending and darkening shadow areas. When the paper was almost dry I stamped over the poppies stems and seed pods to give them a bit more definition. Once the paper was completely dry I sponged blue ink in the top left hand corner and green ink in the bottom right hand corner.
Supplies:
Stamps: Damask Pattern, Blooming Garden PB)
Inks: Memento Summer Sky, Tangelo, Cantaloupe, Olive Grove (Tsukineko)
Also: Matching Faber Castell water colour pencils
Cardstock: Fabriano 25% cotton hot pressed watercolour paper
Water Stamped Grasses
Posted: August 29, 2013 Filed under: Aspire, CAS, Watercolour | Tags: CAS, Penny Black stamps, Tsukineko Memento inks 14 Comments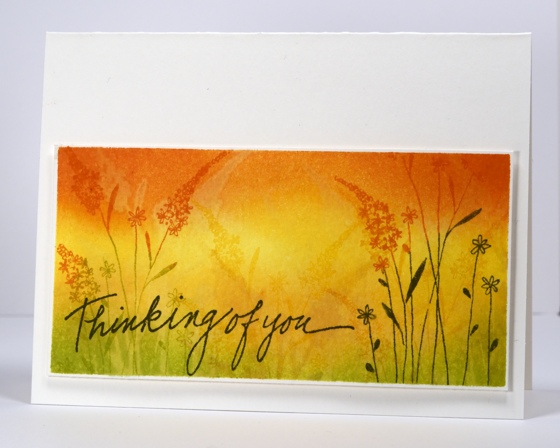
After stamping the Queen Anne’s lace with water I tried the technique again with a different stamp. I masked a rectangle then used ink to sponge the background with green, yellow and orange tones. I then painted water onto my stamp and stamped several times along the panel. You can see a clear water stamped impression on the left hand side but the others are less obvious. To finish I inked the same grass stamp in green and orange and stamped it several times before adding the sentiment
The card and the panel are cut from 140lb weight water colour paper.
By the way if you are looking for One Layer Wednesday this week Karen is hosting a Silhouette challenge which I hope to play along with soon.
Supplies:
Stamps: Aspire, Thinking of You (PB)
Inks: Memento Cantaloupe, Tangelo, Pear Tart, Olive Grove (Tsukineko)
Cardstock: Fabriano 25% cotton hot pressed watercolour paper
Watermarked in blue
Posted: August 14, 2013 Filed under: CAS, Queen Anne's Lace, Watercolour 14 Comments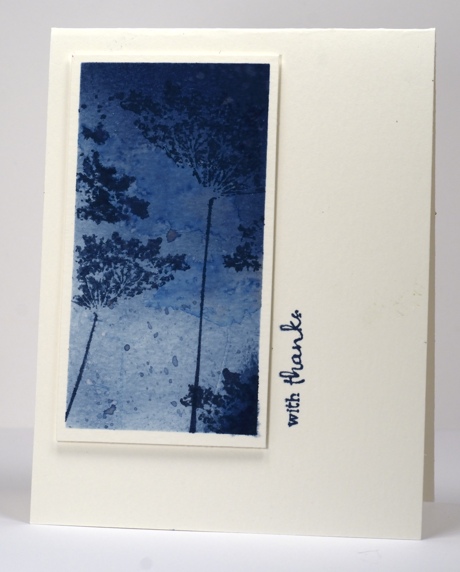
You may know blue is a favourite colour of mine as is Queen Anne’s Lace a favourite flower and watercolour a favourite technique. So when I saw this weeks Case this sketch I decided to use all three favourites to complete the challenge.
The panel and the card base are both watercolour paper (details below). I sponged the panel with nautical blue ink then painted the stamp with water and stamped it onto the sponging. The image created by “water stamping” is quite subtle and in the background. I then stamped in nautical blue, once the whole stamp as well as a few partial impressions. The final touches were some water droplets and some ink droplets.
Supplies:
Stamps: Queen Anne’s Lace, Wishes (PB)
Inks: Memento Nautical Blue (Tsukineko)
Cardstock: Fabriano Hot pressed 25%cotton watercolour paper
Beat the Heat with Water(colour)
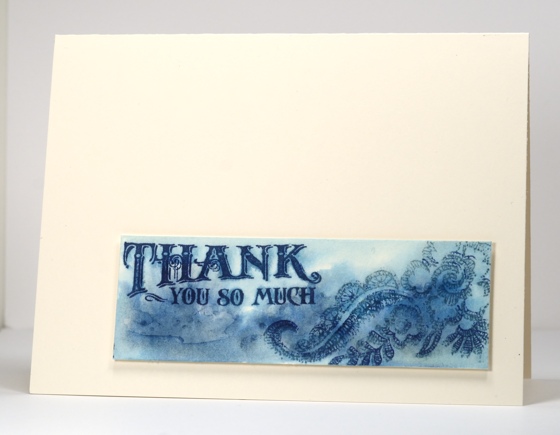
Posted: July 24, 2013 Filed under: Floral Applique, Hot Rod, Lace Trims, Social Butterfly, Summer Fun, Watercolour | Tags: Penny Black stamps, Tsukineko Memento inks 10 Comments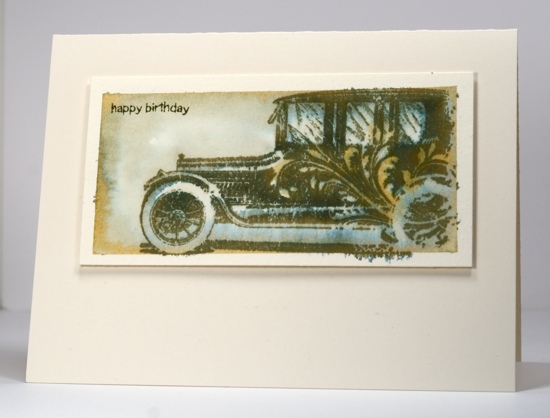
There is a new challenge running at on the Penny Black blog inviting you to share your summer stamping for a chance to win some stamps.

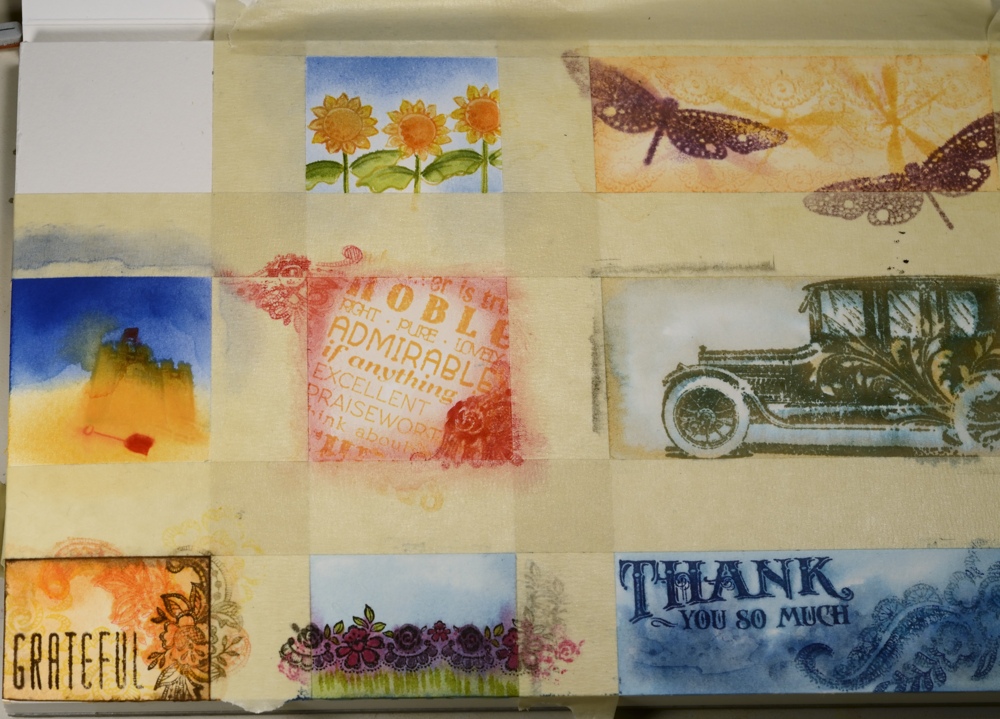
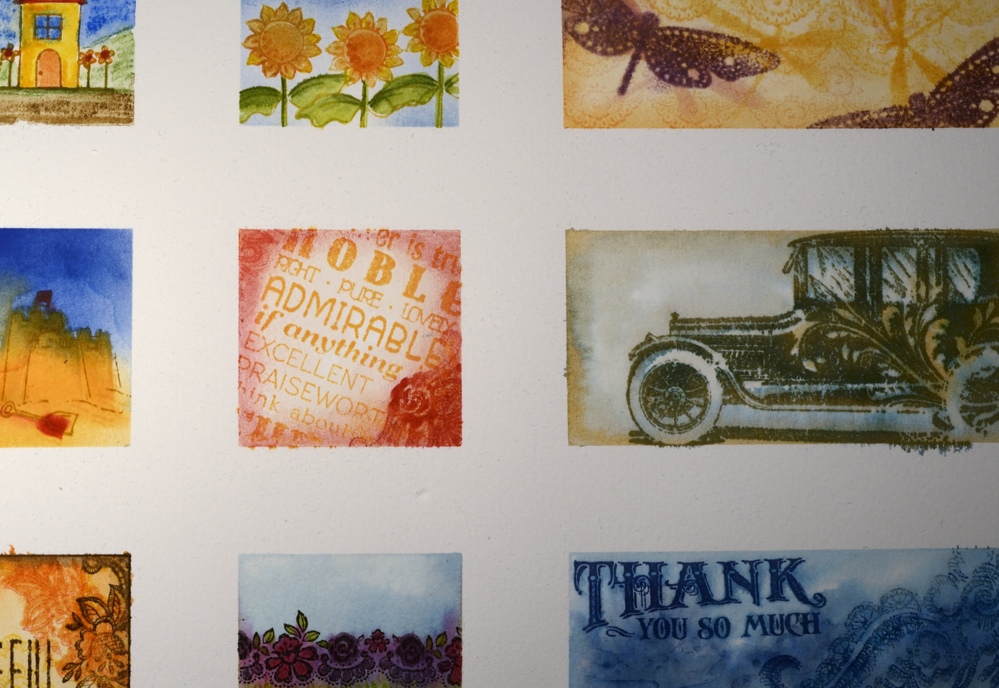
We have had a long stretch of hot weather here in Ottawa and one of the coolest places in the house is my basement craft area. The best way to cool down and beat the heat is to head for the water so I created a one page watercolour sample sheet. I used masking tape to make nine mini panels but next time I think I’ll use painter’s tape as the masking tape ripped the surface of the paper in a few places. I worked on two or three panels at a time and ended up with six out of nine that I wanted to make into cards.
The hot rod panel above was created by wetting the panel first then stamping the car image with Memento Olive Grove ink. The ink began to bleed immediately separating into two pigments, a green and an orange. I increased the amount of orange by adding a little Memento tangelo ink with a paintbrush here and there.
The panel below was also created by stamping onto wet paper. In order to have soft blended images as well as sharp ones I stamped with both Memento ink and Versafine. The memento is a water soluble dye ink whereas the Versafine is oil based.
You will see some of the panels have a border left by the tape but others were cropped right to the edge of the water coloured panel.
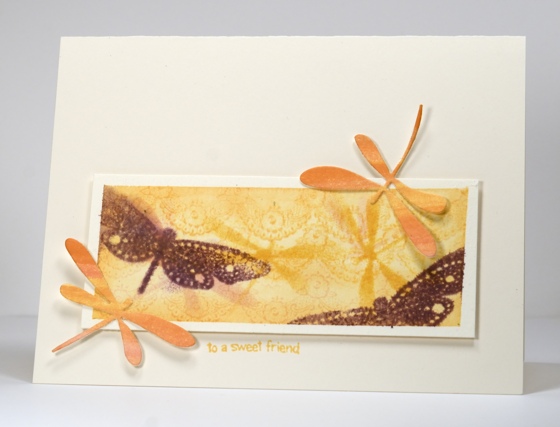
To create the dragonfly panel below I wet the paper with a yellow wash made using memento cantaloupe, this time stamping with a lace trim stamp. When the panel was dry I sponged through a die-cut mask of a dragonfly before stamping the dragonflies. I die cut a couple of watercoloured dragonflies to add to the border of the panel.
I also created a couple of tiny scenes using the cute little stamps from the Summer Fun set
One of my panels was very small so I made a mini card.
Supplies:
Stamps: Floral Applique, Sentimental, Hot Rod, Lace Trims, Summer Fun, Life’s Messages (PB)
Inks: A selection of Memento ink pads and markers & Versafine inks (Tsukineko)
Dies: Flutters
Cardstock: Portofino 100% cotton 140lb hotpressed watercolour paper
Vintage collage
Posted: July 16, 2013 Filed under: Background Stamps, Collage cards, Delicate Florals, Watercolour | Tags: Faber Castell gelatos, Penny Black stamps, Tsukineko Memento inks 21 Comments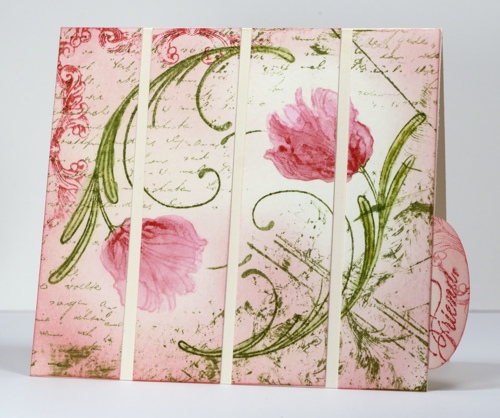
Once again I hesitate to try and describe the process involved in creating this card because it is a combination of experiments and errors!
I started with a large piece of watercolour paper on which I was stamping all the flowers from the Delicate Florals set and experimenting with ways to colour them. The tulips above were stamped with Memento Angel Pink and Bamboo leaves. I then did the colouring with gelatos. I made a little watercolour paint by colouring with the gelato on a plastic sheet then blending in some water. I also picked up colour directly from the gelato with an aqua painter as well as applying gelato onto the tulip then blending. At this point I had a circle made from two tulips and no plan in place. I cut it into a square, masked the tulip flowers and added the letter background. I think it was about this point that I tipped over the bamboo leaves ink pad onto the panel creating some of those random lines you see on the right hand side. (It was also around then that I knocked tomorrow’s OLW card over onto an inked stamp and ruined it but that’s another story.)
So after dragging the edge of the ink pad over the panel a few times to add more vintagy effects I decided to add a little corner of Divine Pattern and a whole lot of pink sponging. Almost happy by this time I settled on one more element: one corner of the frame stamp. The panel was a square but I decided not to make a square card; instead I sliced it up and laid it out on a 5½” x 4¼” cardbase. Even after spacing it out there was still empty space which didn’t look quite right so I created the oval tab, slipped it under the last panel and decided to make a smaller card with the tab sticking out.
Thanks for dropping by; I will be back tomorrow with hopefully my fourth and final attempt at this week’s One Layer Wednesday challenge card.
Supplies:
Stamps: Delicate Florals, Letter Background, Divine Pattern, With Florish, Eloquence (PB)
Inks: Memento Bamboo leaves, Angel Pink, Love letter
Cardstock: Fabriano 25% cotton hot pressed watercolour paper,
Also: Faber Castell gelatos
Tulips and gelatos
Posted: July 5, 2013 Filed under: Blooming Garden, CAS, Watercolour | Tags: CAS, Faber Castell gelatos, Penny Black stamps 13 Comments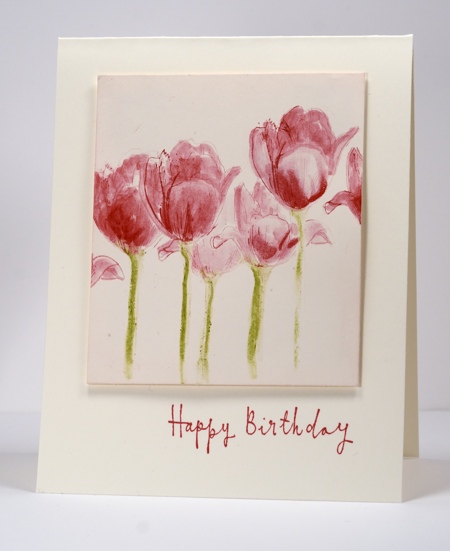
I recently bought a set of Faber Castell gelatos so tonight I had a little play with them. I will try describing how I created this little watercolour collection of tulips but I was experimenting a lot so don’t expect a coherent tutorial just yet. I fiddled with gelato on the stamp, then on the cardstock, then some on an acrylic block mixed with water until I was happy with the watercolour effect. To finish I inked up one side of each tulip on the stamp with a marker then restamped. I redrew the stems, which were looking very pale, with the edge of the gelato. This is just the beginning of my adventures with gelatos so when I am able create an effect more than once I will attempt to share what I have learnt. I sponged the panel ever so slightly round the edge with angel pink then popped it up on the card base.
Have a great weekend. My daughter returns from a tour to Cuba with her violin ensemble tomorrow so we are all looking forward to seeing her and hearing about the trip.
Supplies:
Stamps: Blooming Garden, Reflection (PB)
Inks: Memento Angel Pink, Love letter (Tsukineko)
Also: Faber Castell gelatos


