
Christmas Stars
Posted: February 22, 2021 Filed under: Cuttlebug, lighting the way, Papertrey Inks, Penny Black | Tags: Penny Black stamps 3 Comments
Last month I made a shaker card with five star cuts outs and sparkly sequins and beads inside to shake around. As the stars were cut out of a watercoloured panel I saved them for another project. My friend Stamping Matilda does this every weekend, her Sunday posts are called ‘Sunday Scraps’ and she features leftovers from that week in a new card or project. I don’t do that anywhere near as often but occasionally I have some scraps, like these stars, which inspire me to turn them into something new. I’m also committed to making a few Christmas cards every month so I don’t leave it all to the last few months of the year.

I used two of the cut out stars as backgrounds for some Christmas themed silhouette stamping, backed them with blue foam then mounted them on embossed backgrounds. On the card above I stamped the Bethlehem scene from the PB ‘lighting the way’ set along with a sentiment from PB ‘Christmas sentiments’. The embossed background was made with neenah solar white cardstock in the Tim Holtz ‘snowflakes – speckles’ embossing folder.
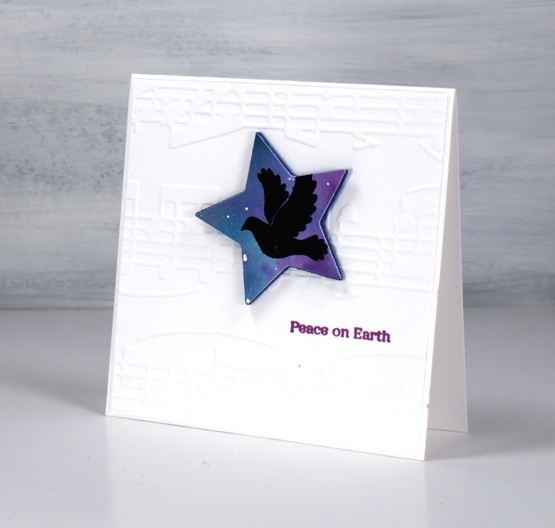
This smaller star was big enough to feature the dove from the PB ‘joy filled’ set and I added sentiment from the PB ‘holiday snippets’ set underneath in versafine clair purple delight ink. The embossed background was made with the ‘allegro’ embossing folder which has been sitting around since my cuttlebug days.

The star dies from We R Memory Keepers seem to be retired but I linked to some similar dies in the supply list below. The original shaker card these stars were cut from contained five stars but I deemed two too small to use. I did stamp the remaining star and it auditioned for a spot on a card but didn’t make the cut. You know it happens sometimes!
Supplies
(Compensated affiliate links used when possible)
Shabby Chic tag cards
Posted: March 16, 2013 Filed under: Background Stamps, CAS, Cuttlebug, Love Chapter, Penny Black 10 Comments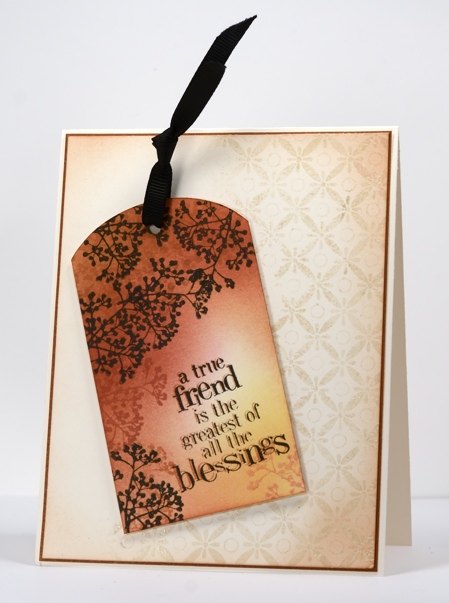
Today I have a couple of cards which developed as I stamped; I had a rough idea how I would do the tag above but nothing more than that. Once the first tag was finished I wanted to try the same technique with another text stamp. When both were finished I played around with layouts for quite a while before I settled on the ones you see here.
To create the tags I stamped the Dots in space background stamp then sponged three colours over most of the tag. Each tag has a branch motif which I stamped in brown tones first then black. The text stamps have an out of focus look intentionally; I stamped them first in Potter’s Clay then again in black but slightly offset from the first impression.
Both the tags were designed to feature but needed to be grounded on the card bases so I picked out a background stamp and an embossing folder. To ground the tag above I stamped part of the background stamp Indian Wheel in Wheat versamagic then embossed in clear powder before sponging the perimeter of the ivory panel in Memento Potter’s Clay. The tag below is grounded on the card base by an embossed panel created using a cuttlebug embossing folder which I sponged over lightly.
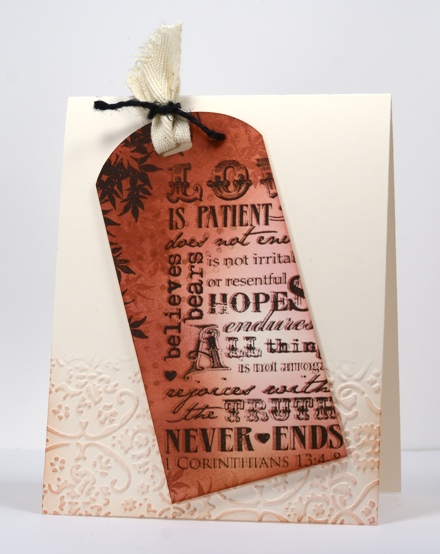
I do make tags from time to time but I rarely put a tag on a gift; I usually add a card in an envelope to a gift so these tags are more likely to get given this way than if they had remained as tags. What about you,do you make tags? Do you use them?
Supplies:
Stamps: Love Chapter, Friendship, Dots in Space, Indian Wheel, Tweet Tweet (PB)
Inks: Memento Potter’s Clay, Rhubarb Stalk, Dandelion, Angel Pink & Versafine Onyx Black & Versamagic Wheat (Tsukineko)
Cardstock: Mix & Match Grand Canyon
Also: Cuttlebug Folder Textile Texture, black ribbon, black twine
Pastel Panels
Posted: March 8, 2011 Filed under: CAS, Cuttlebug 22 Comments
The current challenge from Mandi and Chrissie at Less is More is to use pastel colours. I tried three different designs before settling on the one above. The totally pastel colour scheme gave me trouble, but that’s part of the challenge isn’t it? I have set aside the other attempts to transform into something else when inspiration hits.
I cut my cuttlebug panel in three strips and sponged in celery, amethyst and pretty in pink. I popped up the strips before adding some gingham ribbon and a little oval tag.
Supplies:
Stamps: Teensy Tiny Wishes (SU)
Inks: Pretty in Pink, Certainly Celery, Almost Amethyst
Cardstock: Flourishes Classic white
Also: Cuttlebug Birds and Swirls folder, pink gingham ribbon
Cuttlebug music thankyou
Posted: June 29, 2010 Filed under: Cuttlebug, Upsy Daisy 1 Comment
As I have mentioned before my daughters are violinists, so I am always on the lookout for nice musical stamps or images. I have had this embossing folder for a while but I think this is the first time I have used it. My 15 year old is moving to a new teacher after 10 years with our current teacher. We prepared sushi as a gift for her and gave her this card when we attended the final lesson.
The daisy image was completed using markers directly on the stamp. I stamped the “Many Thanks” stamp on the vellum overlay, which unfortunately makes my picture look really out of focus.
Supplies:
Stamps: Upsy Daisy, All Year Cheer
Inks: Old Olive, Pumpkin Pie, Only Orange
Cardstock: Old Olive, Vellum, Whisper White, Confetti White
Also: Artichoke eyelets, Allegro cuttlebug embossing folder
Inspired by…
Posted: July 3, 2009 Filed under: Cuttlebug 1 CommentThe following cards were inspired by the talented and very amusing Joan from Paperlicious. I made them a couple of weeks ago after I saw hers and then forgot that I had photographed them. I was inspired by her cards HERE and HERE
Note added – Joan’s layout originally came from Krystie Hersch
I decided I would try and use up some cuttlebug embossed scraps I had lying around in place of the designer paper panel. I like the colour contrast of the Teal and Moss mattes below but think there might be a bit too much white.

When I looked at the Handsome Hunter embossed swirls I wasn’t particularly inspired. The only thing I could think of to use it with was some gold for a Christmas card. So that means I have ONE Christmas card done! Sticking those little half gold pearls on was a little frustrating and I almost left it with just three, but that did not look right so I persevered.

The last one is my favourite with the crisp contrast of black, white and Brocade Blue. I love the classy textile cuttlebug folder.

Supplies:
Stamps: 1. All Year Cheer 2. Many Merry Messages 3. All Year Cheer
Inks: 1. Mellow Moss 2. Handsome Hunter 3. Brocade Blue
Cardstock: 1. Mellow Moss, Terrific Teal, Whisper White 2. Handsome Hunter, Brushed Gold, Confetti White 3. Brocade Blue, Basic Black, Whisper White
Also: 1. Moss gingham ribbon, Birds and Swirls folder 2. Gold ribbon, gold half pearls, D’vine swirls folder 3. Black grosgrain ribbon, Textile folder
Vintage Blue
Posted: June 1, 2009 Filed under: Cuttlebug, Eastern Influences 3 Comments
Although I love lace and the vintage look, I don’t often make vintage themed cards. I was inspired by a card I saw with an embossed, then sponged background. I used the Textile cuttlebug folder and sponged lightly over the top. I stamped my flower and my sentiment then cut them out. The oval was cut using the CM oval cutters and the tag with the ticket corner punch and a little trimming. I wanted the same thread on the tag as is in the lace so I unraveled some of the lace to get enough thread to tie a little bow.
Thanks for dropping in today. I hope to be back tomorrow with my CASE from the Sunday’s featured stamper on Splitcoast.
Supplies:
Stamps: Eastern Influences, Pocket Silhouettes
Inks: Bordering Blue
Cardstock: Very Vanilla, Bordering Blue
Also: Cotton Lace
Getting Sentimental
Posted: March 9, 2009 Filed under: Cuttlebug, Itty Bitty Buds, Texturz plates 2 Comments
Flourishes is releasing three new stamp sets at the end of this week and to celebrate they have posted a challenge where the sentiment is to be the main event on the card. My first Flourishes set is enroute as I write this, a birthday present from my daughter.
As I have some new texturz embossing plates from SU I thought I would use the Flourish plate to provide the background for my sentiment. I put it through the cuttlebug and then wiped the Bashful Blue stamp pad back and forth across it to highlight the swirls. I had to try a couple of times before I found the right “sandwich” but it worked with “A” plate, silicone rubber, cardstock, texturz plate, cardstock+paper(as shim) and finally Texturz impressions pad. I split my background piece in two and then put lace and ribbon either side of the white strip, then added a bow. I decided to triple matte the sentiment and add one little flower and sparkle using stamps from the hostess set Itty Bitty Buds.
Thanks so much for dropping in and for leaving such encouraging comments.
Supplies:
Inks: Bashful Blue
Cardstock: Whisper White, Bashful Blue
Stamps: Itty Bitty Buds, All Year Cheer
Also: Rhinestone, Flourish Texturz plate, Bashful Blue taffeta ribbon, cotton lace from my lace basket
Ever After
Posted: February 9, 2009 Filed under: Cuttlebug, Ever After 2 Comments
This card happened a little by accident, but I am very happy with the accident. After I had had all sorts of issues with my previous heart card, which had meant that I had stamped the heart, cleaned the stamp, botched it and then stamped the heart, cleaned the stamp, botched it… the stamping scrub was tinged with red ink, so even when I cleaned the stamp I didn’t do a good enough job. I inked up the heart withTsukineko Wheat Versamagic chalk ink, which I had never used before, and stamped it on vanilla cardstock. The colour of the heart was the pale salmon colour in the card above, not wheat. It just happened to match beautifully with Blush Blossom so a few layers and a cuttlebug embossed matte were all that was needed to make this wedding card.
As the card is 5¼” square the cuttlebug matte needed to be wider than the embossing folder. I put it through once and then moved the folder over to the unembossed strip down the side of the square and carefully fitted the folder partially over the already embossed part of the square but also over the rest of the square. Sharon actually explains how to do it with pictures here.
Thanks for dropping in.
Supplies:
Inks: Tsukineko Versamagic chalk ink- Wheat
Cardstock: Very Vanilla, Blush Blossom
Stamps: Ever After
Also: Textile cuttlebug folder
Cuttlebug Valentine
Posted: February 8, 2009 Filed under: Cuttlebug, Ever After 2 Comments
This heart is the first stamp I have from the new catalog. I didn’t have a heart stamp so I decided to get this beautiful one. Simple though this card is, it took me forever! I had hoped to post it a few days ago but I just couldn’t work out what was missing. I changed orientation, added words, removed the ribbon, etc, etc. As it turned out all it needed was the embossed background; I had been working with a blank vanilla piece which was just too plain. The embossed background filled in the space without making it too busy.
I stamped the heart in red, cut it out and cut a matte out of real red. The heart is raised slightly over the ribbon by stampin’ dimensionals. Thanks for dropping in, I have another heart card which I am almost finished which should be up soon.
Supplies:
Inks: Real Red
Cardstock: Very Vanilla, Real Red
Stamps: Ever After
Also: Red grosgrain ribbon, Birds and Swirls cuttlebug folder
Brocade gift set (cont.)
Posted: June 24, 2008 Filed under: Cuttlebug, Designer Paper 1 CommentI did not get back to the gifts for my friend’s birthday until Friday night and then gave it all to her on Saturday without getting good photos of everything. If I get a chance I will try and take some photos of the rest of the gifts. I do have photos of two more cards which were part of a box of greeting cards. I managed to find a nice woven box to put everything in. (You wouldn’t know that the photos from the last post and these ones show cards from the same set as I have very warm yellow light in the first ones and cold grey light in these.)
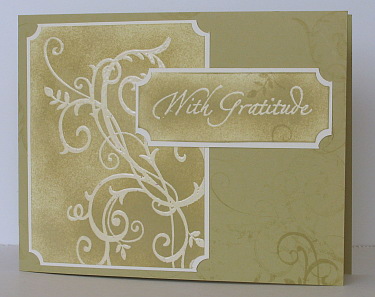
The card above features a clear embossed flourish on vanilla cardstock with river rock sponging over the top. To give the background some depth I stamped the flourish lightly and unevenly in river rock and did a little sponging as well.
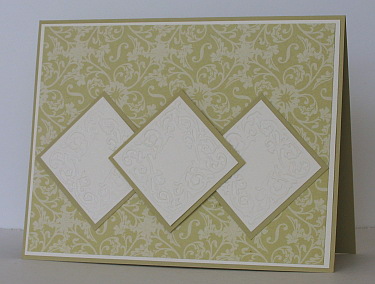
You can’t see them very well but the three squares on the card above were embossed with the cuttlebug using one of the formal squares folders. The design co-ordinated so well with the background designer paper that I didn’t add anything else.
Supplies:
Stamps:With Gratitude, Baroque motifs
Inks: River Rock, versmark
Cardstock: Very Vanilla, River Rock
Also: Brocade Backgrounds designer paper, formal squares embossing folder


