
A New Year
Posted: January 2, 2011 Filed under: Branch Out, Stamped Landscapes 2 Comments
Happy New Year everyone. I started a post yesterday featuring some of my favourites from the cards I made over the last year but I didn’t really have the time to put it together so I decided to give you a new card instead. If you want to look at some fabulous favourites from 2010 take a look at the CAS Best of 2010 thread at Splitcoast today. It is overflowing with inspiration! Thank you to those who shared their favourites and thank you to those kind people who listed a few of my cards, it is a thrill to make the list.
At this time of year the scene in the card above should typically be what I see out the window. Instead we have had fog and rain all day. The thin layer of snow we had is fast disappearing and green grass is evident. I will keep posting snowy cards in the hope that they soon resemble the view from my front door.
My technique was the same as usual for this snow scape card, but I used more dramatic lines and colours. Once again I added snow after all the stamping and sponging was done by splattering and painting with a mix of acrylic paint and water.
A winner…
Thank you for all your kind comments about the tutorial, and thank you, Sue for emailing a picture of your lovely card. As promised I put all the names of those who commented in a draw for the original card and I asked my son to pull a name out of a hat yesterday. The winner is… Janet Kay.
I will be in touch to get your address, Janet so I can put the card in the mail for you.
Supplies:
Stamps: Branch Out
Inks: Brilliant Blue, Basic black,Bashful Blue, Versamark
Cardstock: Flourishes classic white
OLW 34 Boot Camp
Posted: December 30, 2010 Filed under: CAS, Snowflakes 9 Comments
One Layer Wednesday is back again. This week Jennifer has sent us back to boot camp; we are limited to one image stamp and one sentiment stamp and a maximum of two inks. I had to double check that I had followed the rules as versamark is not actually a colour. I really did go back to basics in choosing this stamp and ink colour which were the first I bought from Stampin’ Up all those years ago.
I used a couple of post-it notes to mask the top and bottom of the card base and then not so randomly stamped the snowflake in versamark. I embossed with clear and then sponged in Not quite navy. After removing the bottom post it note I stamped some snowflakes in Not quite navy, re-stamping some without re-inking to get the lighter shade.
Supplies:
Stamps: Snowflakes, Short and Sweet
Inks: Versamark, Not quite navy
Cardstock: Flourishes Classic White
Also: Clear e.p.
Snow falling on pines
Posted: December 29, 2010 Filed under: CAS, Lovely as a Tree, Stamped Landscapes 19 Comments
When I showed this card to my second daughter she told me with a smile that I was in a rut. I prefer to think I am on a roll! I am concentrating on sponged landscapes at present, but it is entirely possible that tomorrow I might have no inspiration for another and start instead to punch out squares or emboss flowers.
I intended for this one to be a one layer card but when removing the post-it notes at the end one took some of the white cardstock with it so I had to cut out my scene and create a new base. I stayed simple just popping it up a little. The falling snow was inspired by a gorgeous card Sally made here. I used her technique of mixing a little white acrylic paint with water and splattering it over the stamping and sponging.
Thanks for all your comments about the tutorial. I am glad it has been helpful and will draw a name to send the original card to on Saturday.
Supplies:
Stamps: Lovely as a Tree, Taglines (Flourishes)
Inks: Basic Black, Perfect Plum, Going Gray
Cardstock: Flourishes Classic White
Also: Stampin’ Dimensionals, White acrylic paint
The long awaited sponging tutorial
Posted: December 27, 2010 Filed under: CAS, Lovely as a Tree, Stamped Landscapes, Tutorial 35 Comments
At long last I have created a sponging tutorial. The photos from the tutorial worked well and the colours are accurate. Unfortunately I had trouble photographing the final product(above) and getting the colours right. In reality they are a little more vibrant. (Also I think the camera lense has smudges on it as my photos always end up with smudges at the top or right hand side) I know I have taken forever to do this tutorial but in deciding what to do I realized that it would be best to start with the simpler version: a sponged card without embossing so this is it. I may even get around to another tutorial which includes embossing, but I know you will only believe that when you see it!
First I positioned post-it notes to create the borders of my scene.
Next I cut a hilly edge on another post-it note and positioned that two thirds of the way down the white space. When doing a snowy scene I often divide the scene to allow two thirds sky, one third snow, otherwise there is too much white space.

I punched a circle out of post-it with a circle punch and positioned it in the sky. For sponging I use a quarter of a circle sponge. I have some from Stampin’ Up and some Dollar Store; the SU ones are better. I start sponging with the lightest colour first and it often takes quite a while to build up the colour. Remember you can always add more colour but you can’t take it off!

This is how I keep my sponges. When I started sponging I didn’t allocate one sponge per colour I was a bit more random. I soon discovered it was worth having more and keeping them labeled. Mine are sorted in the old SU categories because I still think in the rich regals, soft subtles, etc. I have yet to move on.

We interupt this tutorial to show you the downy woodpecker who flew in for a little suet mix while my daughter was taking a few photos for this tutorial.

After sponging with the lightest colour, which was Almost Amethyst, I started sponging with Brocade Blue. I left a ring of amethyst around the moon and started the brocade outside that.
Then I moved onto Elegant Eggplant. I just keep on sponging until I am happy with the blend and coverage. It always looks more dramatic once you have lifted the masks at the end, so I peek underneath occasionally to see how strong the colour is.

Next, some trees. I repositioned my hill mask, moving it left and a little below where it was previously and removed the moon mask.

I stamped the trees in black, being careful to avoid the little grassy bits at the base of each tree.

At this point I also did a little sponging to show the edge of the snow bank. I usually do a bit with the sponge, but to sponge a smaller area I use a q-tip.

Then I added some trees in Eggplant which I first stamped on scrap and then on the card so it would be paler and appear more distant.

I moved the hill again and sponged the edge of the hill to create the next snow drift.

You can add another few trees here also if you like so you have some more in the foreground. Then move the hill mask again and sponge along the edge again.

Once you have the snow drifts and trees you want remove the hill mask and sponge a little colour along the lower edge so your scene will have an edge one the masks are removed.

There you have it. If you lasted this long, well done. If you are interested in having the original card leave me a comment and I will pick a name at the end of the week. If you make a card using this tutorial let me know and I will put your name in the draw twice. Thanks so much for dropping in and for all the encouragement you give me.

Supplies:
Stamps: Lovely as a Tree, Hugs & Wishes
Inks: Basic Black, Almost Amethyst,Brocade Blue, Elegant Eggplant
Cardstock: Flourishes Classic White
Feed the birds
Posted: December 17, 2010 Filed under: Branch Out, CAS, Stamped Landscapes 5 Comments
Our family enjoys watching the birds feeding outside our kitchen window. In winter the seeds scatter on the snow and the cardinals, if they come, stand out: red against white. I added a little scattering of seeds in this scene with a brown marker.
I know I owe you a sponging tutorial; you have been very patient. I am hoping to do one over the Christmas break. I agree that it helps to see the steps rather than have me try and describe them. That being said, I will not go into detail about how I did this card. Of course there were post-it notes, sponges and embossing powder involved!
I have just a few more Christmas cards to make, and then I might need to whip up a few tags. But I had better get onto the gifts or I won’t be needing tags!
Supplies:
Stamps: Branch Out, Everyday Flexible Phrases
Inks: Bordering Blue, Basic black, Not quite Navy, Real Red, Close to Cocoa, Versamark
Cardstock: Flourishes classic white
Also: Clear e.p.
Moonlit Night
Posted: December 16, 2010 Filed under: CAS, Stamped Landscapes 7 Comments
One of my favourite techniques as you might have noticed, is to create sponged and stamped scenes. This one just might be the smallest I have done. I started by masking a rectangle with post-it notes and then cutting a hill shape with another post it note. I punched a tiny circle out of post-it note and stuck it in the corner. With my hill and moon in place I sponged in both brocade blue and night of navy until I was happy with the sky. I then added my trees and removed the mask. I did a little bit of sponging on the snow in blue and then stamped the trees upside down in navy and sponged around them.
Once I had removed the masks I could see that it had actually created a moonlit hill top.
To borrow a “Joan Bardee-ism” Mood when done: most pleased!
Supplies:
Stamps: A little tree stamp from Embassy Arts, Wondrous Gift
Inks: Night of Navy, Bashful Blue, Basic black, Brocade Blue
Cardstock: Flourishes classic white
A musical theme
Posted: December 15, 2010 Filed under: CAS, Rollers 7 Comments
These cards were inspired by cards I admired on Susan Raihala’s and Colleen Dietrich’s blogs.
As our family is involved in many musical activities I bought the musical notes roller from SU planning to make many cards with it. I made a few and then seemed to get stuck without inspiration. That is until I saw Susan’s delightful Christmas balls which I reproduced with very minor changes.

When I saw Colleen’s clever stack of presents I again saw an opportunity to use my music roller. I reproduced her card but without all her gorgeous embossing and layers (I was a bit lazy to add them). Then, because I was on a roll, I made another card with the gifts in a row. On all the cards the punched shapes are popped up on stampin’ dimensionals and on the two cards above the shapes are sponged around the edges too.
Now I had better get on with writing in these cards, that is the idea of making them after all isn’t it?

Supplies
Stamps: Music Notes roller, Short & Sweet
Inks: Choc Chip, Real Red, Wild Wasabi
Paper: Whisper White, Confetti White ,
Also: Gold cord, Red ribbon, red gingham ribbon, stampin’ dimensionals
Penny Black Snow Dust
Posted: December 14, 2010 Filed under: CAS, Penny Black, Snow dust, Stamped Landscapes, Wondrous Gift 7 Comments
It is not quite as snowy as this card just yet, but it won’t be long. When I bought the Penny Black wreath stamp, I also bought this PB stamp called Snow Dust. I did my masking with post-it notes as I usually do, both to frame the scene and to create the snowy hills. I stamped the trees in versmark with a base of black and then embossed in clear before sponging in the sky and the hills. Once all the sponging was done I realised that my tree bases were too black compared to the white branches so I used a super fine black marker to draw a line under several branches so that they appeared to be snow laden not made out of snow.
I noticed that the technique lovers challenge at Splitcoast this week is to use sponging, so I will be participating with at least this card, but probably more.
Supplies:
Stamps: Snow Dust(Penny Black),
Inks: Versamark, Bashful Blue, Pretty in Pink, Brocade Blue, Going Gray
Cardstock: Flourishes classic white
Also: Clear e.p.
Watercolored tags
Posted: December 12, 2010 Filed under: All That Glitters 3 Comments
When I had finished creating the gift set of watercolored Christmas cards I used the last few balls to make a few tags to add to the set. The details about stamps and inks can be found on my previous post. I’m so glad you dropped in.

Watercolored Gift Set
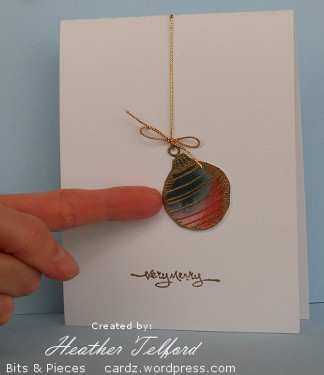
Posted: December 8, 2010 Filed under: All That Glitters, CAS 9 CommentsRecently a friend of mine celebrated her 50th birthday. Because her birthday is in late November I decided to create a set of Christmas cards and tags as her gift. It is a gift she will end up giving away but hopefully she will still enjoy it.

I have been wanting to create some watercoloured Christmas balls so a gift set was the perfect opportunity. I created one sheet of randomly blended watercolour first using blue, green and pink ink on wet watercolour paper and when it dried I stamped the Christmas balls all over it and embossed in gold. The time consuming part was cutting all the balls out. Once that was done I started playing with combinations of balls. The first card took forever as I threaded the gold cord through the card so that it could attach to each ball and then added little bows. It was at this point that I doubted my decision to make a gift set. Things sped up after that and I got all the cards made and finished off with a few tags.

On a couple of cards I threaded the cord through the loop of the ball but did not adhere the ball so it swings when you tip the card from side to side. I thought this little gimmick was cute; I just hope it doesn’t break off the cord at some point.


Some of the Christmas balls are stuck directly on the cardstock; others I popped them up on stampin’ dimensionals. For the little balls I did not use real cord, instead I drew cord and bows with a gold gel pen.

Thanks for dropping by, I know it’s been rather quiet here lately. I started writing Christmas cards yesterday and it seems I might need a few more. That is fine with me; I have had much stamping time lately.
Supplies:
Stamps: Short and Sweet, All that Glitters(Flourishes), Many Merry Messages, Graceful words
Inks: Versamark, Not quite Navy, Garden Green, Pretty in Pink, Bravo Burgandy, Riding Hood Red
Cardstock: Flourishes classic white, Fabriano Hot pressed watercolour paper, Not quite Navy, Riding Hood Red, Pretty in Pink
Also: Gold e.p., Gold cord, Gold gel pen, Stampin’ dimensionals


