
Complementary collage
Posted: January 14, 2013 Filed under: Bliss, CAS, Collage cards 14 Comments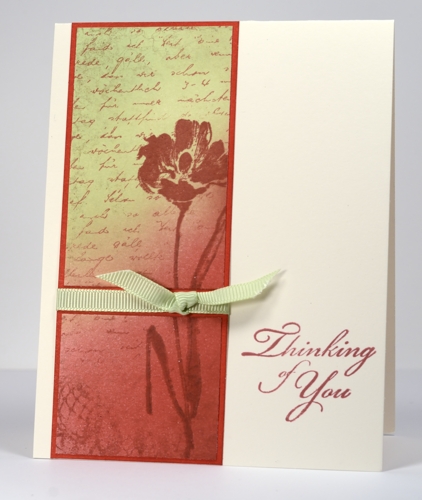
Most, if not all of the collages I have done previously have been analagous colour schemes. This one is a complementary colour scheme meaning that it uses colours opposite each other on the colour wheel. Complementary colours create more contrast and each colour promotes the other. In creating this card with red and green together you can see that my natural tendency for muted and harmonious tones influenced which red and green I chose to put together.
I started by stamping a very light impression of lace background in red where the image was darker at the bottom and hardly visible at the top. I then sponged the red from the bottom right hand corner to around the middle and the green from the opposite corner down. I stamped the flower in the same red but with some brown added on the stem. Finally I added the letter background in red to tie the whole panel together. I sliced the panel and matted it before adding the ribbon.
Tomorrow I have a collage in an analogous colour scheme, more of what you are used to from me. Thanks for dropping in. I am glad when I have inspired you to try something new and love reading your kind comments.
You probably realize this, but on the right side of my blog I have a little drop down menu that allows you to search my archives by single stamp, set, technique, tutorials, manufacturer, etc. I have just added a “collage” category and there is already a stamped landscape category. Just thought I’d mention it as it might be helpful if you are looking for something specific.
Supplies:
Stamps: Letter Background, Floral Thread, Gratitude, Bliss (PB)
Inks: Memento Rhubarb Stalk, Rich Cocoa and New Sprout, (Tsukineko)
Cardstock: Mix & Match Coral Reef
Lemon and Lace
Posted: January 13, 2013 Filed under: Background Stamps, Collage cards, Lace Flower, Penny Black 16 Comments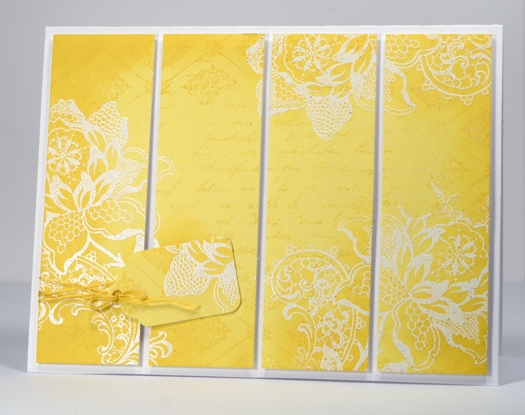
This is an unusual colour scheme for me but a happy one. Because the flower is made of lace I think it works well in white. I began the design on a rectangular piece of Penny Black Mix & Match Summer Sun cardstock by stamping the diamond design background stamp around the edge of the panel and the letter background in the middle. I then stamped the lace flower several times on in versamark ink and embossed in white embossing powder. To highlight the edges and the flowers I sponged some memento dandelion ink around the edges of the panel then sliced it into four pieces. I had a scrap left over so I punched a tag out and tied it on with embroidery floss. The four panels are popped up for a little added dimension.
I hope your day is happy and sunny.
Supplies
Stamps: Letter Background , Diamond Pattern, Lace Flower, (PB)
Ink: Memento Dandelion, Versamark (Tsukineko)
Cardstock: Penny Black Mix & Match Summer Sun
Also: embroidery thread
Masking Fluid Christmas Collage 2
Posted: December 22, 2012 Filed under: Background Stamps, Before the Snow, Collage cards, Stamped Landscapes 13 Comments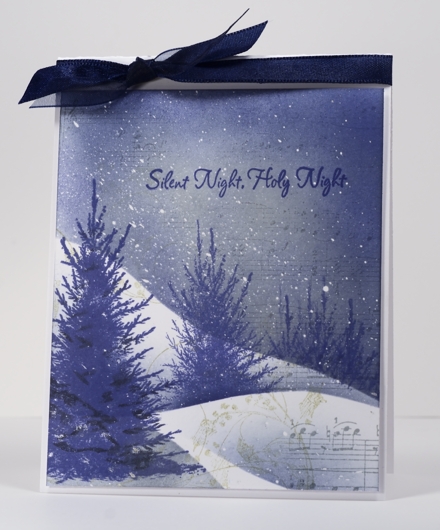
Here ends a week of Christmas cards made using masking fluid to create falling snow. I really enjoy this technique and I hope you will too when you get a chance to try it out. I would love to see what you create as I’m sure others would too so I have created a link up below where you can share your creations. It will be open for two weeks.
To create this one I stamped music background and winter scroll first, before I placed any masks. Then I positioned the first hill mask and sponged the blue and grey sky and added some background trees. I then repositioned the mask to create a snowbank, added a tree, removed the mask, stamped a foreground tree.and added a bit more sponging. I did add a bit of black on the foreground tree for extra definition but I don’t really like it so I wouldn’t bother next time. If that description is a bit rushed check out my tutorial where I go into way more detail.
I hope to post my last few Christmas cards in the next two days and some gingerbread creations too.

Supplies:
Stamps: Letter Background, Winter Scroll, Silent Night, Before the Snow (PB)
Inks: Memento Pistachio,London Fog, Paris Dusk (Tsukineko)
Also: Winsor & Newton Masking Fluid
Masking Fluid & Christmas Baubles
Posted: December 20, 2012 Filed under: Background Stamps, CAS, Collage cards, Hanging Treasures, Penny Black 14 Comments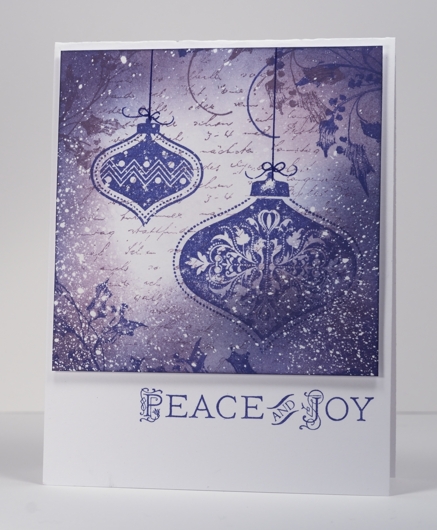
Look no trees in this card!
I used the same technique as I used for the Snow Storm Collage card over a base of flicked masking fluid. Several readers have looked for masking fluid with varied success. The one I am using is Winsor & Newton masking fluid for watercolour painting.
Edited to add: Several readers have shared that the masking fluid is available at Hobby Lobby, Michaels, Dick Blick, Jerry’s Artorama, I have bought it at both Michaels and Wallacks art supply. One thing to look for when you buy is that it is for watercolour painting, another is that it is not permanent. I prefer to have a little colour in it so I can see where it is, so I would not go for the colourless one. Mine ends up looking a creamy colour but I have used one that is bright orange also.
That’s all for today; thank you for visiting and thank you for all the encouragement, I love reading your comments.
Supplies:
Stamps: Letter Background , Hanging Treasures,Winter Scroll (Penny Black)
Inks: Sweet plum, Paris Dusk (Tsukineko)
Also: Winsor & Newton Masking Fluid
Snowstorm collage
Posted: December 13, 2012 Filed under: Background Stamps, Before the Snow, Collage cards, Penny Black, Stamped Landscapes 22 Comments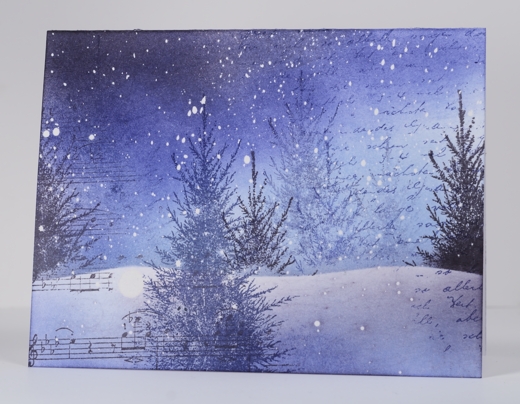
After making a small panel collage the other day I picked up another card base which I had covered in flecks of masking fluid and made a snowstorm collage. Other than the addition of masking fluid I used the same technique described in my collage tutorial: two background stamps and a feature image (often I use a small additional image as well, but for this one I used the tree multiple times)
I created the collage in the following order over the masking fluid:
- stamp part of letter background in Paris Dusk ink after stamping it on scrap paper first
- stamp part of music background in Elderberry ink
- position hill mask and stamp “Before the Snow” trees in blue and elderberry ink
- sponge sky in blues and elderberry
- remove mask, sponge the snow around the bottom of card and stamp foreground tree in blue.
- remove masking fluid
Supplies:
Stamps: Letter Background, Music Background, Before the Snow (PB)
Inks: Memento Summer Sky, Elderberry, Paris Dusk (Tsukineko)
Also: Winsor & Newton Masking Fluid
Snowflake collage
Posted: December 12, 2012 Filed under: All is Bright, CAS, Collage cards, Penny Black 11 Comments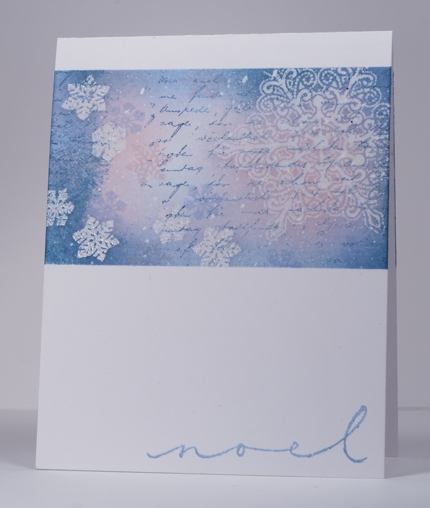
Cheryl is hosting the One Layer Wednesday challenge this week and her theme is Snowflakes. A nice thick layer of snow would be welcome here because we have a treacherous layer of ice that needs to be covered up.
I realized yesterday that I hadn’t created any Christmas cards using my collage technique so I played around and made a few. I had a few card bases with masking fluid already flicked onto them so when I decided to make a collage Christmas card I picked up one of the bases complete with ready made snow. The post-it masks were place before I flicked masking fluid on and then remained there while I created the collage. The order for the collage was:
- stamp letter background in teal zeal
- stamp snowflakes in versamark and emboss in clear powder
- sponge in blues and pink
- stamp extra snowflakes in blue and pink
- remove masks and masking fluid
Have a great day, keep warm and stamp some snowflakes if you get the chance.
Supplies:
Stamps: All is Bright, Noel, Hello Winter , Letter Background(PB)
Inks: Memento Summer Sky, Teal Zeal, Angel Pink, Versamark(Tsukineko)
Also: Clear e.p., Masking Fluid
Monochrome collage
Posted: November 13, 2012 Filed under: Aspire, CAS, Collage cards, Penny Black 14 Comments
A few weeks back our talented OLW host Ardyth challenged us to create a card inspired by a song. That was weeks ago, I know but this is the card I made for the challenge. The sad thing is I only realised as I was attaching the tiny tags that I had created a three layer card for a one layer challenge! Needless to say I did not participate in the challenge but saved the card to share another day.
I used my tried and true method to create the collage: a couple of background stamps, an image and a sentiment all stamped with different shades of brown. I inked only part of the two background stamps so they would blend together. I sponged first with the lightest brown, Memento Desert Sand, then added some Potter’s Clay and finally some Rich Cocoa on the edges of the panel.
I turned a “Happy Birthday” stamp into my song sentiment “Oh Happy day” by inking only a portion of the stamp with markers and handwriting the “Oh”. I have had “Oh Happy Day” on my brain for several weeks, ever since it sprang into my mind prompting me to look it up on youtube. The first version that comes up is from Sister Act 2 and is an entertaining rendition.
Supplies:
Stamps: Letter Background, Diamond Pattern, Aspire, Happy Birthday(PB)
Inks: Memento Potter’s Clay, Rich Cocoa & Desert Sand (Tsukineko)
Also: tag punch and cotton twine
Collage Card Tutorial
Posted: July 16, 2012 Filed under: Collage cards, Flamboyant, Penny Black, Tutorial 17 Comments
I have put together a tutorial describing the way I made my recent collage cards. I am sure there are many successful methods but this is the way I did it.
The tutorial describes how I made a monochromatic collage; my blue collage and the brown collage are in this post. Once again I relied on my son’s and my husband’s expertise to complete the video tutorial but I think I am getting quicker over all!
Supplies:
Stamps: Letter Background, Flamboyant, Gratitude, Lace Delight (PB)
Inks: Memento New Sprout, Pear Tart, Bamboo Leaves (Tsukineko)
Collage Thank You cards
Posted: July 4, 2012 Filed under: A Flight of Thread, CAS, Collage cards, Penny Black, Queen Anne's Lace 18 Comments
Our daughter graduated from high school last week and when thinking back over the years I started recalling the many people who have positively impacted her life, contributed to her education and prayed for her through thick and thin. I thought I might get a few photos and slip them inside cards and send them, especially to our friends and family in Australia who love her dearly but rarely get to see her.

I enjoyed making my own collages although it does take a little time and does not always work the way I intend. In order to blend the images together without unattractive overlap it is sometimes necessary to ink only part of the stamp or as I did, ink it all then wipe off some ink with a cloth. It is hard to describe my process, especially as I am not sure that I remember what order I did things; perhaps it’s time for another tutorial?
Edited to add: I have posted a tutorial here on the blog and it is on my youtube channel
Supplies:
Stamps: A Flight of Thread, Queen Anne’s Lace, Letter Background, Flourish Thank You 4175F, Gratitude (PB)
Inks: Memento Rich Cocoa & Desert Sand, Summer Sky, Nautical Blue & Teal Zeal (Tsukineko)
Mix and match
Posted: June 30, 2011 Filed under: Berry Branch, Collage cards 23 Comments
I’m not sure what to call this style of card but I have been trying to successfully create one for a while. I like the mix of image with text and a little texture. I have seen several superb examples where different textures and images are mixed very cohesively, sometimes with several layers, other times with one.
I started by working on one layer but decided a mat and an extension of the stamping would work best. I stamped the branch first after inking it with regal rose, using marker to add choc chip twigs and branch colour. I find this stamp quite frustrating although I love the design, as I always want it in two colours but it is very hard to ink it successfully with markers. What I ended up doing here was drawing with choc chip marker over a lot of the twigs after I had stamped them.
I don’t own a large text stamp so I stamped a sentiment stamp repeatedly to give the impression of a page of text. I also inked my large canvas background stamp but stamped it off first so I would only get a faint impression. Finally I sponged the parts of the panel and flicked some water droplets around. The panel is popped up ever so slightly.
Thanks for dropping in; I’ve enjoyed reading the comments you have kindly left here lately.
Supplies:
Stamps: Berry Branch (Penny Black), Canvas (SU), Ageless Adornment (SU)
Inks: Certainly Celery, Regal Rose, Choc Chip, Pretty in Pink
Cardstock: SU Whisper White, Mellow Moss


