
Dissolving blossoms
Posted: April 3, 2010 Filed under: Garden silhouettes, Uncategorized 3 Comments
Yes, it is another watery coloured image! (It definitely looks better if you click on it to see it full size)You can see I had fun with this technique. There is only one more after this one, then I will try and move onto other techniques, I think.
Once again I wet the watercolor paper then inked the stamp with markers before stamping it on the wet paper. There is quite a lot of blurring in this image but I still like the contrast of the sharper leaf tips with the dissolving flowers.
Supplies:
Stamps: Garden Silhouettes, Teeny Tiny Wishes
Inks: Real Red and Always Artichoke Markers
Cardstock: Flourishes Classic White, Always Artichoke
Brayered backgrounds
Posted: July 29, 2009 Filed under: Garden silhouettes, Inspired by Nature, Upsy Daisy 7 CommentsI have been working on this trio of cards for a couple of days . The idea had been in my head for a while but when I saw Susan’s masked and stippled cards here I was inspired to make these cards with a masked rectangular focus.

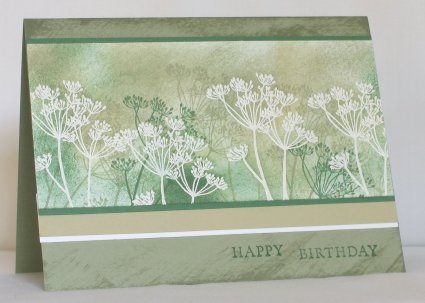
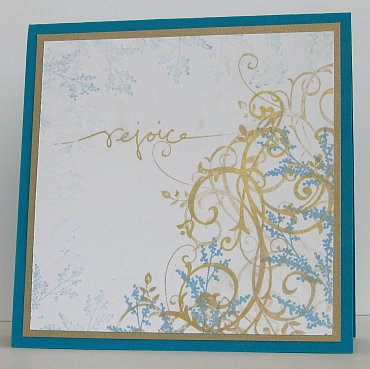
There was a bit of trial and error involved. I masked with post-it notes and then brayered with two colours. Both the orange card and the grey/green card took four attempts. Each time the brayering went through the post-it notes or the silhouette touched outside the brayered space or the post-it note tore the cardstock but finally I achieved what I had set out to do. The grasses card worked first time?!

I stamped over the brayering with Basic Black ink, sometimes more than once to make a solid image. I had trouble photographing these cards. I think I need to spend some time with the camera manual.

Things I learnt while making these cards:
- Sometimes it is necessary to mask with two layers of post-it notes so the brayering won’t go through, mark the edge or the cardstock and turn what was going to be a one layer card into a two layer card.
- It is probably best to use a fresh post-it note to mask the second, third or fourth attempt, they did come from the dollar store after all.
- Rather than try and use your stamp-a-ma-jig after you have stamped an incomplete image, stamp with it the first time, them it is in place for the second and third inking.
- If you stamp on your stamp-a-ma-jig imaging sheet with waterproof black ink you might want to wash it straight away.
Hmmm…
Supplies:
Stamps: Upsy Daisy, Inspired by Nature, Garden Silhouettes, Everyday Flexible Phrases
Inks: Pumpkin Pie & Summer Sun, Brocade Blue & Mellow Moss, Sage Shadow & Bordering Blue
Cardstock: Pumpkin Pie, Very Vanilla, Brocade Blue, Bordering Blue, Whisper White
Also: Brayer
FTL 52
Posted: July 27, 2009 Filed under: Garden silhouettes, Thoughts and Prayers 2 Comments
I am enjoying the wide range of Clean & Simple cards being created around the place these days. I came across the Clean & Simple stamping blog the other day and decided to play along with their current challenge FLT52.
I chose a favourite set of mine, Garden Silhouettes. I inked the whole stamp in Pretty in Pink then used markers to ink in the red centres and green leaves and stems over the top. I did a little masking to overlap the branches a little. The flower is made with the Boho Blossoms punch and a red brad.
Supplies:
Stamps: Garden Silhouettes, Thoughts and Prayers
Inks: Real Red and Garden Green Markers, Pretty in Pink
Cardstock: Garden Green, Pretty in Pink, Whisper White
Also: Real Red brad, Boho Blossoms Punch
Story-book window & tutorial
Posted: March 7, 2009 Filed under: Baroque Motifs, Branch Out, Garden silhouettes, Pocket Silhouettes, Season of Friendship, Stamped Landscapes, Tutorial 6 Comments
I have finally completed a card tutorial! I had hoped to do one for a snowscape, but the seasons are changing and I have more of a spring scene instead. I used some of the same techniques to do this scene as I used for my snowscapes. The inspiration for this card came from the cover of a children’s novel The Dragonfly Pool by Eva Ibbotson
First I cut a piece of scrap card to be a mask for my hillside. I kept both pieces so I could mask the sky and the hills at different times. Of course you don’t need the huge piece I have, I’m not sure why I went so large?

I started with the sky, holding the mask in place while I sponged with both Bashful Blue and Ballet Blue.

To do the hills I swapped masks and sponged down the left hand side and across the bottom with Garden Green.

I then moved the mask a little to make the edge of a hillside and sponged with more Garden Green and some Certainly Celery.


On the right hand side of the hills I sponged with Summer Sun which I blended into Certainly Celery to create a lighter hillside.


With all the background sponging done I began to stamp the silhouettes along the bottom of the card. I used Basic Black, stamping some of the stamps upside down to use just the stems as grass. Where the flower stems were a little short I lengthened them with a black marker. I used two stamps from Garden Silhouettes to frame the picture in foliage.

Around the outside of the scene I embossed a silver border using an embossing marker and ruler to make a line down each edge.

I added a little flourish to each corner with versamark and the large flourish stamp from Baroque Motifs.

Rather than pouring embossing powder over the whole image I dipped the edges into silver e.p. one at at time and then did the corners.

I stamped the dragonfly in black and coloured the wings with an embossing pen before embossing them in silver.

To make the sentiment I sponged a rectangle of Whisper White cardstock in Garden Green and Certainly Celery, then stamped the words in Basic Black and matted in black.( the photo didn’t turn out, sorry) I attached silver cord to both ends, wrapped it around the back of the cardstock and taped it. I also added the tiny butterflies from the Branch Out set.

As I was mounting the card on black I needed a white panel inside, so I sponged a bit in both greens and made the silver edges and flourishes using the same method described above.

I hope my instructions make sense, the method is fairly straight forward so have fun if you try it. Thanks for dropping in and reading this far! Have a great weekend.

Supplies:
Stamps: Garden Silhouettes, Pocket Silhouettes, Infinite Goodness, Season of Friendship, Baroque Motifs, Branch Out
Inks: Bashful Blue, Ballet Blue, Garden Green, Certainly Celery, Summer Sun, Basic Black, Versamark
Cardstock: Whisper White, Basic Black
Also: Silver e.p., silver cord
Glimpse of Spring
Posted: February 26, 2009 Filed under: Best Yet, Garden silhouettes, Stamp Simply challenges 17 Comments
Today is my last day as guest designer for Sharon’s Stamp Simply Challenge at No Time to Stamp. I have enjoyed myself immensely. Thanks, Sharon and your wonderful design team for the opportunity to join in the fun.
Stamp Simply challenge #76 is to provide a remedy for Cabin Fever. We need to see some spring. I don’t know what it is like where you are but the ground is still well and truly snow covered where I am! The temperature today did rise above zero today, though, so some would say spring must be on it’s way.
This is one of those cards I designed in my head and then when I came to try it out it actually worked out! Sometimes I can see a design clearly in my head and no matter what I do I cannot make it happen on cardstock. To make the spring scene I first cut an oval out of cardstock with my Creative memory cutters. I used the piece with the oval missing to make a mask, laying it on my white cardstock and stamping, then sponging everything except the sentiment without moving the mask.
I used the blossom stamp from Garden Silhouettes which is a favourite set of mine. Using the Rose Red, Regal Rose, Bravo Burgandy and Always Artichoke markers I coloured directly onto the stamp. The flowers were done with Regal Rose, but I added a centre dots with Bravo Burgandy and a few highlights on the edges with Rose Red. The leaves and stems were all Artichoke. It sounds fiddly but it onlytook me about 10 minutes to colour and stamp, this is the Stamp Simply challenge after all. I sponged Pretty in Pink and Mellow Moss around the oval edges. After removing the mask I used my Stamp-a-ma-jig to place my sentiment exactly where I wanted it.
(Just for the record, I did try to add ribbon, on the white, on the green, in bows or knots or just flat, but I couldn’t make it improve the composition at all!)
Don’t forget to check out the design team’s spring inspirations:
Dee, Tammy, Janine, AJ, Jennifer, Julie and Sharon
Supplies:
Stamps: Garden Silhouettes, Best Yet
Inks: Rose Red, Regal Rose, Bravo Burgandy and Always Artichoke Markers, Pretty in Pink, Mellow Moss
Cardstock: Always Artichoke, Mellow Moss, Whisper White
Also: Creative Memories oval cutters
Christmas gifts (3)
Posted: November 3, 2008 Filed under: Designer Paper, Garden silhouettes, Pocket Silhouettes, Upsy Daisy 1 Comment
This is my last boxed set of cards for now. I made these to co-ordinate with the card from my Stamp Simply Challenge a few weeks ago. I will be posting this set off to Australia soon.

Thanks for dropping in, I’m planning on giving myself a bit of a challenge this week, hopefully I’ll be back with more about it later.

Supplies:
Stamps: Upsy Daisy, Pocket Silhouettes, Garden Silhouettes, Infinitie Goodness
Inks: Versamark, certainly Celery
Cardstock: Whisper white, Certainly Celery, Certainly Celery Designer papers
Also: White e.p. white eyelet, White grosgrain ribbon
Peaceful Blossoms
Posted: August 17, 2008 Filed under: Garden silhouettes 4 Comments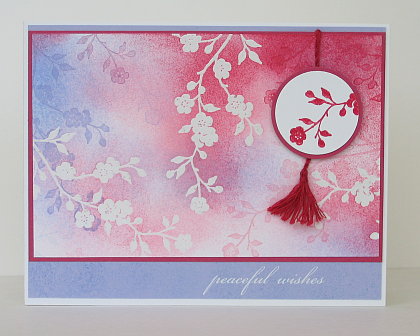
I’ve been wanting to participate in one of Sharon’s Stamp Simply challenges again so I was pleased when I read what this week’ challenge was. I had planned to try remaking a favourite card of mine anyway. Sharon’s challenge is to choose one of your own cards and then use it as your inspiration for a new card. You can change as little or as much as you like.
The card I chose was this one:
I love this set and have enjoyed using it lately to create some cards with a Chinese style. I decided to use the same technique and stamp set but change colours and layout. When I had settled on the size of the image panel and the mattes, it still need something so I created the little tassel which is a design element I often saw when in China.
I stamped the white blossoms in versamark first and embossed them with clear e.p. Then I sponged in Rose Red, Pretty in Pink, Bashful Blue and Almost Amethyst. Over the top of the sponging I stamped pale versions of the blossoms, stamping off on paper first so the colour was not at full strength. To make the medallion I stamped the blossom in versamark and then Rose Red so I could emboss it with clear e.p. The tassel is made from embroidery thread. The sentiment is a Cherished Memories rub-on.
Supplies:
Stamps:Garden Silhouettes
Inks: Rose Red, Pretty in Pink, Bashful Blue, Almost Amethyst
Cardstock: Rose Red, Whisper White, Almost Amethyst
Also: Clear embossing powder, circle punches, embroidery thread
Shadows
Posted: August 10, 2008 Filed under: Baroque Motifs, Garden silhouettes, My Kid's cards Leave a comment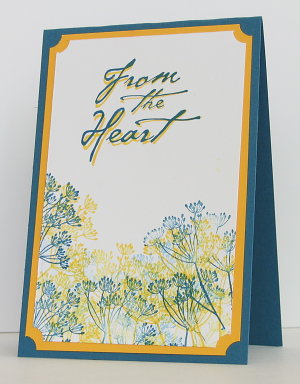
Here are the other two cards that A12 made recently. I think both turned out beautifully. She did an expert job on the shadowing of the sentiment in the card above and created a nice faded motif on the card below.
Supplies:
Stamps:Garden Silhouettes, All Year Cheer, Baroque Motifs, Graceful Words
Inks: Not quite Navy,Taken with Teal, Gold, Summer Sun
Cardstock: Not quite Navy, Taken with Teal, Summer Sun, Whisper White, Natural White, Brushed Gold
Thoughts of China
Posted: July 28, 2008 Filed under: Garden silhouettes, Stamped Landscapes 1 Comment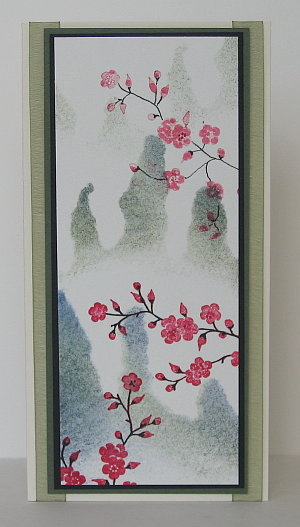 It has been over a month since I had anything to share here on my card blog. There is a reason. My girls and I have been to China and back. I intended to write a short post before I left explaining why and where we were going but with all the preparations I ran out of time. If you are interested you can read about our trip on my family blog. While I was away I was on the lookout for cards or even stamps made with Chinese motives and artwork, but I did not see much. I did buy my younger daughter a marble stamp with her name written in Chinese characters, but I didn’t think of buying myself one to stamp on my cards!
One of the places we visited was Huangshan or Yellow Mountain. It was enveloped in fog the day we climbed but the following day as we walked through an art gallery I saw many impressions of what we had missed. There were the somewhat familiar images of mountains and blossoms with whispy clouds around the slopes. That is what I have tried to recreate in these cards. In the gallery there was a series of four paintings showing a misty mountain side with branches of flowers in the foreground. Each one represented a different season.
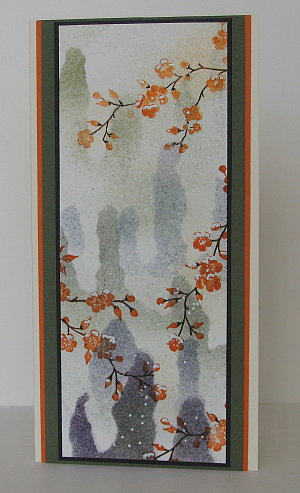 To create my two cards I tore the mountain shapes out of a piece of card and used the negative piece as a stencil. I sponged in Night of Navy, Always Artichoke and Basic Black. Then I stamped the blossom stamp from Garden silhouettes in Rose Red on one card and Pumpkin Pie on the other. To create some variation in the blossoms I blended with a blender pen and highlighted with a marker. I used a black marker to trace over the stems. On the orange blossom card I wanted to create a light dusting of snow so I added dots and sprinkles of snow on the blossoms with an embossing marker and then used white embossing powder. The pink blossom card is mounted on black then artichoke and finally over two pieces of olive organza ribbon. The orange blossom card is mounted on black , artichoke and pumpkin pie.
Supplies:
Stamps:Garden Silhouettes
Inks: Always Artichoke, Night of Navy, Basic Black, Rose Red, Pumpkin Pie
Cardstock: Watercolour paper, Very Vanilla, Always Artichoke, Basic Black, Pumpkin Pie
Also: Olive organza ribbon, white embossing powder
Subtle shades
Posted: February 22, 2008 Filed under: Garden silhouettes 1 Comment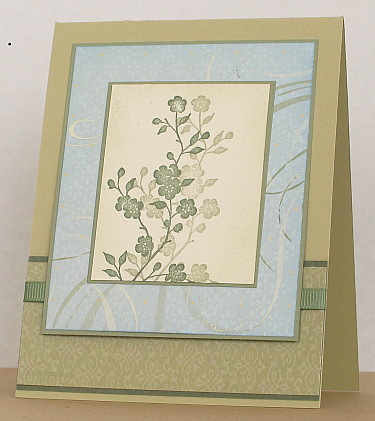
Sharon from No Time to Stamp posted a sketch challenge last week. I completed the card over the weekend but only managed to photograph it today. I like the soft shades of blue and green in Le Jardin set of designer paper. If I did it again I think I would use blue instead of moss ribbon.
Supplies:
Stamps: Garden Silhouettes
Inks: Mellow Moss, Always Artichoke
Cardstock: Very Vanilla, Le Jardin Designer paper, Almost Artichoke, River Rock, Mellow Moss
Also: Moss grosgrain ribbon


