
Radiant blooms
Posted: April 30, 2018 Filed under: Peerless watercolours, radiant | Tags: Faber-Castell Polychromos Colour Pencil, Peerless Transparent Watercolors, Penny Black creative dies, Penny Black stamps, Tsukineko Versafine inks 12 Comments
I am sharing floral cards this week here and on the Penny Black blog. This particular one makes me happy. It took me an age to complete but I think it’s bright and sunny. I’ve been wanting to create a card where the design continues across the back and front; my next challenge is one where the design covers back, front and inside!
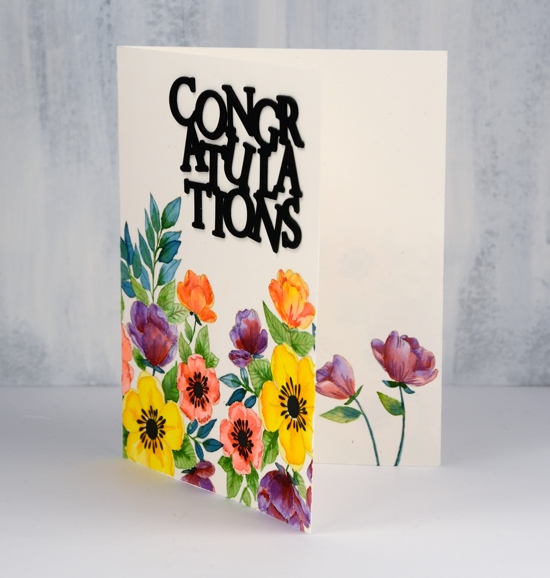
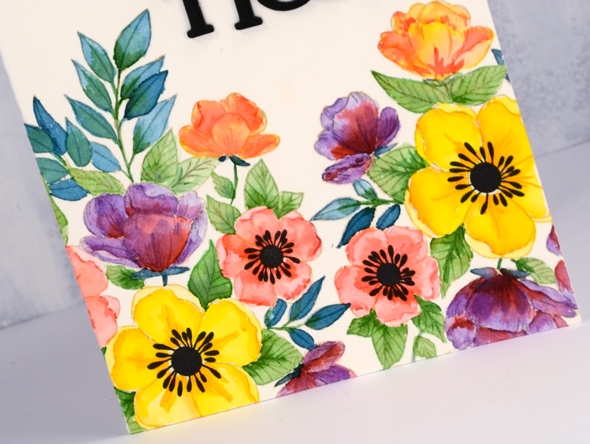
I used the large floral stamp from the transparent set ‘radiant’; it’s part of the new Nature’s Art release from Penny Black. I used my stamping platform and antique linen ink to stamp three prints across the panel. I wanted them to fit nicely together but not look like a repeat pattern so I changed the direction each time. If I had been really diligent I would have masked the first before I stamped the next but I just let them overlap a little. When it came to adding colour I decided which petals or leaves would be in front and painted accordingly. You can’t tell now can you?
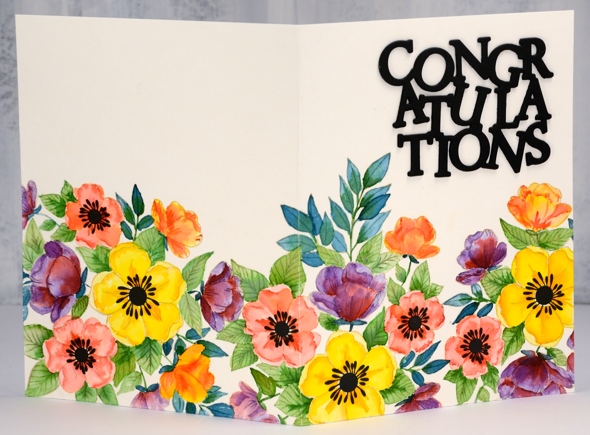
I used quite a few colours but I mixed and matched a bit. Basically I chose a yellow and orange for the large flowers, a peach and a pink for the medium flowers then did some smaller flowers with the orange and the pink (not new colours) I added a purple to the mix but shaded with the pink used earlier. On each flower I painted the lighter colour first then dropped in some of the darker one where I wanted shadow. I painted half the leaves with green and the other half with blue green then added shading to all with a darker green. When the same colour pops up in a few different mixes on your design it keeps things cohesive and visually appealing. Once all the painting was completed I used coloured pencils here and there to darken shadows and add more definition
The set includes solid centres in two sizes for the flowers so I stamped them in black and created my die cut stacked sentiment in black also. And I almost forgot to mention I stamped and painted a couple of flowers inside too.
I’ll be back with more bright and breezy florals tomorrow.
Supplies
Stamps: radiant 30-481 (PB)

Die: congratulation 51-439 (PB)

Inks: antique linen distress ink, nocturne versafine clair

Paint: Peerless watercolours

Paper: hot pressed watercolour, neenah black


Pencils: Faber-Castell polychromos pencils


This card is fantastic! So pretty!
Heather, I have followed your blog for quite a while, and have always enjoyed your work, but I have to say that lately your cards have been spectacular! Thank you so much for sharing your beautiful work and inspiring others.
WOWZERS! Heather you have really out done yourself this time! This is absolutely GORGEOUS!
Wow!!! Beautiful layout, beautiful colors!! I love the layers and that you even used colored pencils to finish. Bet it is going to be hard giving this one away! I am so tickled I got to see this work of art!
Knocked this one right out of the park, Ms. Heather! (And taught me how to cheat without masking…big yay!)
“WOWZERS” is right. Thanks, too, for the tip about using the same colors to unify a design. So fresh and pretty!
It is so amazing, oooh l would love to do a card like that, Heather.
STUNNING! Clavell and I have discussed this beauty and are trying figure out if you cut cluster apart in order to get the pieces to stamp (since you did not mask)??????????????????????
Would love to see a video on this one but understand how difficult that might be to do. Also, is this an A-2 card?????????????????
Thanks in advance for a response Heather!
Paper Hugs,
Jan
No, I didn’t cut the cluster apart. I stamped once then rotated the stamp a bit, positioned it nice and close to the first image (maybe with some tiny overlaps) and then stamped again and the same thing a third time.
It would be a rather long and boring video! I’ll see if I can do something similar but not so time consuming so you can see some of the steps.
Yes, it’s an A2 card.
So glad you liked it.
Thanks so much for the reply Heather…Clavell and I studied your card closer and assumed that you did indeed use the cluster, but still needed to know if it was an A-2 card. We both ordered the stamp – thinking we would cut it apart if necessary – LOL!!!
So grateful for your continued inspiration….we both agree we love your videos – please keep them coming!!!
Paper Hugs,
Jan
Absolutely gorgeous 😊
Sent from my iPhone
>
The wrap around stamping looks fabulous and love the bright colours Heather and the large black die cut sentiment looks great with it. x