
Masking Fluid & Brayered Sky 2
Posted: December 21, 2012 Filed under: CAS, Penny Black, Pine & Star, Stamped Landscapes 17 Comments
Another snowy scene for you today using masking fluid; I know many of you have purchased masking fluid and are trying it out or waiting for a chance to play. I have one more masking fluid card to post tomorrow so I might set up inlinkz so that you can link your cards if you get a chance. I could love to see what you create.
I used a brayer for the sky and applied grey ink from one edge and pink from the other so they would blend in the middle. I sponged the snow banks in both pink and grey.
To see why I keep creating snow scenes check out the photos below taken when I looked out my windows this morning.
Supplies:
Stamps: Pine & Star, Silent Night(PB)
Inks: Memento Angel Pink, London Fog(Tsukineko)
Also: Winsor & Newton Masking Fluid
This morning I woke up to this out my back door:

and this out my front door:

Masking Fluid & Brayered Sky
Posted: December 18, 2012 Filed under: CAS, Penny Black, Stamped Landscapes, Winter Ledge 7 Comments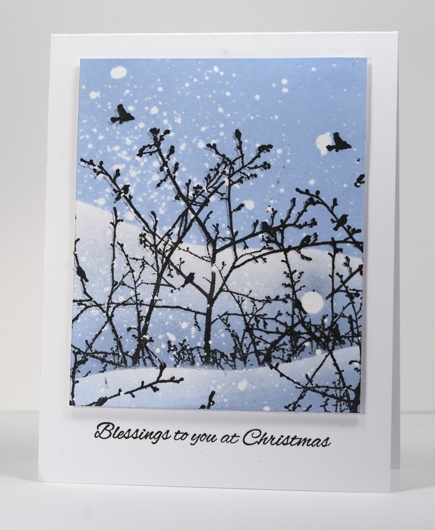
Following on from the tutorial I posted yesterday, today’s card features masking fluid to create falling snow but with a brayered sky instead of a sponged sky. With a brayer it is easier to create a uniform colour and coverage than it is with sponging. Usually I want variety and gradation in the sky but I also like to apply the ink with a brayer and create the kind of sky which I occasionally see, bright and beautiful on a winter’s day.
I used two hill masks to create this scene and used sponges on the snow banks where I gradation in the blue shadow. I stamped the winter ledge stamp once before removing the lower mask and then again over the corners of the panel. The masking fluid was applied in the same way as shown in yesterday’s tutorial.
We are expecting 5-10cm of snow tonight so perhaps I will see a scene like this sometime soon.
Supplies:
Stamps: Winter Ledge, Silent Night (PB)
Inks: Memento Summer Sky, Versafine Onyx Black, Versamark(Tsukineko)
Also: Winsor & Newton masking fluid
Snowy Scene Tutorial
Posted: December 17, 2012 Filed under: Before the Snow, Stamped Landscapes, Tutorial 40 Comments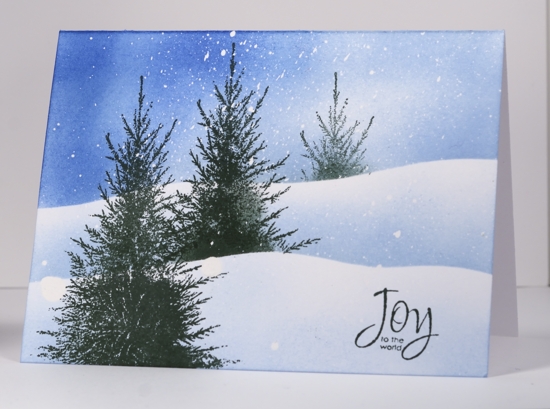
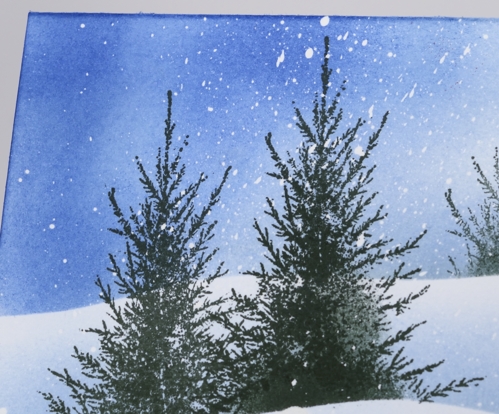
So here is a new tutorial! Thanks for waiting patiently for it. I guess I really should do more so the whole process becomes embedded in my brain! I apologize for the length of this one; you can fast forward if you like; it seems to go on and on! I hope it is helpful particularly in showing the masking fluid technique. I have made quite a few masking fluid resist cards lately as I love the falling snow effect which I will post them on the blog during the week ahead.
Below is a a close-up of the white flecks left on the card after the masking fluid is removed.
Supplies:
Stamps: Before the Snow, A Wish for Peace (PB)
Inks: Memento Summer Sky, Danube Blue, Northern Pine (Tsukineko)
Also: Winsor & Newton masking fluid
Snowstorm collage
Posted: December 13, 2012 Filed under: Background Stamps, Before the Snow, Collage cards, Penny Black, Stamped Landscapes 22 Comments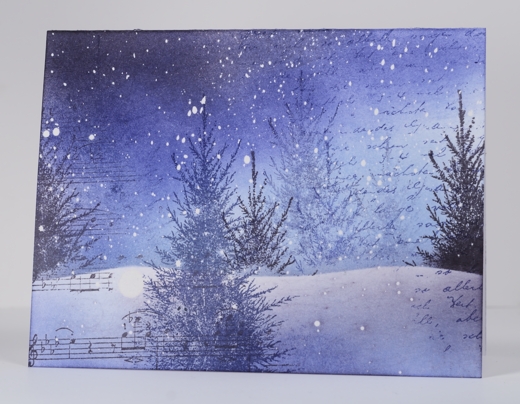
After making a small panel collage the other day I picked up another card base which I had covered in flecks of masking fluid and made a snowstorm collage. Other than the addition of masking fluid I used the same technique described in my collage tutorial: two background stamps and a feature image (often I use a small additional image as well, but for this one I used the tree multiple times)
I created the collage in the following order over the masking fluid:
- stamp part of letter background in Paris Dusk ink after stamping it on scrap paper first
- stamp part of music background in Elderberry ink
- position hill mask and stamp “Before the Snow” trees in blue and elderberry ink
- sponge sky in blues and elderberry
- remove mask, sponge the snow around the bottom of card and stamp foreground tree in blue.
- remove masking fluid
Supplies:
Stamps: Letter Background, Music Background, Before the Snow (PB)
Inks: Memento Summer Sky, Elderberry, Paris Dusk (Tsukineko)
Also: Winsor & Newton Masking Fluid
Winter Magic window
Posted: December 1, 2012 Filed under: CAS, Christmas Park, Penny Black, Stamped Landscapes 19 Comments
A few weeks back I made a snowscape with the ‘Christmas Park’ stamp used above. My first attempt didn’t entirely please me so I covered up the lower part by putting it behind a window panel. Next time you have a bit of a stamping mishap consider trying the window save.
I did a count today to work out how many Christmas cards I still need to make. Many! I had forgotten this one so now it is one less.
How is your pile growing? Or have you finished already?
Supplies:
Stamps: Christmas Park, Winter Magic(PB)
Inks: Memento Summer Sky, Danube Blue, Paris Dusk, Versafine Onyx Black, Versamark(Tsukineko)
Also: Clear embossing powder
Snowy Spruce
Posted: November 22, 2012 Filed under: Before the Snow, CAS, Stamped Landscapes 22 Comments
There is no sign of snow around here yet which is making life much simpler, especially as I am going places with a one year old at present. But of course in the card making world there is plenty of snow! My favourite method for creating falling snow on a card is to use masking fluid. To create this scene I stamped and embossed the tree first and then flicked masking fluid over the whole panel with a tooth brush. Once it dried I positioned my hill mask and sponged the sky with Memento summer sky ink. I repositioned the mask three times to create the snow drifts. If you haven’t used masking fluid before I have a tutorial here.
Supplies:
Stamps: Before the Snow, Noel (PB)
Inks: Memento Summer Sky, Versafine Majestic Blue (Tsukineko)
Also: Clear embossing powder, Gingham Ribbon, Winsor & Newton Masking fluid
Snowy forest
Posted: November 9, 2012 Filed under: Christmas Park, Penny Black, Stamped Landscapes 19 Comments
Give me a tree stamp and I will try and make a snowscape with it. I will also try autumn, spring and summer scenes but there is something about a magical snow covered scene that really works beautifully with tree stamps.
I used a technique which I have described previously in a tutorial here: Winter Berry Branch tutorial
I stamp an image twice, once in versamark then again slightly lower in black ink before embossing in clear powder. After sponging over the double stamped image any branches or trees appear to have snow sitting on them.
After a week of cold, cold mornings our weather is supposed to be warming up over the weekend. Which is good because it’s really not time for snow and as usual we don’t have all our leaves collected yet.
Supplies:
Stamps: Christmas Park, Silent Night(PB)
Inks: Memento Summer Sky, Danube Blue, Paris Dusk, Versafine Onyx Black, Versamark(Tsukineko)
Also: Clear embossing powder
New moon and snow
Posted: October 31, 2012 Filed under: Berry red snow white, Penny Black, Stamped Landscapes 16 Comments
I have another snowy scene for you today, not unlike some of my previous ones but the moon is new!
I inked the stamp with versamark then Memento markers and embossed it in clear before positioning my moon and horizon masks. To create the snow banks I just moved the mask down a little and added sponging several times.
Supplies:
Stamps: Berry Red Snow White, Beautiful Season (Penny Black)
Inks: Memento Teal Zeal, Summer Sky, Rhubarb Stalk, Rich Cocoa, Versamark (Tsukineko)
Cardstock: Mix & Match Papers Coral Reef, Storm
Also: Clear e.p.
OLW 106 Sponging
Posted: September 19, 2012 Filed under: CAS, OLW, Penny Black, Stamped Landscapes, Tutorial, Winter Ledge 42 Comments
As you may know if you have spent any time browsing around my blog, I love to use sponges to apply ink. That being the case I thought it appropriate that I devote one of my weeks hosting the One Layer Wednesday challenge to sponging. I want you to enter into the sponging fun too. You have no doubt tried it already; I see beautifullyl sponged cards here, there and everywhere. So your challenge this week is to use some sponging on your card; use a little or a lot, combine it with another technique if you like, just get inky! (Aach! I just realised, at the eleventh hour, that I used the very same stamp on my last OLW challenge. Sorry for the repetition; I will pay more attention next month!)
Don’t forget about the Gratitude Campaign! See Susan’s blog for details.
Don’t forget to check out the sneak peaks and giveaways on the Penny Black blog.
OLW106 Rules
1. A ONE-LAYER card is defined as a single layer of card stock folded in half. No other layers allowed!
2. Make a card that incorporates sponging
3. Post your card somewhere online and link back here using the InLinkz button at the bottom of this post. Please make sure you link to the specific post on your blog rather than your blog’s main page.
4. Have Fun!

I have received several requests lately for a sponging video tutorial. I am sorry I don’t have one for you today but I do have the next best thing, a photo tutorial. I will get a sponging video done as soon as I can.

Position your masks first; I find that it helps to use the lines on a cutting mat to get everything square.

Sponge your lightest colour first.

I only used two blues so I started sponging the darker blue on the side I wanted darkest. I even started off the card base to help regulate how much ink I applied. Without picking up more ink I sponged towards the lighter side of the sky as the intensity of the colour faded.

When I am getting close to the coverage I want I blend the ink by sponging in circles instead of dabbing it on.

When I sponged this snowdrift I did not go back to the lighter blue I used the dark blue sponge without picking up more ink. I sponged right on the edge of the post-it mask rubbing it against that edge so the blue would define the snow drift.


I always sponge a little on the bottom edge to define the edge of the panel.


Supplies:
Stamps: Winter Ledge, Silent Night (PB)
Inks: Memento Summer Sky, Nautical Blue, Versafine Onyx Black, Versamark(Tsukineko)
Les Petites
Posted: September 5, 2012 Filed under: A Wish for Peace, CAS, Penny Black, Stamped Landscapes 11 Comments
Yesterday I featured the lovely new patterned paper from Penny Black; today I have a little card to share. My card is made using Les Petites the sweet little pre-folded cards with coloured envelopes which are available from Penny Black.
The cards are 12 x 8.6cm (4¾”x3 3/8″) and are perfect for a little note.
I opted for petite stamps to create my little snow scene. The tiny spotted tree and the spotted swirl are from the transparent set ” A Wish for Peace”. The tree is embossed in clear embossing powder and all the sponging and stamping is done with Memento Teal Zeal ink.
One of my fellow PB designers, the talented Cathy Andronicou has a fabulous giveaway happening at her blog: The Bright Side of Life. Included in the giveaway are products by Faber Castell Design Memory Craft and Penny Black. Go and check out the giveaway and browse through Cathy’s lovely work at the same time. http://candronicoucardcraft.blogspot.co.uk/2012/09/giveaway.html
Supplies:
Stamps: Winter Magic, A Wish for Peace(PB)
Inks: Memento Teal Zeal, Versamark(Tsukineko)
Also: clear embossing powder


