
Gilded Dragonfly
Posted: May 23, 2017 Filed under: Dragonfly Frame, Gilding Flakes | Tags: Gilding, Penny Black creative dies 11 Comments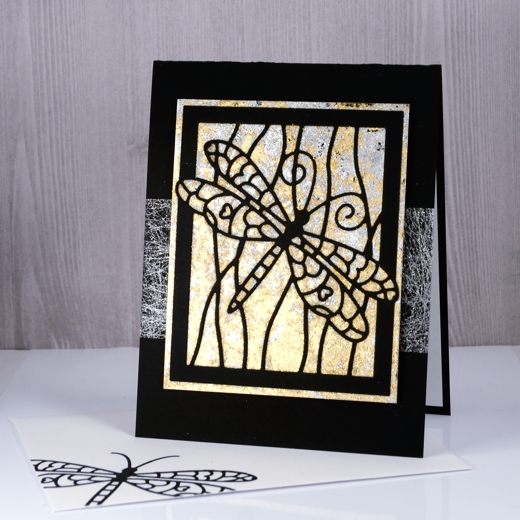
The lovely folk at The Foiled Fox have been spoiling me again, this time with gilding flakes. I tend not to add sparkly elements to all my cards but I do like the option of a little or sometimes a lot when a card asks for bling. I had no idea just how much I would like playing Midas with the Nuvo gilding flakes. They arrived on Friday, I experimented with them on Saturday and turned my panels into cards yesterday. If I didn’t have classes to plan and groceries to buy I would probably play with them more today.
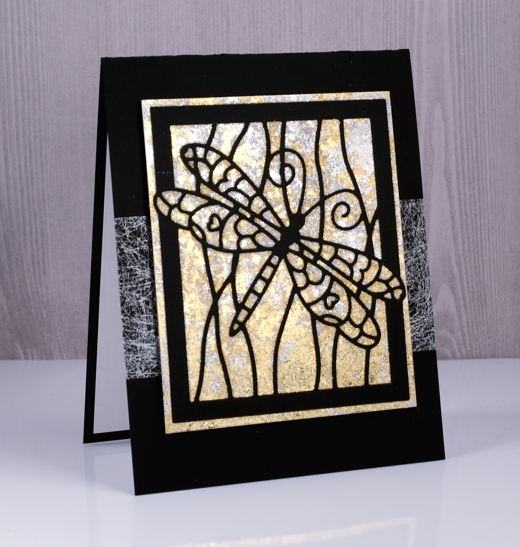
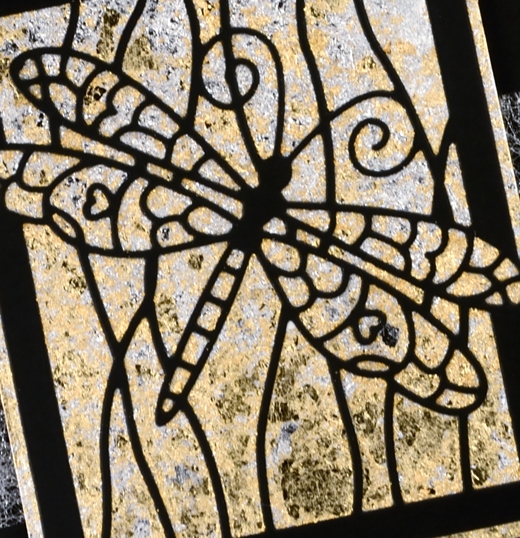
My initial experiments have resulted in six cards which I will share over the next little while. I played with a few techniques for adhering the gilding flakes and today’s is possibly the most effective so far. A word of warning, the gilding flakes are lighter than feathers and they do go everywhere! Jennifer McGuire suggested a swiffer cloth for clean up so I might just need to get one of those! To create the gilded background I cut a piece of ‘stick-it’ adhesive sheet larger than my dragonfly frame die and stuck it to a piece of white cardstock then removed the backing paper. Next I cut the dragonfly frame from black cardstock and positioned it on top of the adhesive rectangle on the white cardstock. I gently laid both silver and gold gilding flakes onto the adhesive panel and pressed lightly. The gilding adheres effortlessly to the ‘stick’it’, filling the entire area not covered by the black die cut. I burnished the flakes gently with a scrubby which breaks off excess pieces and makes sure all the adhesive is covered. The scrubby tends to turn the shiny silver and gold to brushed silver and gold so if you want maximum shine then burnish with your fingers or something smoother than a scrubby.
I trimmed the panel keeping a gilded border round the die cut frame. I wanted something extra behind the panel but not too much so I wrapped a strip of silver spiderweb fabric around my black card base then attached the gilded panel over the top. I finished the card with a white paper panel inside to write on and an envelope decorated with the die cut dragonfly. I am training myself to complete a card/envelope combo each time rather than have to catch up with envelopes at a later date. I have a booth in a craft market next month so most cards I make at present will be heading to Craft-Fest 2017 on June 17 here in Ottawa. More about the market in the days to come.
Supplies
Die: dragonfly frame (PB)
Cardstock: solar white, epic black (Neenah) textured white paper
Also: stick it adhesive (Ken Oliver), silver bullion gilding flakes, radiant gold bullion gilding flakes (Nuvo), silver spiderweb fabric from France


The gilding flakes make such an elegant background, Heather! Perfect with the black dragonfly frame!
Like a stained glass window. Lovely. ✔
Very dramatic and beautiful card!
This gilded background looks great with the black dragonfly frame Heather and I love the way the gilding extends beyond the black frame. x
What a beautiful gilded background to showcase the dragonfly. My own experience with the gilding flakes was, well, a flaky mess! That Craft Fest looks wonderful! Wish I could be there.
Beautiful!
I love working with gilding sheets or flakes. I hold my work over a shoebox and take the excess flakes off with a soft toothbrush. I keep the flakes in the shoe box until I need them again. I also burnish my work with a small stainless steel teaspoon that I picked up at a flea market. The back of the spoon works great.
Gorgeous combination of the beautiful gilding flakes and that amazing die-cut dragonfly, Heather. Need to add that die to my wish list! Black always looks amazing with the shine and shimmer of gilding flakes. xx
[…] and I think they are so very pretty. I have shared two techniques for applying the flakes so far (here and […]
Mm I agree re scrubby, Heather as a calligrapher who has done a lot of Gilding work I’ve ditched the scrubby and use my fingers. They work a treat. In my calligraphy where I use 23 carat gold leaf I use a soft brush to burnish it, so start it off that way and finish with sift circular strokes with gentle fingers.. I really do noit like the scrubby at all.
Shaz in Oz. X ps a truly wonderful card. Of course… 😉
… They work a treat also though a hand cut stencil I make disposable ones with Die cuts and cesarean packets, use the flitter glue and gild away.
See here:
https://calligraphycards-shazinoz.blogspot.com.au/2017/04/use-die-as-stencil-mixed-gilding-flakes.html
Argh auto correct.. cereal packets not cesarean, arghhhhhh!! 🙂