
Snowflake collage
Posted: December 12, 2012 Filed under: All is Bright, CAS, Collage cards, Penny Black 11 Comments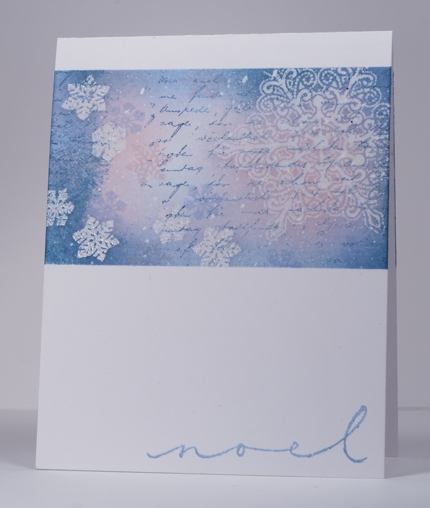
Cheryl is hosting the One Layer Wednesday challenge this week and her theme is Snowflakes. A nice thick layer of snow would be welcome here because we have a treacherous layer of ice that needs to be covered up.
I realized yesterday that I hadn’t created any Christmas cards using my collage technique so I played around and made a few. I had a few card bases with masking fluid already flicked onto them so when I decided to make a collage Christmas card I picked up one of the bases complete with ready made snow. The post-it masks were place before I flicked masking fluid on and then remained there while I created the collage. The order for the collage was:
- stamp letter background in teal zeal
- stamp snowflakes in versamark and emboss in clear powder
- sponge in blues and pink
- stamp extra snowflakes in blue and pink
- remove masks and masking fluid
Have a great day, keep warm and stamp some snowflakes if you get the chance.
Supplies:
Stamps: All is Bright, Noel, Hello Winter , Letter Background(PB)
Inks: Memento Summer Sky, Teal Zeal, Angel Pink, Versamark(Tsukineko)
Also: Clear e.p., Masking Fluid
OLW 117 Snow
Posted: December 9, 2012 Filed under: CAS, OLW, Penny Black, Winter Berries 19 Comments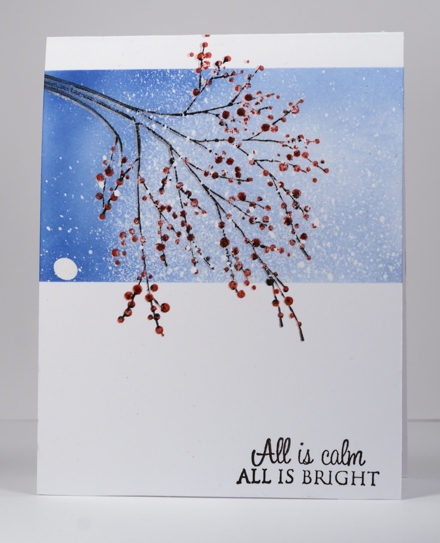
Susan’s challenge for One Layer Wednesday this week is to create snow on your card. My card uses my favourite method for making snow: masking fluid. I masked either side of the panel and then flicked the masking fluid onto the panel with a toothbrush. After it had dried I removed the masks and stamped the Winter Berries stamp as an overhanging branch rather than a tree. I inked it with black and red markers, stamped it once, then inked it with versamark and stamped it again before embossing with clear. For some reason a lot of the embossing powder stuck around the branches resulting in more snow than I expected from the flicked masking fluid. Not to worry; I have a berry branch in a snow storm. I replaced the masks and sponged the sky in two shades of Memento inks. I realize this is a layout and technique I have done several times before, but making it with a different stamp adds another card to my Christmas card stack.
Supplies:
Stamps: Winter Berries, All is Bright (PB)
Inks: Memento Summer Sky, Danube Blue, Lady Bug, Rhubarb Stalk,Tuxedo Black, Versamark(Tsukineko)
Also: clear embossing powder
Bethlehem hills
Posted: December 4, 2012 Filed under: CAS, Penny Black, Silent Night 8 Comments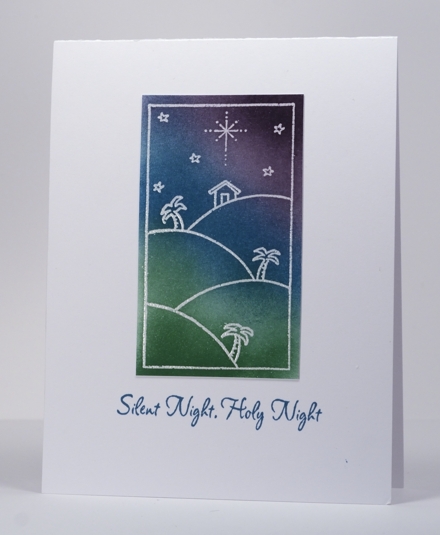
After I made my first card with this stamp and took over an hour to colour it with pencils I knew I had to come up with another technique if I was going to make this card multiple times. So, believe it or not, I decided to try sponging the scene.After stamping in versamark and embossing in clear on a separate piece of cardstock, I masked around the border and then chose three colours for sponging the scene. I wish I had masked the card base and stamped the outline image directly onto it because then I could participate in Karen’s One Layer Wednesday Challenge to create a scene. I love creating stamped scenes so I am sad to not have played along this week.
Love is in the air on the Penny Black blog this week and next so drop in and see the Valentine’s new releases and enter to win one of the new stamps.
Supplies:
Stamps: Silent Night (PB)
Inks: Memento Cottage Ivy, Teal Zeal, Elderberry, Versamark, Tsukineko)
Also: Clear embossing powder
Winter Magic window
Posted: December 1, 2012 Filed under: CAS, Christmas Park, Penny Black, Stamped Landscapes 19 Comments
A few weeks back I made a snowscape with the ‘Christmas Park’ stamp used above. My first attempt didn’t entirely please me so I covered up the lower part by putting it behind a window panel. Next time you have a bit of a stamping mishap consider trying the window save.
I did a count today to work out how many Christmas cards I still need to make. Many! I had forgotten this one so now it is one less.
How is your pile growing? Or have you finished already?
Supplies:
Stamps: Christmas Park, Winter Magic(PB)
Inks: Memento Summer Sky, Danube Blue, Paris Dusk, Versafine Onyx Black, Versamark(Tsukineko)
Also: Clear embossing powder
Pine tree
Posted: November 29, 2012 Filed under: CAS, Penny Black, Pine & Star 18 Comments
Something a little different from the past few days but not entirely without a musical connection. There is really nothing to the making of this card and I’m sure it could be done in a different colour scheme such as grey/black or dark green/light green. I used Summer Sky and Nautical Blue and, as I did not have the exact blue card stock to mat the panel with, I sponged Summer Sky onto the card base to frame it above and below.
Don’t forget the “Cute to Elegant” promotion over on the Penny Black blog. There are give-aways everyday this week.
Supplies:
Stamps: Pine & Star, Silent Night(PB)
Inks: Memento Summer Sky, Nautical Blue(Tsukineko)
Final Thank you card with a Musical Theme
Posted: November 28, 2012 Filed under: Background Stamps, CAS, Winter Scroll 13 Comments
This is the last of the musical thank you cards for now. This card was inspired by a beautiful card by Laurie of Soapbox Creations. I haven’t found the card on her blog but you can see it on Pinterest here. Laurie’s elegant card is a one layer card which would have been my preference too but I was making larger cards than usual and did not have the card stock to make a larger portrait oriented card. On my panel I stamped the musical background in black on the lower two thirds and the winter scroll in gold in the upper third with Thank You in Majestic Blue over the scroll. The gold edged ribbon looks black but is actually navy. I rounded three corners and popped up the panel on a white card base.
Thanks for all your lovely comments about these musical thank you cards; you are such kind and encouraging readers.
Supplies:
Stamps: Winter Scroll, Music Background, Gratitude (Penny Black)
Inks: Versafine Majestic Blue & Onyx Black, Encore Metallic Gold (Tsukineko)
Also: Gold edged navy ribbon.
Yet another Thank you card with a Musical Theme
Posted: November 27, 2012 Filed under: Background Stamps, CAS, Winter Scroll 16 Comments
If you haven’t visited the Penny Black blog this week you really should. There are give-aways all week and beautiful cards by Jill Foster.
My next musical thank you card has a different colour scheme and orientation but the same stamps and technique (emboss resist) as the last. I revisited a layout I did a few weeks ago here. I stamped the rectangular panel with the music background stamp (I don’t know what I would do without this stamp!) in versamark and embossed in clear ep. I did not get complete coverage with the embossing which ended up working just fine as the effect is ‘collagy’ and ‘vintagy’. I then sponged with three colours and stamped the winter scroll over the sponging and across the card base also. I think this one might be my favourite of the five I made, probably because of the colour scheme.
By the way, we have snow now, I wonder if it is here to stay?
Supplies:
Stamps: Winter Scroll, Music Background, Gratitude (Penny Black)
Inks: Memento Summer Sky, Grape Jelly, Nautical Blue and Versamark (Tsukineko)
Also: Clear embossing powder
Another Thank you card with a Musical Theme
Posted: November 26, 2012 Filed under: Background Stamps, Penny Black, Winter Scroll 10 Comments
I have another of the thank you cards I made to be used at my daughter’s violin concert on Saturday. After making the first one I decided to make the remainder of the cards unique but stick with the same few stamps. To create this card, I started by stamping the music background but in versamark so I could emboss with gold powder. I sponged over the embossing with three memento inks and added a few water droplets before stamping the winter-scroll several times.
Tonight my older daughter is playing violin with the Ottawa Symphony Orchestra for the first time. We are thrilled for her as you can imagine.
I have received many requests for a video tutorial showing how I do the snow covered trees and snow drifts. I will try to do something soon. With the big concerts over I may have a little more time. I do have several photo tutorials which cover these techniques if you want to check them out while waiting patiently for me to oblige!
Sponging Tutorial (Snow Drifts)
Supplies:
Stamps: Winter Scroll, Music Background, Gratitude (Penny Black)
Cardstock: Penny Black Mix & Match Olive Grove
Inks: Memento Pistachio, Summer Sky, Olive Grove and Versamark (Tsukineko)
Also: Gold embossing powder
Thank you cards with a Musical theme
Posted: November 25, 2012 Filed under: Background Stamps, CAS, Penny Black, Winter Berries 19 Comments
As I have mentioned here on Bits & Pieces and on my other blog, November is concert month for my daughters, the violinists. My younger daughter is a member of Stellae Boreales, a violin ensemble which performs concerts in our city as well as going on tour each year. Touring means fundraising and last night was the biggest yearly fundraiser the group does, a concert and silent auction. My 16 year old played a solo as well as participating in the ensemble performances and we were very proud of her. In an effort to keep expenses down this year we decided to thank our coaches, accompanist, MC and special guest artist with homemade truffles and hand made cards. I was happy to make the cards which were bigger than my usual size so that all the violinists could sign. (4 5/8″ x 6 1/4″)
As four out of five cards were for men I steered away from floral motifs. As we do not yet have snow on the ground I steered away from snowflakes. Of course I incorporated the Music Background stamp and for this card combined it with a whimsical tree. The layout was inspired by this lovely card by Charlene. (And Charlene’s card was inspired by one of Karen’s cards) I created the design on a panel by first stamping the music background lightly then the tree which was inked with markers. I sliced the panel into squares, rounded two corners on each square and added some perimeter sponging before matting them and popping them up.
Have a great week; I hope to be back with the other thank you cards during the week.
Supplies:
Stamps: Music Background, Winter Berries, Thanks, thanks (Penny Black)
Inks: Memento Pistachio, Olive Grove, Rich Cocoa, Cottage Ivy, Elderberry(Tsukineko)
Cardstock: Mix&Match olive grove
Snowy Spruce
Posted: November 22, 2012 Filed under: Before the Snow, CAS, Stamped Landscapes 22 Comments
There is no sign of snow around here yet which is making life much simpler, especially as I am going places with a one year old at present. But of course in the card making world there is plenty of snow! My favourite method for creating falling snow on a card is to use masking fluid. To create this scene I stamped and embossed the tree first and then flicked masking fluid over the whole panel with a tooth brush. Once it dried I positioned my hill mask and sponged the sky with Memento summer sky ink. I repositioned the mask three times to create the snow drifts. If you haven’t used masking fluid before I have a tutorial here.
Supplies:
Stamps: Before the Snow, Noel (PB)
Inks: Memento Summer Sky, Versafine Majestic Blue (Tsukineko)
Also: Clear embossing powder, Gingham Ribbon, Winsor & Newton Masking fluid


