
Playing with texture
Posted: March 23, 2011 Filed under: CAS, Infinite Goodness 7 Comments
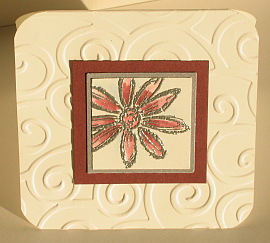
Creating my floral panel was a little like designing a piece of fabric. I started by stamping the flowers in versamark and embossing in clear. Then I added pink by using a direct to paper technique. I wanted to create a little texture in my background so I laid the cardstock on the stamp pad and rolled over the top with my brayer. The fabric of the stamp pad as well as the edges showed up on the cardstock. It was very patchy coverage so I added sponging in many places otherwise the embossed flowers would not have been prominent enough.
The panel was still a bit empty so I randomly added pink flowers. There was still something missing so I stamped some more flowers in black. After adding a black mat I was happy with the way the flowers popped, both the black and the white. So this was definitely one of those cards that evolved.
Thanks for dropping by; I’ll have another card featuring the same texture technique later in the week.

Supplies:
Stamps: Infinite Goodness, Hugs and Wishes
Inks: Basic Black, Pixie Pink, Versamark
Cardstock: Basic Black, Pixie Pink, Flourishes classic white
Also: Clear e.p.
The dragonfly tale
Posted: August 12, 2010 Filed under: CAS, Infinite Goodness 3 Comments
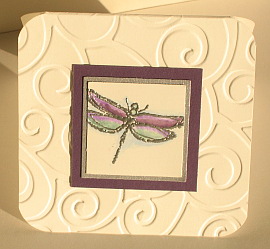
I mentioned earlier in the week that I had a set of dragonfly cards to share. I have five in total but I only set out to make one. The one above. The fact is that the one above ended up being the fourth one I made as things didn’t always work as I wanted them to.
So keeping in mind that I was aiming for that one above you can probably see how I made the one below. I had my dragonflies stamped in silver on my brayered cardstock. I had also added the eggplant dragonflies on the natural cardstock but something wasn’t working so I took my punch and extracted a few squares and created the layout below. It was then that I decided to be a little more methodical in my approach as it can be tricky to line up an image on a top layer and a layer underneath.

I brayered Elegant Eggplant, Taken with Teal and Sage Shadow on a piece of white cardstock so that I had plenty of background colour to work on. For the top card I cut a strip and stamped the dragonflies in silver encore ink and embossed them in silver ep. It worked much better when I made sure the brayered colour was entirely dry and was not going to pick up any of the embossing powder. I then lay my coloured strip with dragonflies on the Natural card base and used a stamp-a-ma-jig to stamp the eggplant dragonflies.

To make the one above and the one below I punched the squares out of the brayered cardstock and used classic CAS layouts.

Finally,I wanted one more card but my brayered cardstock was punched full of holes so I created a one layer card and instead of brayering the colour I sponged it using a mask punched out of post it note.

Thanks so much for scrolling through the whole dragonfly tale, once again I’m glad I didn’t give up when the first idea didn’t work as planned.
Supplies:
Stamps: Infinite Goodness, Graceful Words, Upsy Daisy, Best Yet, Simple Sayings 2, Everyday Flexible Phrases
Inks: Taken with Teal, Elegant Eggplant, Sage Shadow, Encore silver
Cardstock: Naturals White, Whisper White
Also: Silver e.p
CASEing the CAS
Posted: August 9, 2010 Filed under: Branch Out, CAS, Infinite Goodness 6 Comments
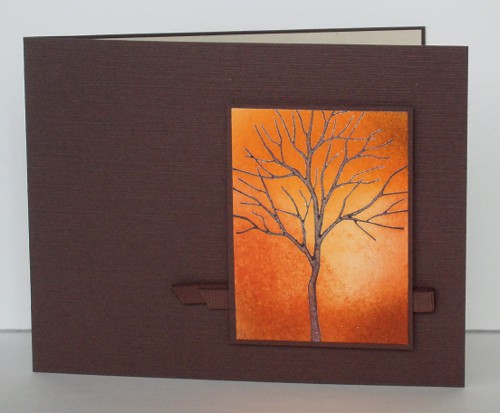
Each Sunday on the Splitcoast general stamping talk forum there is a thread where people list their favourite CAS cards of the week. Whenever I can I browse through the lists and end up inspired and ready to stamp. Yesterday was no exception, I think I saved at least a dozen cards in my favourites file. I picked two to CASE straight away and share with you today. The first was made by girlgeek101 and I decided to keep her colour scheme and technique but changed the stamp and orientation. I love tree stamps and images and thought the chocolate textured cardstock she used was rich and warm. The tree is stamped in Craft ink, clear embossed and the background sponged.
Supplies:
Stamps: Branch Out
Inks: Close to Cocoa Craft, Pumpkin Pie, Really Rust, Close to Cocoa
Cardstock: Chocolate Chip, Whisper White
Also: Chocolate grosgrain ribbon

The second card I CASEd was quite different. Made by Jennifer Styles it featured a classic single square in the top half of the card with some very sweet stitching and text. I have tried stitching on cardstock with my sewing machine but it doesn’t like it so I did not even attempt it this time. Instead I punched a square out of some cardstock I had coloured with a brayer and then stamped my dragonfly in silver and embossed in silver. Using the Stamp-a-ma-jig I stamped the dragonfly again on the card so the wings and tail would line up, then added the word “dream” This card is part of a set of five dragonfly cards that I will post later in the week.
Supplies:
Stamps: Infinite Goodness, Everyday Flexible Phrases
Inks: Taken with Teal, Elegant Eggplant, Encore silver
Cardstock: Naturals White, Whisper White
Also: Silver e.p
Thanks for dropping and thanks girlgeek101 and Jennifer for the inspiration.
Dragonfly Split
Posted: August 2, 2010 Filed under: Infinite Goodness 2 Comments
For this card I played with sponging and embossing again. The dragonflies were embossed in silver and the sponging applied in Yoyo Yellow, Certainly Celery and Not quite Navy. Then I stamped some more dragonflies in Not quite Navy and Celery before adding ink drops and water drops. After fiddling with mattes and layouts I decided to split the panel in two and add a little silver cord .
Today is my older daughter’s 16th birthday so I intended to post the three homemade cards she received this morning. I have missed the good light now so I will have to photograph and post them tomorrow. Ihope you are having a good long weekend if you live where I do or a great start to the week in the rest of the world!
Supplies:
Stamps: Infinite Goodness
Inks: Yoyo Yellow, Certainly Celery, Not quite Navy, Versamark
Cardstock: Not quite Navy, Whisper White
Also: Silver e.p., silver cord
Boughs and blessings
Posted: May 17, 2008 Filed under: Infinite Goodness 1 Comment
Often when I look at Sharon’s Stamp Simply Challenge I find she has suggested something I haven’t tried before, but this week her challenge features a technique I’ve tried several times. The challenge is to feature three panels on your card. The method I often use to do this is to stamp a design across a rectangle of card stock and then cut it into three panels. For this card I spread the panels slightly apart and adhered them to one matte.
The branches are stamped in chocolate chip, coloured with watercolour pencils and blended with a blender pen. I sponged the edges with bashful blue and added the word ‘blessings’. It was very relaxing to finally be stamping again!
Supplies:
Stamps: Infinite Goodness, Graceful words
Inks: Chocolate Chip, Bashful Blue
Cardstock: Very Vanilla, Chocolate chip, Green Galore
Also: Apple green grosgrain ribbon, watercolour pencils
Cracked pear
Posted: March 27, 2008 Filed under: Infinite Goodness Leave a comment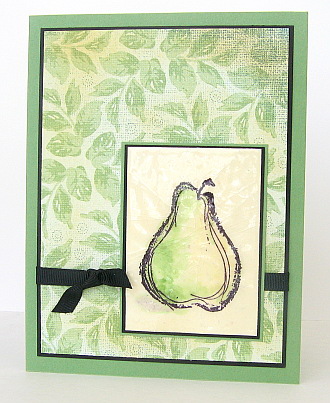
I decided to play with the glassy glaze enamel and this sketched pear image was perfect. The embossing is an example of cracked glass, but I could not get a good photo of the effect. You can see that it is very glossy but it is hard to pick out the cracks in the glaze. To create the effect I stamped my image and watercoloured it first. Then I stamped the versamark pad straight onto the whole piece of cardstock and covered it with glassy glaze embossing powder. After heating it I repeated the whole process and then put it in the freezer for a few minutes. Immediately after taking it out I bent it one way and another making cracks in the glaze.
Supplies:
Stamps: Infinite Goodness
Inks: River Rock, Basic Black, Wild Wasabi
Cardstock: Very Vanilla, Black, Wild Wasabi, Porcelain Prints d.p.
Also: Black grosgrain ribbon, glassy glaze embossing powder
Blue daisies
Posted: March 27, 2008 Filed under: Designer Paper, Infinite Goodness 1 Comment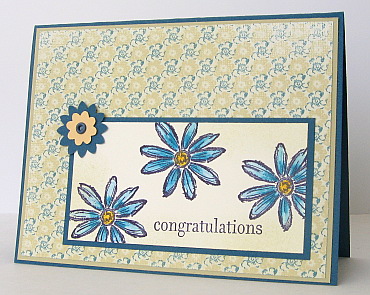
I made this one for Beate’s weekend sketch, and will use it at a workshop next week. Using patterned paper is such a simple way to create a backdrop for the focus of the card. I stamped the daisies on Vanilla cardstock and sponged the edges with River Rock to make to co-ordinate with the colours in the patterned paper. The two little flowers are punched out with the Boho blossoms punch.
Supplies:
Stamps: Infinite Goodness
Inks: River Rock, Basic Black,
Cardstock: River Rock, Not Quite Navy, Porcelain Prints Designer paper, Very Vanilla
Also: Boho Blossoms punch, Navy eyelet, watercolour pencils, blender pen
A trio of minis
Posted: March 25, 2008 Filed under: Cuttlebug, Infinite Goodness 3 Comments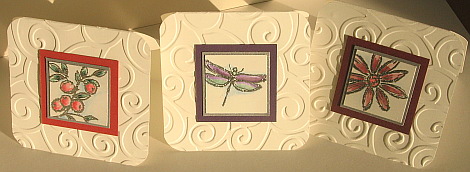
For Sharon’s Stamp Simply challenge #27 last week she asked for rounded corners, that’s all, the rest was up to us. On my mini cards I tried adding rounded corners to the square images in the centre of the cards but it didn’t look right so I stuck with rounded corners for the card only. The cards are made from whisper white cardstock but look very creamy as I took the pictures in late afternoon sunlight and really liked the way the cuttlebug embossing stands out. For the dragonfly card in the centre I have used the negative side of the embossed cardstock, the others have the positive side showing.
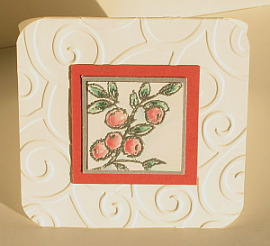
To create the little squares I stamped the images from Infinite Goodness in versamark and embossed in silver before colouring with blender pens dipped in ink. I then punched out a 1¼” square, then a silver square with the 1 3/8″ punch and finally a larger matte in a colour from the image. I think I will make a little pouch or purse for these and use them as a hostess gift.
Supplies:
Stamps: Infinite Goodness
Inks: Versamark, Ruby Red, Handsome Hunter, Bravo Burgandy, Cameo Coral, Elegant Eggplant, Lovely Lilac, Garden Green, Bashful Blue
Cardstock: Whisper White, Brushed Silver, Ruby Red, Bravo Burgandy, Elegant Eggplant
Also: D’vine Swirls embossing folder, sterling silver e.p.
Fruit for my friend
Posted: March 22, 2008 Filed under: Infinite Goodness Leave a comment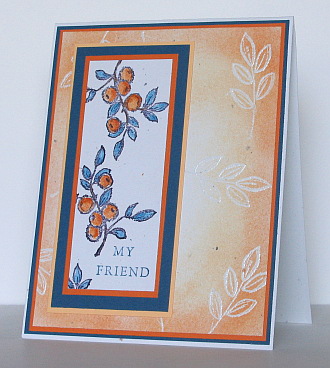
It has been over a week since I posted anything here! I certainly did not intend there to be such a gap between posts but a combination of hassles with the blog, a very sore back and busyness of life here at our house kept me away from my craft desk and the computer. I did enjoy a night away with my elder daughter and a close friend with her elder daughter. We went to a B & B and spent the evening watching the entire BBC version of Pride and Prejudice, it was great fun.
The pieces of cardstock for the card above have been sitting on my craft table for a week or so, cut and ready to be stamped. I really like the sketched look of the images in the Infinite Goodness hostess set, so I enjoyed trying out a couple of ideas today. I initially thought I would leave the background white with the leaves embossed in clear, but the leaves did not stand out enough so I sponged over them with Pumpkin Pie and Apricot Appeal.
The fruit are stamped in Basic Black and then coloured by dipping a blender pen in the residue of ink left on the lid of the stamp pad when you press it against the pad.
Supplies:
Stamps: Infinite Goodness, Fundamental Phrases
Inks: Pumpkin Pie, Apricot Appeal, Not Quite Navy, Basic Black
Cardstock: Pumpkin Pie, Apricot Appeal, Not Quite Navy, Confetti White
Also: Blender pen, clear e.p.
First cuttlebug card
Posted: March 12, 2008 Filed under: Cuttlebug, Infinite Goodness 6 Comments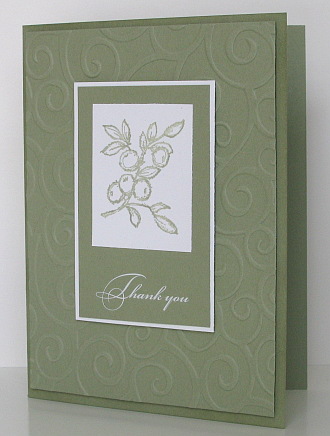
This is the first of many cards, I’m sure, that will be made with the help of my new Cuttlebug. My family took note of my many hints and gave it to me for my birthday. The effect of embossing is very classy. This card just shows a simple full background embossing folder but there are many techniques I will be trying.
I sponged around the edges of the card front with Mellow moss ink before attaching the embossed piece on raised tape. The berries are from a current SU hostess set Infinite Goodness and the sentiment from the Cherished Memories rub-ons.
Supplies:
Stamps: Infinite Goodness
Inks: Mellow Moss
Cardstock: Mellow Moss, Whisper White
Also: Two sided foam tape, D’vine Swirls embossing folder


