
CAS 83 Sketch challenge
Posted: September 9, 2010 Filed under: CAS, Lovely as a Tree, Stamped Landscapes 6 Comments
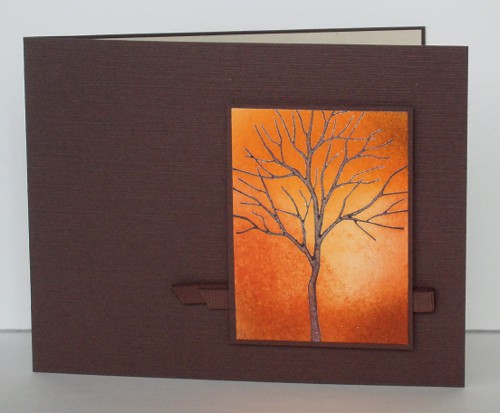
This week’s CAS challenge at Splitcoast is to make a card using this sketch. I decided to make a one layer card sponging my design through a mask. I realize I am in a bit of a rut as far as sponging and masking is concerned but I keep on thinking of different approaches to it.
I made my window mask by punching squares out of post it notes and lining them up to give me a window. My sky and the hills were sponged in using a torn paper mask and the background trees were stamped while the lower mask was still in place. That is all there is to it.
Supplies:
Stamps: Lovely as a Tree, Thoughts and Prayers
Inks: Brocade Blue, Mellow Moss, Always Artichoke, Really Rust, Chocolate Chip
Cardstock: Flourishes Classic Ivory
Also: Post-it notes
Casing the CAS (again)
Posted: September 6, 2010 Filed under: CAS, With Gratitude 3 CommentsOnce again the CAS favourites thread at Splitcoast provided me with an abundance of inspiration yesterday afternoon. The first one I CASEd was a bright happy card by Wanda Cullen. I used her layout and some of her techniques but went with a different theme and colour scheme.

I embossed the bottom of the card using my cuttlebug, then masked and sponged the top area with Really Rust, Ruby Red and Rose Red. I stamped and restamped the leaves using the same three colours before hunting through my ribbon for a co-ordinating colour. I’m not sure what it is, it was from a sample pack and isn’t in the SU line up anymore. I stamped my little sentiment, punched it, inked the edge and then adhered it over the ribbon with stampin’ dimensionals.
That’s all for now, school starts tomorrow so my stamping and blogging time is going to be somewhat diminished.
Supplies:
Stamps: With Gratitude, Teensy Tiny Wishes
Inks: Rose Red, Ruby Red, Real Rust
Cardstock: Flourishes Classic Ivory
Also: grosgrain ribbon, Forest branches embossing folder
OLW 17 Border Stamps
Posted: August 29, 2010 Filed under: CAS, Rollers 3 Comments
Susan’s One Layer Wednesday challenge this week is to use a border stamp. Rollers are all I really have in the way of border stamps and I tend to forget them most of the time. I decided to pull out this one and my watercolour pencils, which have also been neglected of late. There is not much to explain really; I inked in black, coloured and then blended with a blender pen.
When the stamping and colouring was done I asked my younger daughter for input regarding ribbon. The choices I gave her were black gingham or red gingham. She didn’t really like either so suggested green, one of her favourite colours. Turns out she was spot on.
Supplies:
Stamps: Time for a Tree, Short & Sweet
Inks: Basic Black
Cardstock: Flourishes Classic White
Also: Faber-Castell Watercolour pencils, Apple Green grosgrain ribbon
Thanksgiving leaves
Posted: August 19, 2010 Filed under: CAS, With Gratitude 16 Comments
I have been thrilled and amazed at all the encouraging comments I have received about yesterday’s OLW 16 Scene card. I was very happy with it but had no idea it would appeal to so many people. Thank you for your kind words. I mentioned at the end of that post that I would try the same technique again but with some autumn colours. Well here it is; not a scene this time but the same process. I masked off my panel, sponged in three colours, stamped the leaves in the same colours and then removed the masks before stamping the bold brown leaf and sentiment.
Those who have regularly drop in here might have noticed the layout has changed. I decided I wanted to try a new theme. All the elements are still here just moved around a little. Just click on the Bits & Pieces title at left to go to the full blog.
PS. I have just been looking at the Speedy the Cat’s Friends Challenge over at Mark’s Finest Papers and I think this card fits the Harvest Theme so I will link it. I have another idea forming in my imagination so check back later in the week.
Supplies:
Stamps: With Gratitude, Teensy Tiny Wishes
Inks: Chocolate Chip, Summer Sun, Ruby Red, Real Rust
Cardstock: Flourishes Classic White
OLW 16 Stamp a Scene
Posted: August 18, 2010 Filed under: CAS, Lovely as a Tree, Stamped Landscapes 44 Comments
Susan’s One Layer Wednesday challenge this week is to Stamp a Scene. You can use a stamp of a scene or make your own.
I have made my own, using a technique I often turn to. I create a background with sponging and then start stamping the far off elements in lighter colours, the middle ground elements in slightly darker colours and foreground larger elements in black. To make this scene I masked off a panel on the card first using post it notes and then began sponging. After sponging three colours one under the other I stamped the trees in Mellow Moss and then Always Artichoke before removing the post it notes. I finished by stamping the trees in black and adding a sentiment.
I think I might try another one using this technique, perhaps with autumn colours. (I have made a new one with autumn leaves here.) Thanks for dropping in today.
Supplies:
Stamps: Lovely as a Tree, Teeny Tiny Wishes
Inks: Basic Black, Always Artichoke, Mellow Moss, Bashful Blue
Cardstock: Flourishes Classic White
OLW 15 Unexpected Colours
Posted: August 17, 2010 Filed under: CAS, Snowflakes 1 Comment
Susan’s latest One Layer Wednesday challenge is to use an unexpected color scheme for a card. It doesn’t get much more unexpected than making pink snowflake Christmas cards. I didn’t really want to make pink Christmas cards, it just didn’t sit right with me! But I persevered and think I might even know who I’ll give these pink cards to. My camera didn’t really pick it up but both cards are embossed with iridescent ice e.p. for a little snowy sparkle.

Supplies:
Stamps: Snowflakes
Inks: Versamark, Pink Passion, White Craft
Cardstock: Whisper white, Pink Passion
Also: Iridescent Ice e.p.
The dragonfly tale
Posted: August 12, 2010 Filed under: CAS, Infinite Goodness 3 Comments
I mentioned earlier in the week that I had a set of dragonfly cards to share. I have five in total but I only set out to make one. The one above. The fact is that the one above ended up being the fourth one I made as things didn’t always work as I wanted them to.
So keeping in mind that I was aiming for that one above you can probably see how I made the one below. I had my dragonflies stamped in silver on my brayered cardstock. I had also added the eggplant dragonflies on the natural cardstock but something wasn’t working so I took my punch and extracted a few squares and created the layout below. It was then that I decided to be a little more methodical in my approach as it can be tricky to line up an image on a top layer and a layer underneath.

I brayered Elegant Eggplant, Taken with Teal and Sage Shadow on a piece of white cardstock so that I had plenty of background colour to work on. For the top card I cut a strip and stamped the dragonflies in silver encore ink and embossed them in silver ep. It worked much better when I made sure the brayered colour was entirely dry and was not going to pick up any of the embossing powder. I then lay my coloured strip with dragonflies on the Natural card base and used a stamp-a-ma-jig to stamp the eggplant dragonflies.

To make the one above and the one below I punched the squares out of the brayered cardstock and used classic CAS layouts.

Finally,I wanted one more card but my brayered cardstock was punched full of holes so I created a one layer card and instead of brayering the colour I sponged it using a mask punched out of post it note.

Thanks so much for scrolling through the whole dragonfly tale, once again I’m glad I didn’t give up when the first idea didn’t work as planned.
Supplies:
Stamps: Infinite Goodness, Graceful Words, Upsy Daisy, Best Yet, Simple Sayings 2, Everyday Flexible Phrases
Inks: Taken with Teal, Elegant Eggplant, Sage Shadow, Encore silver
Cardstock: Naturals White, Whisper White
Also: Silver e.p
CASEing the CAS
Posted: August 9, 2010 Filed under: Branch Out, CAS, Infinite Goodness 6 Comments
Each Sunday on the Splitcoast general stamping talk forum there is a thread where people list their favourite CAS cards of the week. Whenever I can I browse through the lists and end up inspired and ready to stamp. Yesterday was no exception, I think I saved at least a dozen cards in my favourites file. I picked two to CASE straight away and share with you today. The first was made by girlgeek101 and I decided to keep her colour scheme and technique but changed the stamp and orientation. I love tree stamps and images and thought the chocolate textured cardstock she used was rich and warm. The tree is stamped in Craft ink, clear embossed and the background sponged.
Supplies:
Stamps: Branch Out
Inks: Close to Cocoa Craft, Pumpkin Pie, Really Rust, Close to Cocoa
Cardstock: Chocolate Chip, Whisper White
Also: Chocolate grosgrain ribbon

The second card I CASEd was quite different. Made by Jennifer Styles it featured a classic single square in the top half of the card with some very sweet stitching and text. I have tried stitching on cardstock with my sewing machine but it doesn’t like it so I did not even attempt it this time. Instead I punched a square out of some cardstock I had coloured with a brayer and then stamped my dragonfly in silver and embossed in silver. Using the Stamp-a-ma-jig I stamped the dragonfly again on the card so the wings and tail would line up, then added the word “dream” This card is part of a set of five dragonfly cards that I will post later in the week.
Supplies:
Stamps: Infinite Goodness, Everyday Flexible Phrases
Inks: Taken with Teal, Elegant Eggplant, Encore silver
Cardstock: Naturals White, Whisper White
Also: Silver e.p
Thanks for dropping and thanks girlgeek101 and Jennifer for the inspiration.
OLW 14 Square Outlines
Posted: July 28, 2010 Filed under: CAS, Christmas Wreath 4 Comments
I had the idea for this card in my head when Susan had the Christmas in July challenge but as I didn’t get round to it then, I thought it would also work for this week’s challenge: a square card using only outline stamps. It looks like I should have been able to whip this one up in a few minutes but it took quite a few attempts. I tried it in gold first but the embossing powder was not fine enough for the detail in this stamp. I am glad the wreath looks good without being coloured because the colouring necessary for this stamp is too scary to undertake more than once a year! To see how beautiful it can look in the right hands just look at Leslie’s.
Even the little baby one below took me 6 attempts to get it stamped properly and the sentiment in the right place! Thanks to Susan’s challenges my Christmas card pile is growing, something generally unheard of in July. Thanks for dropping by.

Supplies:
Stamps: Christmas Wreath (Flourishes), Snow Swirled
Inks: Riding Hood Red, Handsome Hunter
Cardstock: Flourishes Classic Ivory
Clean&Simple 100th Sketch
Posted: July 25, 2010 Filed under: CAS, Designer Paper 4 Comments
Clean & Simple are celebrating their 100th sketch challenge. I often have trouble with sketches but when one works for me it can become a favourite. which I revisit again and again. For this one I pulled out the remnants of one of my all time favourite packs of SU Designer paper. To make the scalloped edge I cut around the design on the paper. The sentiment caused me a little trouble as it wasn’t inked adequately the first time. I used the stamp-a-ma-jig to restamp but was off by a bit. As my designer paper was already stuck down I decided the double font looked just fine (even though it now looks totally out of focus!)
Supplies:
Stamps: Christmas Wreath (Flourishes)
Inks: Real Red
Cardstock: Real Red, Flourishes Classic Ivory, Cerise Designer paper
Also: Red grosgrain


