
Only Berry Bliss
Posted: March 13, 2008 Filed under: Designer Paper, One of a Kind 1 Comment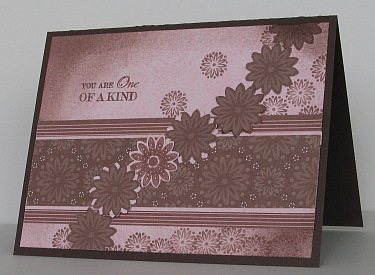
For the Ways To Use It Challenge at Splitcoast today the requirement was to use only patterned paper to make the card design. Cardstock was permitted only for the card base. My card is made from papers in the Berry Bliss designer paper pack and the matching flower stamps from the One of a Kind set. I punched out flowers from the designer paper with the co-ordinating punch.
Supplies:
Stamps: One of a Kind
Cardstock: Berry Bliss designer paper, Chocolate Chip
Ink: Close to Cocoa
Also: Boho Blossoms punch
Simple flap challenge
Posted: March 12, 2008 Filed under: Cuttlebug, One of a Kind 2 Comments 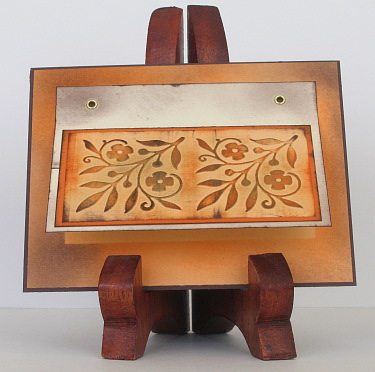
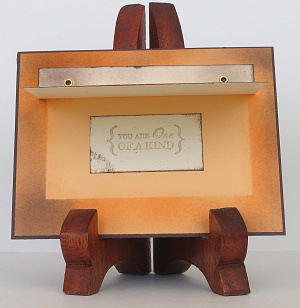
For this challenge from Sharon at No Time to Stamp I wanted the aged look of an old cupboard door. I’m not sure that many cupboard doors start out Apricot coloured but I like the effect of the distressed embossing. This is my second finished cuttlebug project and I’m having fun with it.
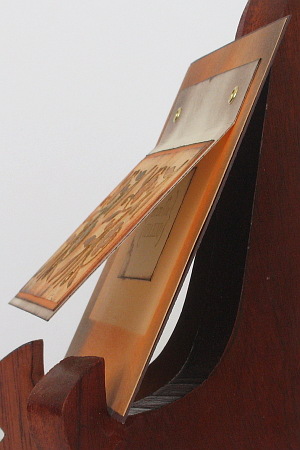
To create the flap I embossed two flower images and then rubbed the choc chip and the pumpkin pie stamp pads directly over the embossing before sponging on some Encore gold ink. I sponged all the other layers with a choc chip and/or pumpkin pie ink. Under the flap I created an unsponged area by sponging over a rectangle of cardstock.
Supplies:
Stamps: One of a Kind
Inks: Chocolate chip, Pumpkin pie, Encore Gold
Cardstock: Chocolate chip, Pumpkin pie, Apricot Appeal, Confetti cream
Also: Gold eyelets, Fancy Corners embossing folder
First cuttlebug card
Posted: March 12, 2008 Filed under: Cuttlebug, Infinite Goodness 6 Comments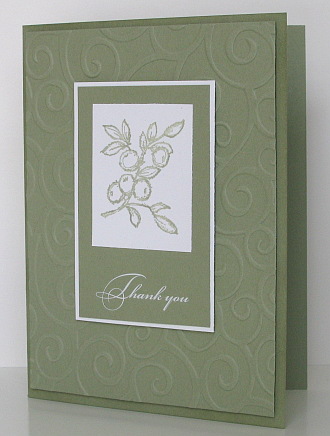
This is the first of many cards, I’m sure, that will be made with the help of my new Cuttlebug. My family took note of my many hints and gave it to me for my birthday. The effect of embossing is very classy. This card just shows a simple full background embossing folder but there are many techniques I will be trying.
I sponged around the edges of the card front with Mellow moss ink before attaching the embossed piece on raised tape. The berries are from a current SU hostess set Infinite Goodness and the sentiment from the Cherished Memories rub-ons.
Supplies:
Stamps: Infinite Goodness
Inks: Mellow Moss
Cardstock: Mellow Moss, Whisper White
Also: Two sided foam tape, D’vine Swirls embossing folder
Butterfly basket
Posted: March 11, 2008 Filed under: Garden Whimsy 1 Comment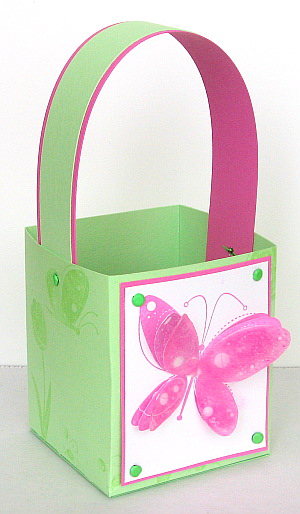
Over the weekend I was preparing for a stamping party on Monday night. I scanned my display board and worked out which cards I should alter for demonstrating and which should be the make and take. After I had worked on three cards, and was not all that happy with any of them I realised they all had green as a featured colour! Different greens, but still too much green. So, I decided on a little basket, partly because it can be an egg basket and partly as my hostess has a delightful daughter who will probably like this. And then I went ahead and made it green?!
It uses the same pattern that I used before Christmas to make my candle boxes, I just cut the sides lower. The pink butterfly is stamped on three separate layers, two cardstock and one vellum.
Supplies:
Stamps: Garden Whimsy
Inks: Pixie Pink, Gable Green
Cardstock: Pixie Pink, Gable Green, Whisper White, Vellum
Also: Bold Brights Brads
Squares and stripes
Posted: March 10, 2008 Filed under: Boho Backgrounds Leave a comment
My inspiration for the colours and some of the layout was the Home Depot Dream book that appeared in my letter box the other day. I was flipping through looking at some beautiful rooms realising that in front of me were some ready made colour schemes and layouts.
Supplies:
Stamps: Boho Backgrounds
Inks: Chocolate Chip, Ballet Blue, Green Galore
Cardstock: Whisper White, Chocolate Chip, Ballet Blue, Green Galore
Also: Square punch
Boho Frames
Posted: March 9, 2008 Filed under: Boho Backgrounds, One of a Kind 3 Comments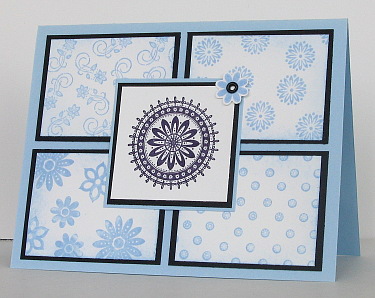
Beate’s current weekend sketch features six rectangles, this is my take on it. One of the rectangles became a little blue flower in my version, I didn’t want to cover any of that intricate circle in the middle. It was only when I finished that I realised in the three weekend sketch challenges I have participated in so far I have used the same set. It wasn’t intentional, I will force myself to reach for something else next week.
Supplies:
Stamps: Boho Backgrounds, One of a Kind
Inks: Black, Bashful Blue
Cardstock: Whisper White, Black, Bashful Blue
Also: Boho Blossoms punch, black eyelet
Red polka dot purse
Posted: March 5, 2008 Filed under: Designer Paper, Purses, Tutorial 5 Comments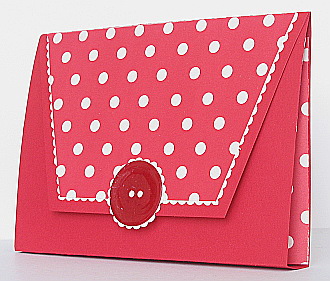
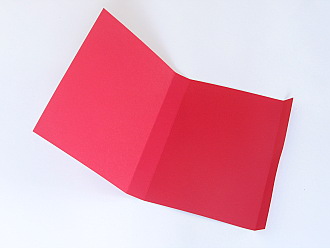
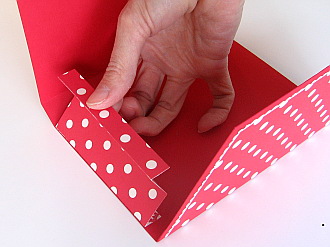
After I had completed my first purse, I set out to make another and create a tutorial as I did it. First I cut a piece of cardstock 10¼” x 6½”. I then scored it at ½”, 5″ and 5¾”as shown below.
To make the purse flap I cut a piece 6½”x 3¾” and measured in 1″ from the corner on both ends of one long side and cut off triangles to make a trapezoid.

I did not measure to make the designer paper shape to decorate the purse flap (sorry), I just made it a little more than ¼” smaller all the way around the three shorter sides. Don’t stick it on yet.
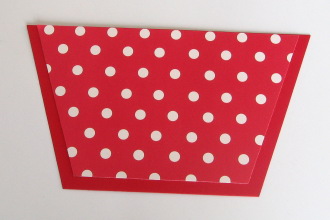
Attach designer paper shape to vanilla cardstock, aligning the longer edge with the edge of the cardstock.

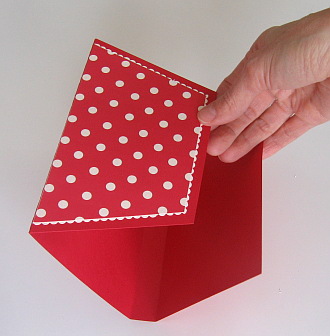
Cut around the designer paper with decorative scissors making a “lace” edge.

Attach the purse flap to the ½” flap on the purse.
Next I made gusset pieces for the sides of the purse with designer paper. I cut two pieces 4″x 3″ and scored them along the length at ½” 1½” and 2½”. Then I folded them concertina style.
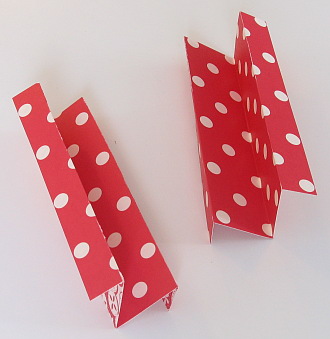
I then glued the narrower section of the concertina piece to the inside of my purse. I think it is easier to just look at the picture than have me try to explain it.
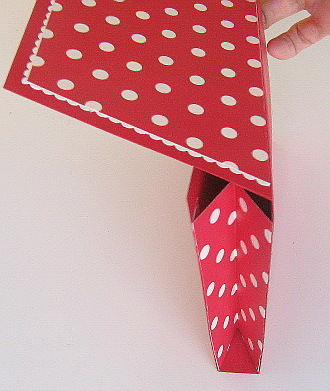
To fasten the purse flap I used a velcro circle and added a big red button with scallop trim to finish it off. The button just happened to end up looking exactly as I wanted even though I wasn’t sure how to make it initially. I punched out a circle of red cardstock and stamped the versamark pad directly onto it. I then embossed with glassy glaze enamel embossing powder, then stamped with versamark and embossed again. When I was heating the second layer I held the heat tool directly over head which pushed liquid enamel out to the sides giving the button a raised edge.

Hello Baby Boy
Posted: March 3, 2008 Filed under: Sweet Shapes 1 Comment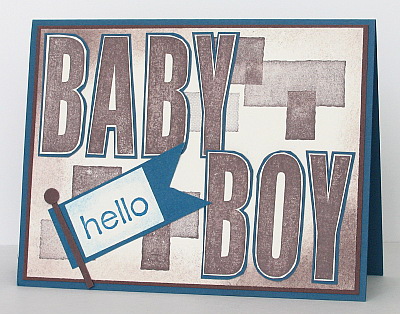
Three families we know have had babies in the last week so I have made a start on some baby cards. Two had boys and one a girl. I have been enjoying the Chocolate chip ink and cardstock lately so thought it would make a good boy colour scheme when combined with Not quite Navy. I stamped the letters on vanilla cardstock and then stuck them on not quite navy before cutting around them. I sponged all the edges but made it heavier in two corners.
Supplies:
Stamps: Sweet Shapes, Headline Alphabet
Cardstock: Chocolate Chip, Vanilla, Not quite Navy
Ink: Chocolate Chip,Not quite Navy
Also: Stampin’ dimensionals
Chocolate weekend sketch
Posted: March 3, 2008 Filed under: One of a Kind, Purses 2 Comments
I made this card to go in the chocolate purse I posted yesterday along with a couple of tags. My inspiration for the layout was Beate’s weekend sketch. 
I am quite taken with the whole purse designing idea and have another one to photograph tomorrow and share with you. Someone made the suggestion that I should put chocolates in my chocolate purse, which is probably a much better idea than tags!
Supplies:
Stamps: One of a Kind
Cardstock: Berry Bliss designer paper, Chocolate Chip, Whisper white, Close to Cocoa
Ink: Chocolate Chip, versamark
Also: Stampin’ dimensionals, scallop scissors, Boho blossoms punch, white e.p., chocolate grosgrain ribbon
Chocolate Purse
Posted: March 2, 2008 Filed under: One of a Kind, Purses 2 Comments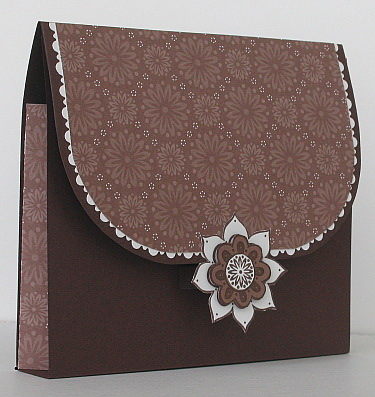
This is my first attempt at a purse. I admit I have seen them in magazines and on blogs but never saw a reason to make one. Now I have made one, I think I’ll be making more. I plan to create some matching cards or tags to put in this one, which I will post when they are completed. Sharon at No Time to Stamp was the catalyst for this one, her Stamp Simply Challenge #24 is to make something purse related.
I could tell you all the measurements and scoring lines but as I was making this one up as I went along, I think I will do another and take pictures as I go. I folded a rectangular piece of designer paper into a concertina fold to make the sides. The white lace is made with a pair of double scallop scissors.
Supplies:
Stamps: One of a Kind
Cardstock: Berry Bliss designer paper, Chocolate Chip, Whisper white, Close to Cocoa
Ink: Chocolate Chip
Also: Stampin’ dimensionals, scallop scissors


