
Sun behind daisies
Posted: January 28, 2009 Filed under: Upsy Daisy 1 CommentI have had the idea for this card floating around in my head for a while so decided to try it on the weekend. (After seeing the finished card my daughter did make the comment that I should use some other sets, otherwise people will think I only own Lovely as a Tree and Upsy Daisy!)

To make this card I did the sky first. I began by sponging with Brocade Blue, and then a little bit with Summer Sun. When there was a a very light layer of Summer Sun I punched a circle out of a post-it note and then stuck it on before sponging some more Summer Sun, some Apricot Appeal and finally at the bottom Pumpkin Pie.
I wanted daisies stretching across the bottom of the card so I stamped, covered the daisies and stamped again, completing any cut off daisies with a black marker. It is quite hard to see but I have a strip of black grosgrain ribbon across the bottom with a knot tied on it. I didn’t want to matte the whole picture so I placed a black strip at the bottom and added a thin frame on the image with a marker.
Thanks for dropping in.
Supplies:
Stamps: Upsy Daisy
Inks: Brocade Blue, Summer Sun, Apricot Appeal, Pumpkin Pie, Basic Black
Cardstock: Whisper White, Brocade Blue(card base), Basic Black
Also: Black grosgrain ribbon, black Stampin’ marker
Blue Thank You
Posted: January 14, 2009 Filed under: Upsy Daisy Leave a comment
Who would have guessed the difference a new black stamp pad would make!? I have been reinking my well used black stamp pad, but as it was beginning to come apart I bought a new one. Wow,it was so much easier to get a good silhouette.
I sponged the sky first for this card, leaving a lighter patch for something. I didn’t really know what when I started the card, sometimes that is just how my cards develop. Neither Brocade Blue or Ballet Blue were quite what I wanted so the sponging is a combination of both plus Bashful Blue. I didn’t want to put anything too dominating in the space so I split the whole piece into three and stamped a blue flower in a square for the ‘thank you’ rub-on.
Thanks for droppng in.
Supplies:
Stamps: Upsy Daisy
Inks: Ballet Blue, Brocade Blue, Bashful Blue, Basic BLack
Cardstock: Whisper White, Ballet Blue, Basic Black
Also: Chateau Bella Rub-ons
Happiness is
Posted: January 13, 2009 Filed under: Happiness is a Journey, Upsy Daisy 1 Comment
The Featured Stamper on Splitcoast last Sunday was Jaydekay. I haven’t had a chance to play for a while, but I managed to browse through Judy’s beautiful gallery on Sunday afternoon and find some inspiration.
I chose Judy’s card here
To make mine I punched the sun out of a post it note and used it to mask a circle while I sponged the sky with Apricot Appeal, Real Rust and Always Artichoke. I then stamped the daisies in artichoke and drew around their edges with a pinky-gold gel pen. To make the clouds I ripped thin strips out of a piece of paper and sponged through the spaces.
Supplies:
Stamps: Upsy Daisy, Happiness is a Journey
Inks: Apricot Appeal, Always Artichoke, Real Rust
Cardstock: Always Artichoke, Real Rust, Very Vanilla
Also: Sakura GellyRoll Metallic gel pen
Christmas gifts (3)
Posted: November 3, 2008 Filed under: Designer Paper, Garden silhouettes, Pocket Silhouettes, Upsy Daisy 1 Comment
This is my last boxed set of cards for now. I made these to co-ordinate with the card from my Stamp Simply Challenge a few weeks ago. I will be posting this set off to Australia soon.

Thanks for dropping in, I’m planning on giving myself a bit of a challenge this week, hopefully I’ll be back with more about it later.

Supplies:
Stamps: Upsy Daisy, Pocket Silhouettes, Garden Silhouettes, Infinitie Goodness
Inks: Versamark, certainly Celery
Cardstock: Whisper white, Certainly Celery, Certainly Celery Designer papers
Also: White e.p. white eyelet, White grosgrain ribbon
Autumn Daisies
Posted: September 29, 2008 Filed under: Pocket Silhouettes, Uncategorized, Upsy Daisy 1 Comment
I haven’t participated in Beate’s weekend sketch challenge for months so when I saw the sketch this weekend featuring three panels I decided it was time. I have been working on Christmas cards today but wanted to stamp these daisies once more at least before it’s all Christmas cards and gifts.
I cut my three pieces and tried to stamp the left, then centre then right side of the stamp so they would roughly line up. I could have used the stamp-a-ma-jig to be absolutely accurate but I didn’t!
Supplies:
Stamps: Pocket Silhouettes, Upsy Daisy
Inks: Artichoke, Pumpkin Pie, So Saffron
Cardstock: Whisper White, Artichoke, Pumpkin Pie, So Saffron
Also: Circle Punches
Grass trio
Posted: September 27, 2008 Filed under: Designer Paper, Pocket Silhouettes, Upsy Daisy Leave a comment
I needed a ‘make and take’ last week and decided to use Pocket Silhouettes and the square punches. You can see from my colours that I’m not quite ready to let go of summer yet but I have to accept that autumn has arrived. I am noticing the colours emerging every where I go now. The leaves will be falling in our yard for the next month or two; we have big trees! Last year we just managed to get all the leaves up before the first snow fall which didn’t disappear until spring. But that’s enough about snow.
I stamped the sentiment first so I would know I had enough room and then layered a Not quite Navy strip, a Confetti White strip and a strip of Bella Rose designer paper. I stamped the three images and then punched out the part of the design I wanted and matted it. Finally a strip of ribbon with a smaller piece knotted on to it.
Supplies:
Stamps: Pocket Silhouettes, Upsy Daisy
Inks: Certainly Celery, Not quite Navy, Chocolate Chip
Cardstock: Confetti White, Certainly Celery, Not quite Navy,, Chocolate Chip, Bella Rose designer paper
Also: Celery grosgrain ribbon
Red Daisies
Posted: September 11, 2008 Filed under: Upsy Daisy 3 Comments
As I’ve said often, designer paper can make the card. The only other elements here are one stamp and a piece of hemp twine! When I was trying out my new stamps and papers both my daughters were away on a violin retreat. They are my critics and advisors when they are here, but my son was happy to give me his opinion which was a thumbs up for this one. My poor neglected garden has several patches of bright and cheery blackeyed Susans at the moment so I picked some and brought them inside today. I might try using this stamp with yellow and black as well.
Supplies:
Stamps: Upsy Daisy
Inks: Riding Hood Red
Cardstock: Riding Hood Red, Pirouette Pink, Bella Rose designer paper
Also: Red Hemp twine
Fresh Daisies
Posted: September 1, 2008 Filed under: Upsy Daisy 1 Comment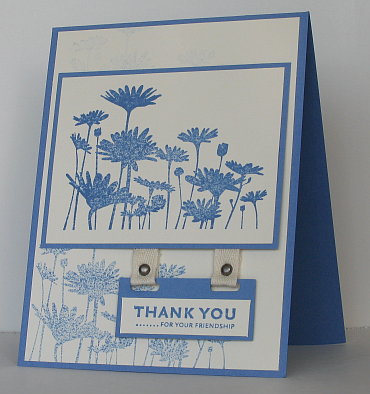
I have new stamps!
I ended up buying three silhouette sets which really appealed to me, plus an Asian style set, which caught eye as anything Chinese does at the moment. The card above is my first design with the Upsy Daisy set, I didn’t set out to make it with only one stamp set and one colour but I like the simplicity. You can barely see it, but the background has the daisies stamped at the top even lighter than the image at the bottom of the card. I wanted the sentiment to look like a sign hanging from a mailbox or something similiar.
Supplies:
Stamps: Upsy Daisy
Inks: Brocade Blue
Cardstock: Brocade Blue, Very Vanilla
Also:Twill tape, brads of unknown origin, horizontal slot punch


