
Little pink bag
Posted: August 19, 2008 Filed under: My Kid's cards, Purses 2 Comments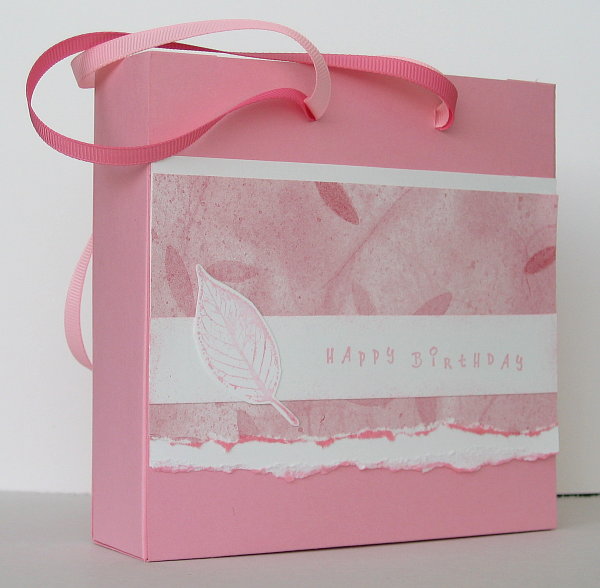
This sweet little gift bag was made by my daughter L14. As she is on holiday and the music theory exam, which took up the last month is over, she has spent a bit of time creating things at my craft desk. The front is 5¼” square and the side 1½” wide. The designer paper was in my stash from several years ago and matches beautifully with Pretty in Pink. Two lengths of ribbon are threaded through holes at the top of the bag and knotted on the inside to make handles.
Supplies:
Stamps: With Gratitude, Simple Sayings 2
Inks: Pretty in Pink
Cardstock: Whisper White, Pretty in Pink
Also: Pink and Light Pink grosgrain ribbon
Blue Purse
Posted: May 11, 2008 Filed under: Designer Paper, Purses 2 Comments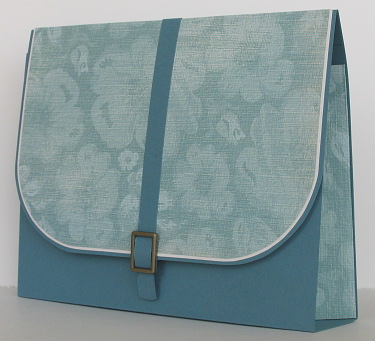
It has been very quiet here on Bits & Pieces this week. That usually means it has been anything but quiet at home. We have just returned home from the third concert of the weekend. Soccer and softball started during the week and there was an extra medical appointment thrown in early in the week. All this has meant no stamping whatsoever!
I made this purse a little while ago, it is the same design as my red one and my chocolate one but a little bigger. I will try a different design one of these days. I like the fabric effect the designer paper gives on the purse flap and sides and the buckle was a nice finishing touch
Supplies:
Cardstock: Blue Bayou, Naturals White, Porcelain Prints Designer paper
Also: Antique Brass hodgepodge hardware
Red polka dot purse
Posted: March 5, 2008 Filed under: Designer Paper, Purses, Tutorial 5 Comments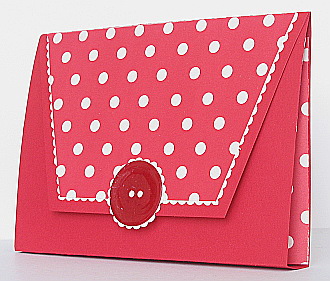
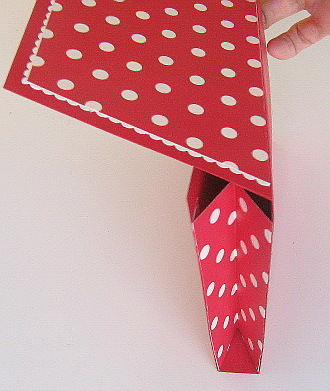
After I had completed my first purse, I set out to make another and create a tutorial as I did it. First I cut a piece of cardstock 10¼” x 6½”. I then scored it at ½”, 5″ and 5¾”as shown below.
To make the purse flap I cut a piece 6½”x 3¾” and measured in 1″ from the corner on both ends of one long side and cut off triangles to make a trapezoid.

I did not measure to make the designer paper shape to decorate the purse flap (sorry), I just made it a little more than ¼” smaller all the way around the three shorter sides. Don’t stick it on yet.
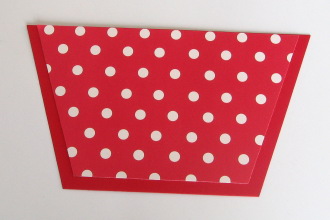
Attach designer paper shape to vanilla cardstock, aligning the longer edge with the edge of the cardstock.

Cut around the designer paper with decorative scissors making a “lace” edge.

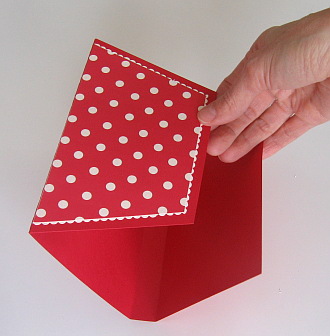
Attach the purse flap to the ½” flap on the purse.
Next I made gusset pieces for the sides of the purse with designer paper. I cut two pieces 4″x 3″ and scored them along the length at ½” 1½” and 2½”. Then I folded them concertina style.
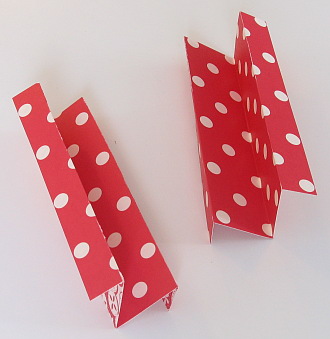
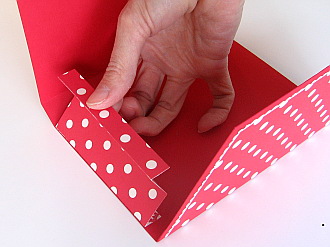
I then glued the narrower section of the concertina piece to the inside of my purse. I think it is easier to just look at the picture than have me try to explain it.
To fasten the purse flap I used a velcro circle and added a big red button with scallop trim to finish it off. The button just happened to end up looking exactly as I wanted even though I wasn’t sure how to make it initially. I punched out a circle of red cardstock and stamped the versamark pad directly onto it. I then embossed with glassy glaze enamel embossing powder, then stamped with versamark and embossed again. When I was heating the second layer I held the heat tool directly over head which pushed liquid enamel out to the sides giving the button a raised edge.

Chocolate weekend sketch
Posted: March 3, 2008 Filed under: One of a Kind, Purses 2 Comments
I made this card to go in the chocolate purse I posted yesterday along with a couple of tags. My inspiration for the layout was Beate’s weekend sketch. 
I am quite taken with the whole purse designing idea and have another one to photograph tomorrow and share with you. Someone made the suggestion that I should put chocolates in my chocolate purse, which is probably a much better idea than tags!
Supplies:
Stamps: One of a Kind
Cardstock: Berry Bliss designer paper, Chocolate Chip, Whisper white, Close to Cocoa
Ink: Chocolate Chip, versamark
Also: Stampin’ dimensionals, scallop scissors, Boho blossoms punch, white e.p., chocolate grosgrain ribbon
Chocolate Purse
Posted: March 2, 2008 Filed under: One of a Kind, Purses 2 Comments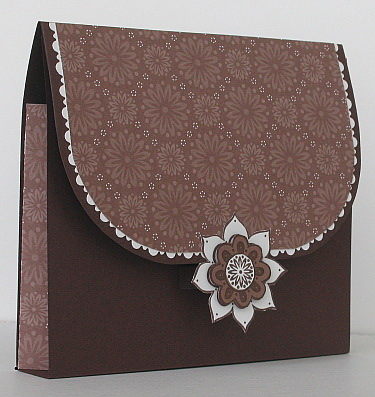
This is my first attempt at a purse. I admit I have seen them in magazines and on blogs but never saw a reason to make one. Now I have made one, I think I’ll be making more. I plan to create some matching cards or tags to put in this one, which I will post when they are completed. Sharon at No Time to Stamp was the catalyst for this one, her Stamp Simply Challenge #24 is to make something purse related.
I could tell you all the measurements and scoring lines but as I was making this one up as I went along, I think I will do another and take pictures as I go. I folded a rectangular piece of designer paper into a concertina fold to make the sides. The white lace is made with a pair of double scallop scissors.
Supplies:
Stamps: One of a Kind
Cardstock: Berry Bliss designer paper, Chocolate Chip, Whisper white, Close to Cocoa
Ink: Chocolate Chip
Also: Stampin’ dimensionals, scallop scissors


