
Christmas gifts (3)
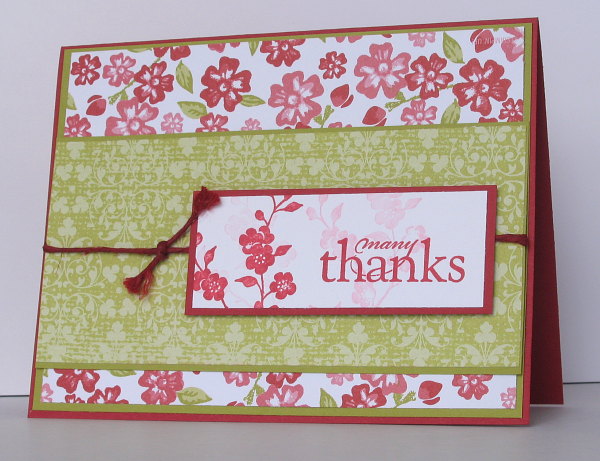
Posted: November 3, 2008 Filed under: Designer Paper, Garden silhouettes, Pocket Silhouettes, Upsy Daisy 1 Comment
This is my last boxed set of cards for now. I made these to co-ordinate with the card from my Stamp Simply Challenge a few weeks ago. I will be posting this set off to Australia soon.

Thanks for dropping in, I’m planning on giving myself a bit of a challenge this week, hopefully I’ll be back with more about it later.

Supplies:
Stamps: Upsy Daisy, Pocket Silhouettes, Garden Silhouettes, Infinitie Goodness
Inks: Versamark, certainly Celery
Cardstock: Whisper white, Certainly Celery, Certainly Celery Designer papers
Also: White e.p. white eyelet, White grosgrain ribbon
Stationery gift basket
Posted: November 2, 2008 Filed under: Baroque Motifs, Designer Paper, Gifts, Paint Prints 8 Comments
This basket was the reason things were a little quiet on the blog earlier this week. A friend asked me if I would make a gift basket for a bridal shower and this is what I came up with. I had two evenings to get it done and really needed to work with what I had on hand. Other than the candles it is filled with stationery. It contains five greeting cards (mainly thankyous, as brides usually have many people to thank), a notebook, bookmark, place cards, two candles and a calendar. It was the first time I had done a calendar, so it was a little bit of trial and error working out how and what I would decorate. I ended up decorating the inside cover, so that when it is hung up the decorated page is showing. I perforated the top edge of all the months so they can be torn off leaving the decorated page showing all year.

The candles are done with tissue paper and wax paper as explained in my tutorial here. All the paper items are made using Brocade Background designer paper, River Rock, Confetti Cream or Vanilla cardstock. I had some lace in my lace basket which co-ordinated perfectly so that is featured on a couple of cards as well as the notebook.
Thanks for dropping in.


Supplies:
Stamps:With Gratitude, Baroque motifs, Paint Prints
Inks: River Rock, versmark, Always Artichoke
Cardstock: Very Vanilla, River Rock, Confetti Cream, Brocade Backgrounds designer paper
Also: Cuttlebug formal squares embossing folder, Lace, Olive Organza ribbon, Embroidery thread, notebook from Staples, basket from Bulk Barn, candles from Ikea, Cherished Memories and Chateau Bella rub-ons
Two favourites
Posted: October 25, 2008 Filed under: Designer Paper, Lovely as a Tree 1 Comment
I pulled out two old favourites for this card and combined them with a new favourite of mine, Riding Hood Red. Lovely as a Tree is definitely a favourite set of mine. I’m not sure where I read it but I believe it is the most popular set Stampin’ Up has ever had. I admit I don’t usually stamp it in red, but I wanted to use some of another old favourite, the Cerise designer paper from a year or so back. The patterns in this set of paper were perfect for making Christmas cards, the designs reminded me of Scandinavian embroidery.
Other than layering the designer paper strip with red and vanilla cardstock all I did was make a tag to be tied on with red hemp twine and also drag the edge of the vanilla rectangle on the Riding Hood Red stamp pad. I have one more gift set of cards which I will post soon, then I will be moving onto to other gift ideas.
Supplies:
Stamps: Lovely as a Tree, Fundamental Phrases
Inks: Riding Hood Red
Cardstock: Riding Hood Red, Very Vanilla, Cerise d.p.
Also: Red Hemp twine
Christmas gifts (2)
Posted: October 24, 2008 Filed under: Designer Paper, Gifts Leave a comment
The second set of cards I put together as a Christmas gift were all made using Bella Rose paper and Riding Hood Red cardstock. In my hurry to get them completed and posted off I didn’t photograph the box but it was the same style as the box in this post. The set included cards posted here, here and here.

Supplies:
Stamps: Upsy Daisy, All Year Cheer, Garden Silhouettes
Inks: Riding Hood Red, Pretty in Pink
Cardstock: Riding Hood Red, Kiwi Kiss, Bella Rose designer paper
Also: Red Hemp Twine
Star Wreath
Posted: October 22, 2008 Filed under: Best Yet, Designer Paper 2 Comments
This is a simple way to make a wreath using the small star punch from Stampin’ Up. To give myself a guide circle I pressed the lid of a container of eyelets into the versmark and stamped it onto the card. Then I punched out stars from the red and green designer paper in the Bella Rose pack, glued them down and added a hemp twine bow. Last year I also made star wreath cards by punching stars out of old Christmas cards.
Supplies:
Stamps: Best Yet
Inks: Riding Hood Red
Cardstock: Riding Hood Red, Kiwi Kiss, Bella Rose designer paper
Also: Red Hemp twine
Christmas Gifts
Posted: October 20, 2008 Filed under: Designer Paper 4 Comments
I posted off four parcels of Christmas gifts today. To send gifts to Australia by surface mail and have them arrive by Christmas they have to be posted in October. I have lived in Canada for eight years now and I am getting better at the early Christmas routine, but I still find myself scrambling to take advantage of the surface mail prices rather than the more expensive airmail rates. As well as sending early, packing light also keeps the postage costs down. This year I made several packs of greeting cards in matching boxes.
I went through my stash of cards and sorted out cards made using the co-ordinating designer papers and then made more matching cards so I had sets of five cards in a box with a designer paper lid. The cards above (along with this one and this one) completed the set I made using Le Jardin designer paper and co-ordinating cardstock.
I will post a few pictures from the other sets as soon as I can. I plan to do a box tutorial when I get a chance but Sharon has an excellent one and so does Leslie.

Supplies:
Stamps: Upsy Daisy, Paint Prints, Art by Design
Inks: Always Artichoke, Bashful Blue,
Cardstock: Very Vanilla, Le Jardin Designer paper, Almost Artichoke, River Rock
Also: Olive Organza ribbon
Stamp Simply without stamps!
Posted: October 16, 2008 Filed under: Designer Paper 14 CommentsNot quite “no stamps at all” just no picture stamps!

The current Stamp Simply challenge is quite a thrill for me as I am Sharon’s co-host this week. Last month when Sharon was having a bonanza of blog candy and competitions my name was chosen. This meant that I came up with the challenge, which is to make a card without using picture stamps. So I refrained from reaching for the Christmas trees, snowflakes, flowers or leaves. The only type of stamps allowed are sentiment or background stamps.
I decided to feature designer paper instead and pulled out the Certainly Celery paper from a year or so back which is covered in pretty designs. As soon as I did I started thinking of fabric swatches again and ended up with the shabby chic design above. I distressed the edges of each piece of designer paper and then found a piece of white lace to fit in with the fabric theme. I stamped the sentiment in versamark and embossed in white before adding a little white eyelet. The sentiment is from the Upsy Daisy set.
Make sure you visit Sharon’s talented design team members’ blogs and see what they came up with.
Darlene
Julie
Dee
Jennifer
Janine
Tammy
Becky
Have a great day and thanks for dropping in.
Supplies:
Stamps: Upsy Daisy
Inks: Versamark
Cardstock: Whisper white, Certainly Celery, Certainly Celery Designer papers
Also: White e.p. white eyelet
Grass trio
Posted: September 27, 2008 Filed under: Designer Paper, Pocket Silhouettes, Upsy Daisy Leave a comment
I needed a ‘make and take’ last week and decided to use Pocket Silhouettes and the square punches. You can see from my colours that I’m not quite ready to let go of summer yet but I have to accept that autumn has arrived. I am noticing the colours emerging every where I go now. The leaves will be falling in our yard for the next month or two; we have big trees! Last year we just managed to get all the leaves up before the first snow fall which didn’t disappear until spring. But that’s enough about snow.
I stamped the sentiment first so I would know I had enough room and then layered a Not quite Navy strip, a Confetti White strip and a strip of Bella Rose designer paper. I stamped the three images and then punched out the part of the design I wanted and matted it. Finally a strip of ribbon with a smaller piece knotted on to it.
Supplies:
Stamps: Pocket Silhouettes, Upsy Daisy
Inks: Certainly Celery, Not quite Navy, Chocolate Chip
Cardstock: Confetti White, Certainly Celery, Not quite Navy,, Chocolate Chip, Bella Rose designer paper
Also: Celery grosgrain ribbon
Grassy silhouettes
Posted: September 23, 2008 Filed under: Designer Paper, Pocket Silhouettes 1 Comment
More of the designer paper from the Bella Rose set and more silhouettes also! This is what the side of the road often looks like as you drive out of town during summer. There is plenty of Queen Anne’s Lace, plus pretty wildflowers and grasses whose names I don’t know. My first attempt used all four silhouette stamps from the Pocket Silhouette set but the grassy roadside lost some definition so one type of grass was eradicated! If only it was that easy to get rid of unwanted plants in my garden.
Supplies:
Stamps: Pocket Silhouettes
Inks: Riding Hood Red, Old Olive, Chocolate Chip
Cardstock: Confetti White, Riding Hood Red, Kiwi Kiss, Chocolate Chip, Bella Rose designer paper
Floral Birthday
Posted: September 14, 2008 Filed under: Designer Paper 1 Comment
The third of the Bella Rose d.p. cards I made last weekend reminds me of a Laura Ashley bedspread, roses and pink polka dots on a crisp white background would be lovely in a bedroom. Perhaps the bedskirt could be in the green floral print. I think one of the reasons I am enjoying using designer paper so much is because it is like sewing, but I can achieve a finished product in much less time than it takes to complete a sewing project.
I did not do much more here than cut rectangles and mattes. I did pull the edges of the green designer paper piece across the Riding Hood Red stamp pad to get a very thin border of red. The rose and leaves are rub-ons, from the new Château Bella rub-ons raised on stampin’ dimensionals.
Supplies:
Stamps: Upsy Daisy
Inks: Riding Hood Red
Cardstock: Riding Hood Red, Kiwi Kiss, Bella Rose designer paper
Also: Château Bella rub-ons


